When Creating a Server Management Group Policy on Windows Server 2003, there are two options that can be set to either Hide or Prevent users from working with the server’s drives:
- Hide these specified drives in My Computer
- Prevent access to drives from My Computer
When these options are enabled, there is a drop-down box that allows the selection of various drive combinations. What if the drives you need hidden are not on the list? This article will show you three ways to add any combination of drive letters to be hidden or denied access:
- Modify System.adm
- Create a new ADM file
- Use the ICAClient.adm file provided by Citrix
Why bother with either manual process when there is a 3rd Party utility called GPDrivesOptions that automates the creation of the necessary information? There are places that do not allow 3rd Party utilities to be run on Domain Controllers or Management Stations. Also, if Change Management is used, it may take longer to go through the approval process to modify System.adm than it takes to create a new ADM file and use it for your Group Policy.
Update February 26, 2015: The GPDrivesOptions article no longer exists on Petri.com.
Microsoft has KB article 231289 that explains the process to add custom drive letter combinations. Using KB231298, if you wanted to hide access to drives A, B, D, E, G, P, and R:
The 26-bit string of drive letters is represented as:
11111111111111111111111111
ZYXWVUTSRQPONMLKJIHGFEDCBA
If you prefer to not work in Binary, the decimal value for each drive letter is:
| Drive Letter | Decimal Value | Binary Value |
| Z |
33554432 |
10000000000000000000000000 |
| Y |
16777216 |
1000000000000000000000000 |
| X |
8388608 |
100000000000000000000000 |
| W |
4194304 |
10000000000000000000000 |
| V |
2097152 |
1000000000000000000000 |
| U |
1048576 |
100000000000000000000 |
| T |
524288 |
10000000000000000000 |
| S |
262144 |
1000000000000000000 |
| R |
131072 |
100000000000000000 |
| Q |
65536 |
10000000000000000 |
| P |
32768 |
1000000000000000 |
| O |
16384 |
100000000000000 |
| N |
8192 |
10000000000000 |
| M |
4096 |
1000000000000 |
| L |
2048 |
100000000000 |
| K |
1024 |
10000000000 |
| J |
512 |
1000000000 |
| I |
256 |
100000000 |
| H |
128 |
10000000 |
| G |
64 |
1000000 |
| F |
32 |
100000 |
| E |
16 |
10000 |
| D |
8 |
1000 |
| C |
4 |
100 |
| B |
2 |
10 |
| A |
1 |
1 |
Putting “0”s for the drives to not be hidden results in:
00000000101000000001011011
ZYXWVUTSRQPONMLKJIHGFEDCBA
The binary string is 101000000001011011. Converted to decimal is 163,931.
If you prefer to work with decimal, add up the value for each drive letter:
| A |
1 |
| B |
2 |
| D |
8 |
| E |
16 |
| G |
64 |
| P |
32768 |
| R |
131072 |
|
163931 |
Method 1 — Modify System.adm:
To change System.adm, go to a command prompt and type in the following commands:
- CD %SYSTEMROOT%\INF and press Enter
- COPY SYSTEM.ADM SYSTEM_BACKUP.ADM and press Enter
- Notepad system.adm
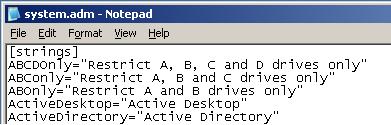
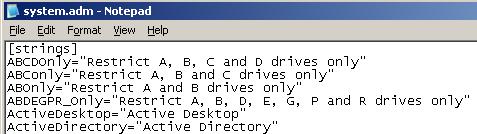
With Notepad open, press Ctrl-F and Find [strings]. Add this line to the [strings] section:
ABDEGPR_Only=”Restrict A, B, D, E, G, P and R drives only”
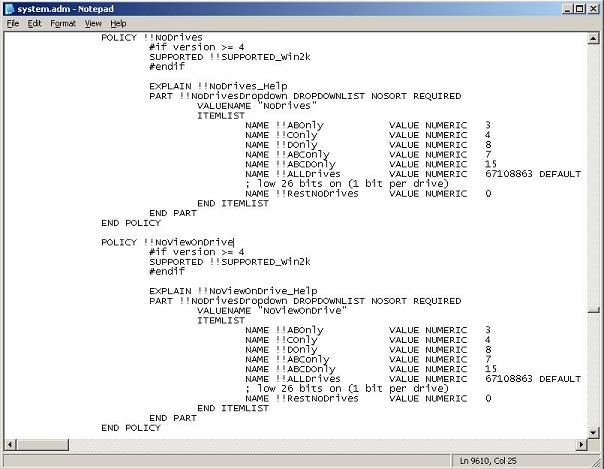
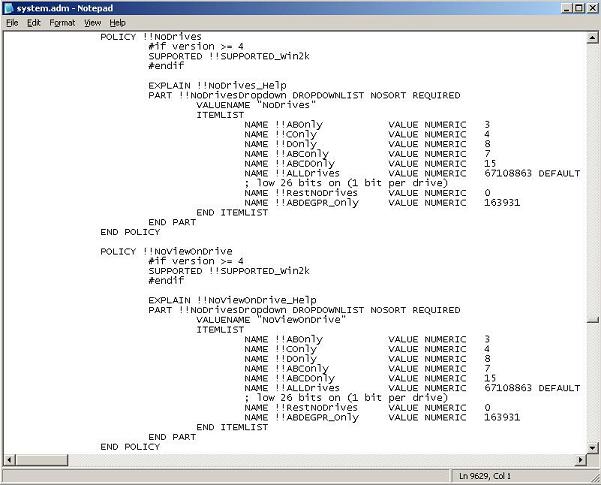
Press Ctrl-Home to return to the top, then press Ctrl-F and Find !!NoDrives. Add this entry in the ITEMLIST section for !!NoDrives:
NAME !!ABDEGPR_Only VALUE NUMERIC 163931
Scroll down just a little until you see the !!NoViewOnDrive Policy. Add this entry in the ITEMLIST section for !!NoViewOnDrive Save the System.adm file and exit Notepad.
NAME !!ABDEGPR_Only VALUE NUMERIC 163931
See Figures 1 and 2 for system.adm before changes and Figures 3 and 4 for system.adm after changes.
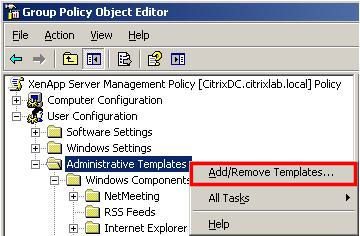
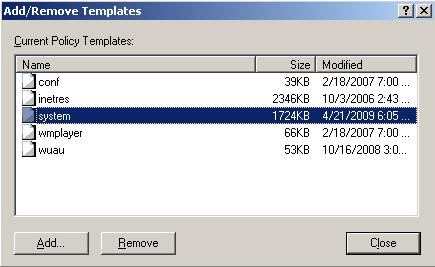
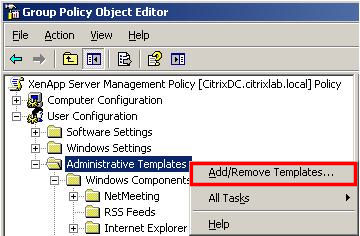
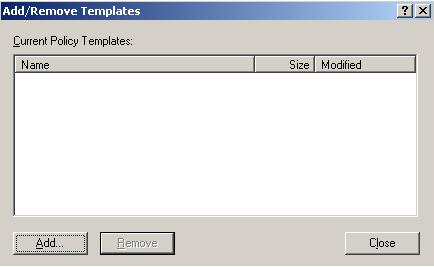
Save the System.adm file, exit Notepad and exit the command prompt. In the Group Policy Object Editor, right-click Administrative Templates in the User Configuration section and select Add/Remove Templates… (Figure 5).

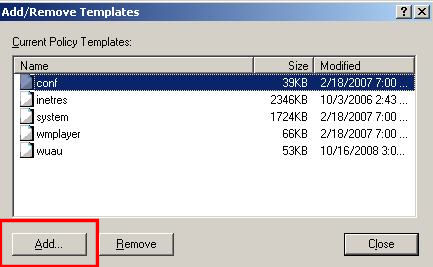
Click system and then the Remove button (Figure 6).
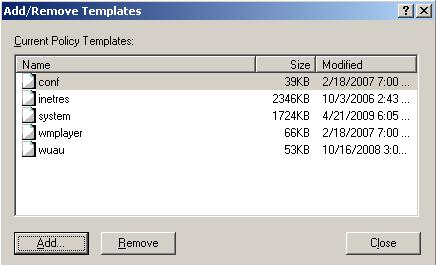
Click the Add… button, scroll to find system.adm, click system.adm, and then click Open (Figure 7).

Click Close (Figure 8).
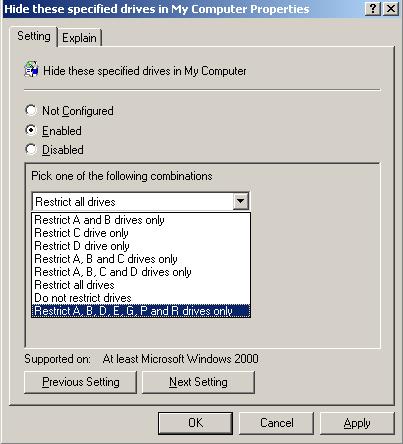
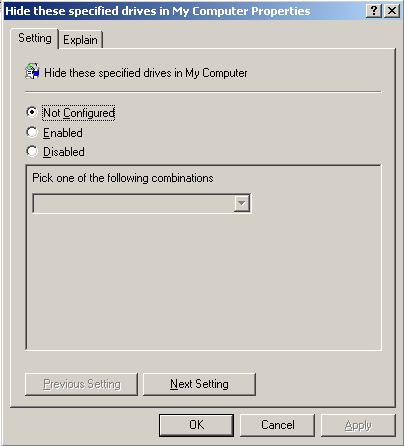
Expand Administrative Templates, expand Windows Components, click Windows Explorer and double-click Hide these specified drives from My Computer (Figure 9).
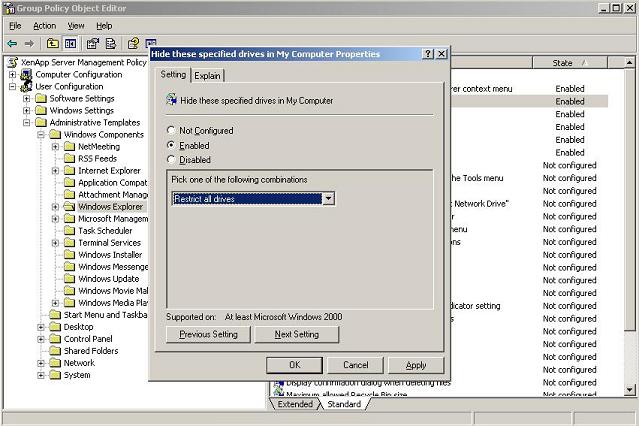
Click the Dropdown box, the new drive restriction selection is now available (Figure 10).
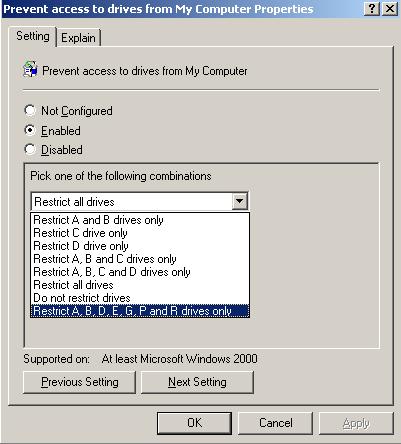
Select the new drive restriction and repeat for the Prevent access to drives from My Computer policy setting (Figure 11).
Exit editing the GPO and the new drive restrictions have been added to your GPO.
Method 2 — Create a new ADM file:
Why use Method 2? If changes are not allowed to be made or Change Control processes must be followed to make changes to files installed by the Operating System, then Method 2 is an easy option. It should take less than five minutes to complete Method 2.
To create a new ADM file, go to a command prompt and type in the following commands:
- CD %SYSTEMROOT%\INF and press Enter
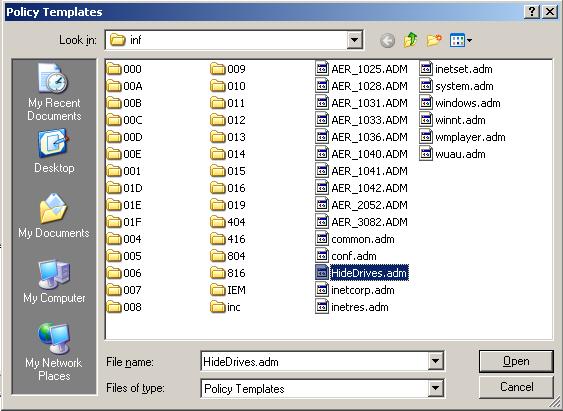
- Notepad HideDrives.adm
- Answer Yes to the Do you want to create a new file? popup
Enter, or copy and paste, the following text into the new HideDrives.adm file:
#if version >= 3
CLASS USER
CATEGORY !!WindowsComponents
	CATEGORY !!WindowsExplorer
		KEYNAME "Software\Microsoft\Windows\CurrentVersion\Policies\Explorer"
		POLICY !!NoDrives
			EXPLAIN !!NoDrives_Help
			PART !!NoDrivesDropdown       DROPDOWNLIST NOSORT REQUIRED
			VALUENAME "NoDrives"
				ITEMLIST
					NAME !!ShowAll       VALUE NUMERIC       0
					NAME !!HideAll       VALUE NUMERIC       67108863 DEFAULT
					NAME !!ABDEGPR_Only       VALUE NUMERIC       163931
				END ITEMLIST
			END PART
		END POLICY
		POLICY !!NoViewOnDrive
			EXPLAIN !!NoViewOnDrive_Help
			PART !!NoViewOnDriveDropdown       DROPDOWNLIST NOSORT REQUIRED
			VALUENAME "NoViewOnDrive"
				ITEMLIST
					NAME !!ShowAll       VALUE NUMERIC       0
					NAME !!HideAll       VALUE NUMERIC       67108863 DEFAULT
					NAME !!ABDEGPR_Only       VALUE NUMERIC       163931
				END ITEMLIST
			END PART
		END POLICY
	END CATEGORY ; WindowsExplorer
END CATEGORY ; WindowsComponents
#endif
[strings]
NoDrives="Show only certain drives in My Computer"
NoDrives_Help="Removes the icons representing all but selected hard drives from My Computer"
NoDrivesDropdown="Pick one of the following combinations"
NoViewOnDrive="Prevent access to drives from My Computer."
NoViewOnDrive_Help="Prevents users from using My Computer to gain access to the content of selected drives."
NoViewOnDriveDropdown="Pick one of the following combinations"
WindowsComponents="Windows Components"
WindowsExplorer="Windows Explorer"
ShowAll="Show all drives"
HideAll="Hide all drives"
ABDEGPR_Only="Restrict A, B, D, E, G, P and R drives only"
Save the HideDrives.adm file, exit Notepad, and exit the command prompt. In the Group Policy Object Editor, create a New Group Policy Object (GPO), name it Hide Server Drives. Edit the Hide Server Drives GPO, right-click Administrative Templates in the User Configuration section, and select Add/Remove Templates… (Figure 12).
Update 10-Jan-2014. To keep you from having weird characters placed in your text file by Copy & Paste, I have placed a copy of HideDrives.adm here.
In this GPO, the only policies used are:
- Hide these specified drives in My Computer
- Prevent access to drives from My Computer
To remove excess policies for this single purpose group policy, remove the other five Policy Templates (Figure 13):
- conf
- inetres
- system
- wmplayer
- wuau
Click Add…, click HideDrives.adm, and then click Open (Figure 14).
Click Close (Figure 15).
Expand Administrative Templates, expand Windows Components, click Windows Explorer and double-click Hide these specified drives from My Computer (Figure 16).
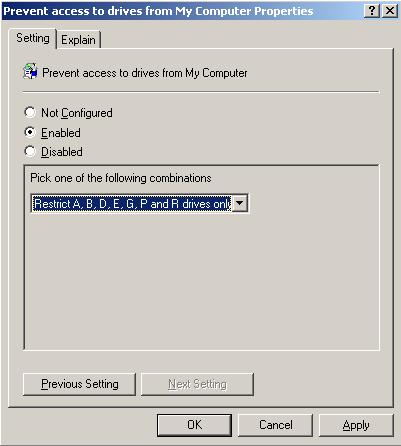
Click Enabled and from the drop-down box select the new Restrict A, B, D, E, G, P and R drives only option (Figure 17).
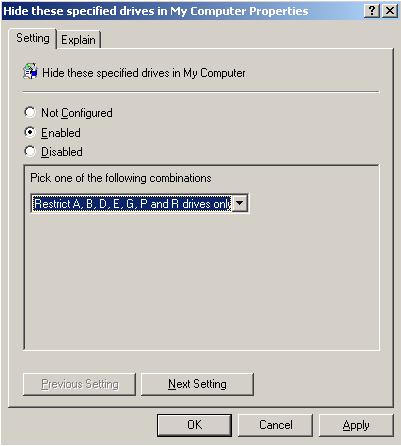
Repeat for the Prevent access to drives from My Computer policy setting (Figure 18).
Exit editing the GPO and the new drive restrictions have been added to your GPO.
Method 3 — Use the ICAClient.adm file provided by Citrix:
If you are using Citrix XenApp and are also using the ICA Client version 10.x or higher than Citrix (akes available ICAClient.adm. Using this ADM file allows you to specify any combination of drive letters with no math involved. Also, this ADM file is fully supported by Citrix if it has not been altered. Citrix recommends using ICAClient.adm as the preferred way of controlling drives. This GPO, in conjunction with the client-side XenApp plug-in, controls access to the specified drive letters.
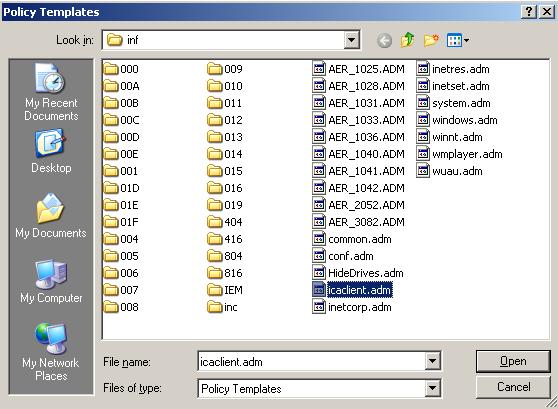
Either download ICAClient.adm.zip and extract the ICAClient.adm file to c:\Windows\inf or copy the file from C:\Program Files\Citrix\ICA Client\Configuration. In the Group Policy Object Editor, create a New Group Policy Object (GPO), name it ICAClient Hide Server Drives. Edit the Hide Server Drives GPO, right-click Administrative Templates in the User Configuration section, and select Add/Remove Templates… (Figure 19).

In this GPO, the only policy that will be used is Client drive mapping.
To remove excess policies for this single purpose group policy, remove the other five Policy Templates (Figure 20):
- conf
- inetres
- system
- wmplayer
- wuau

Click Add…, click icaclient.adm, and then click Open (Figure 21).
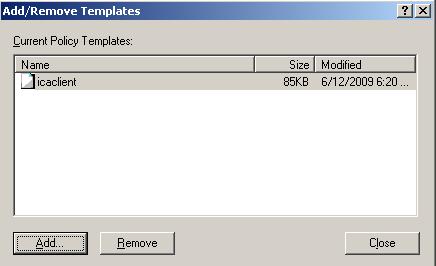
Click Close (Figure 22).
Expand Administrative Templates, expand Citrix Components, expand Presentation Server Client, click Remoting client devices, and double-click Client drive mapping (Figure 23).
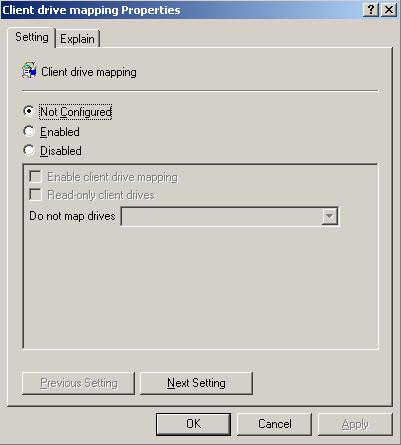
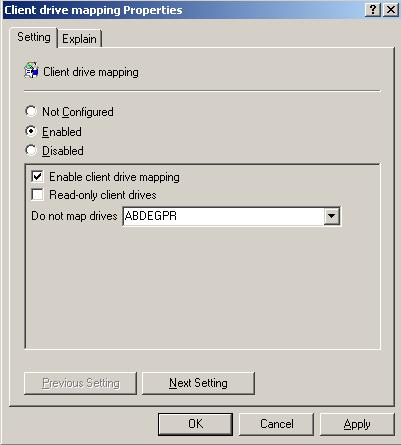
Click Enabled, make sure Enable client drive mapping is checked and enter ABDEGPR in the box for Do not map drives: and click OK (Figure 24).
Exit editing the GPO and the new drive restrictions have been added to your GPO.
In this article, you learned three methods of adding additional drive letters to hide or prevent access for use on your Terminal or XenApp Servers.
Thanks
Webster

How can i do this with windows server 2008 r2 or windows server 2012 ?
I will see what I can come up for you.
Webster
Nice and thx
See also http://www.marcelvenema.com/HideDrives for automatic .ADM creation.
Hi Carl,
I am getting error (pleases find below),
——— Error————-
on HideDrives.adm on line 3:
Error 62 the corresponding string was not found in the [string] section
found: !!windowscomponents
The file can’t be loaded
——–End of error message——
Checked the internet is pointing to extra space in string but not able to find the extra space ( I did copy the adm from your site)
Regards,
Hadi
That must have been caused by a Copy & Paste issue with weird characters somehow winding up in your file. I have placed a copy of HideDrives.adm here.
Thanks
Webster