-
Running PowerShell Scheduled Tasks – a Third Opinion
I recently published an article titled Running PowerShell Scripts As a Scheduled Task. That article was from a reader showing how he ran one of the PowerShell scripts as a scheduled task. After that article was released, another reader, Guy Leech (@guyrleech), sent me a Word document showing how he accomplishes the same task. After that article, another reader (from Denmark) sent me his process. So this third option is from Gunnar Hermansen who is a Senior Technical Support Engineer Manager for CensorNet.
What follows are Gunnar’s words. The only things I have changed are some of what Grammarly thought should be corrected.
Configure a Windows Server Scheduled Task with XML to run a PowerShell script.
Thank you
Thank you for taking the time to read this blog.
Creating a scheduled windows server task with an XML file.
In this example I want to create a scheduled windows server task, that is triggered by an event in the Microsoft event log. If the script is activated it sends an e-mail with the content of the event. This example is a lockout notification from CensorNet MFA (former SMS PASSCODE) but you can use this for any event ID and any event container. This is only a question about modification. You can also use multiple windows tasks for the same script, as you send parameters to the script with the data.
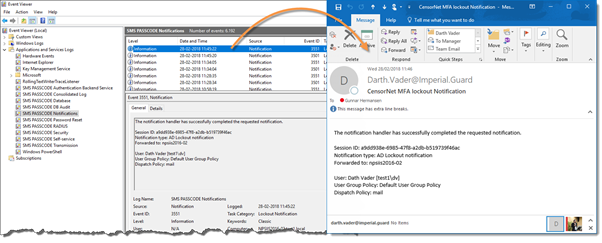
To visualize what I want to do. I want to go from an event that is written in the event log, to have an automated e-mail sent with the information to a specific mailbox.

Figure 1 The event containers
First, you need to know a couple of names. You will find these in the event. It is the EventID, Source, and Log name.
The next step is to prepare the XML file for the event-driven scheduled Windows Server task.
This XML file contains all the settings needed for the scheduled task.
Note that the XML file contains the event container name and the event IDs that the Scheduled task will monitor in the Microsoft Event Viewer. You can modify the XML file if you want to monitor something else.
The Event Ids are written in the <Subscription> section of the XML file, and the parameter Path contains the event container’s short name, along with name and EventIds.

Figure 2 In this task, the event Id must match, and the event description must contain a certain domain name with the name “test”. The domain is specified as a regular expression in the <Arguments> section. You can remove this parameter if do not want to limit the notification to a certain domain. The parameter is called -RegExPattern.

Figure 3 The <WorkingDirectory> section contains the path to the directory, where you have the PowerShell script.

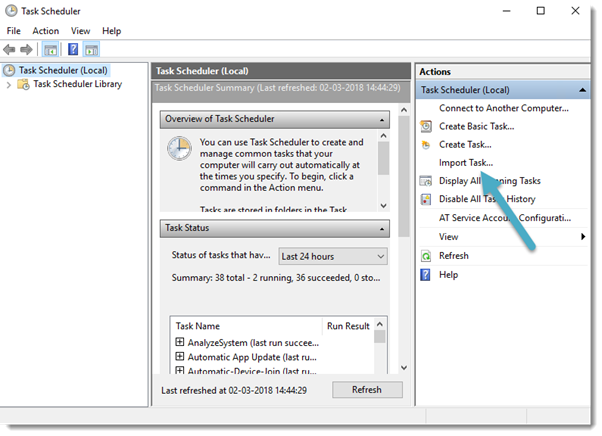
Figure 4 Once you have your XML file configured to match your needs, it is time to import the file, as a windows task.
The XML file
Below is the XML file, ready to be imported into the Task Scheduler (ready if you have done the required modifications, described above). You import the settings XML file, by clicking the Import Task.

Figure 5 <?xmlversion="1.0"encoding="UTF-16"?><RegistrationInfo><Date>2017-05-29T11:20:48.4475292</Date><Author>CensorNet</Author><Description>Get-CensorNetADLockoutNotification</Description><URI>\Event Viewer Tasks\Get-CensorNetADLockoutNotification</URI></RegistrationInfo><Triggers><EventTrigger><ExecutionTimeLimit>PT2H</ExecutionTimeLimit><Enabled>true</Enabled><Subscription><QueryList><Query Id="0" Path="SmsN"><Select Path="SmsN">*[System[Provider[@Name='Notification'] and (EventID=3551)]]</Select></Query></QueryList></Subscription><ValueQueries><Valuename="eventRecordID">Event/System/EventRecordID</Value></ValueQueries></EventTrigger></Triggers><Principals><Principalid="Author"><UserId>S-1-5-18</UserId><RunLevel>HighestAvailable</RunLevel></Principal></Principals><Settings><MultipleInstancesPolicy>Parallel</MultipleInstancesPolicy><DisallowStartIfOnBatteries>true</DisallowStartIfOnBatteries><StopIfGoingOnBatteries>true</StopIfGoingOnBatteries><AllowHardTerminate>true</AllowHardTerminate><StartWhenAvailable>true</StartWhenAvailable><RunOnlyIfNetworkAvailable>false</RunOnlyIfNetworkAvailable><IdleSettings><StopOnIdleEnd>true</StopOnIdleEnd><RestartOnIdle>false</RestartOnIdle></IdleSettings><AllowStartOnDemand>true</AllowStartOnDemand><Enabled>true</Enabled><Hidden>false</Hidden><RunOnlyIfIdle>false</RunOnlyIfIdle><WakeToRun>false</WakeToRun><ExecutionTimeLimit>PT2H</ExecutionTimeLimit><Priority>7</Priority></Settings><ActionsContext="Author"><Exec><Command>%SystemRoot%\System32\WindowsPowerShell\v1.0\powershell.exe</Command><Arguments>-nop -c ".\Get-CensorNetLockoutNotification.ps1 -EventLogName SmsN -EventRecordId $(eventRecordID) -RegExPattern ""\[test1\\.+?\]"""</Arguments><WorkingDirectory>C:\Program Files\SMS PASSCODE\PowerShell\</WorkingDirectory></Exec></Actions></Task>The PowerShell-script.
The first thing is to place the script in the same path as you declared in the XML file in the WorkingDirectory section.
The script will be activated by your newly created Task with parameters containing information regarding the event that is monitored.
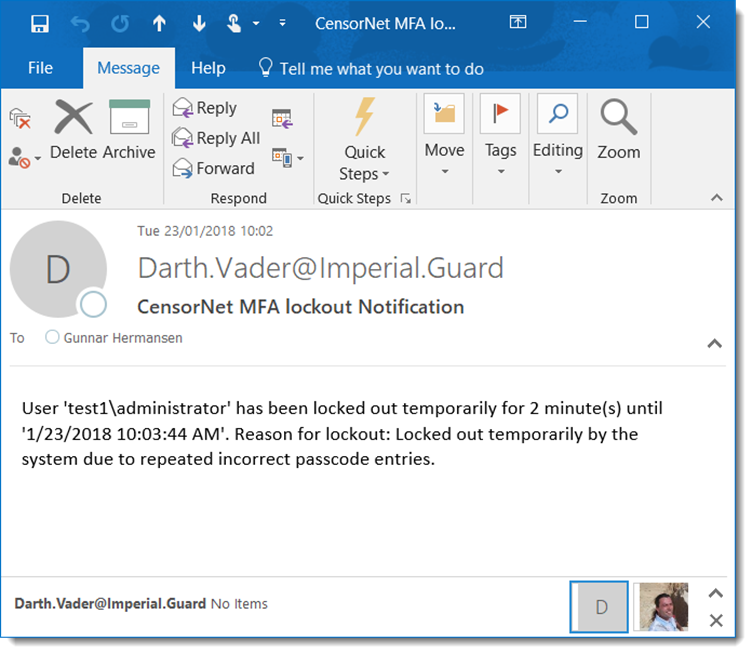
You can see the text in the mail body (screenshot below) is taken from the event that we monitored. This is added to the script by a parameter.

Figure 6 Parameters in the script.
- E-mail subject ($EmailSubject)
- Mail from address ($EmailFromAddress)
- Mail to Address ($EmailToAddress)
- SMTP server ($SmtpServer)
The script is as simple as this:
[CmdLetBinding()]param([Parameter(Mandatory=$True)][String]$EventLogName,[Parameter(Mandatory=$True)][UInt16]$EventRecordId,[String]$EmailSubject="CensorNet MFA lockout Notification",[String]$EmailFromAddress="Darth.Vader@Imperial.Guard",[String]$EmailToAddress="ReceivingMailAddress@Domain.local",[String]$SmtpServer="YourMailServer.domain.Local",[String]$RegExPattern=".*")(Get-WinEvent-FilterHashtable@{Logname =$EventLogName}-ErrorActionIgnore-Verbose:$False).Where{([Xml]$_.ToXml()).Event.System.EventRecordID-eq$EventRecordId} |ForEach-Object{if($_.Message-match$RegExPattern) {Send-MailMessage-From$EmailFromAddress-To$EmailToAddress-Subject$EmailSubject-Body$_.Message-SmtpServer$SmtpServer}}You might notice that there is a parameter called $RegExPattern that I did not mention. This is because this parameter is configured in the XML file, in the <Arguments> section, and handed over to the script as a parameter when the PowerShell script is activated. If no arguments are handed over the default value will accept any value (regular expression .*).
After the parameter section in the script, we have the handling of the event. The data is collected and for each event, an e-mail is sent (last part of the script) with the Send-MailMessage commandlet.
Now for testing what you have configured, you will have to lock yourself out (or somebody else).
Enjoy.
PS
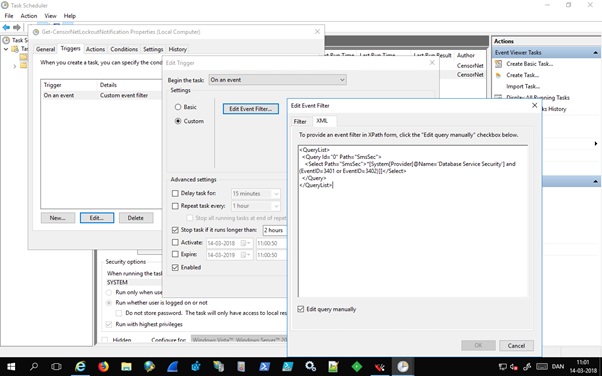
If you really do not want to mess around with the XML files, then you can edit the QueryList in the Scheduled task if the trigger settings are custom and not basic.

Figure 7 Thank you for reading
Gunnar Hermansen
Twitter: @Gundaris
[Webster: Gunnar provided me the XML and PS1 files from this article. They are available here. https://carlwebster.sharefile.com/d-s2af4ce8b7a5491a8 ]


March 16, 2018
PowerShell