-
How To Hide Additional Drive Letters On A Server Updated for ADMX/ADML
August 9, 2018
Back in June 2009, I wrote the original How To Hide Additional Drive Letters article. Recently, someone asked me how to do the same task but with an ADMX file instead of ADM.
Following the original example from 2009.
Microsoft has KB article 231289 that explains the process to add custom drive letter combinations. Using KB231298, if you wanted to hide access to drives A, B, D, E, G, P, and R:
The 26-bit string of drive letters is represented as:
11111111111111111111111111
ZYXWVUTSRQPONMLKJIHGFEDCBA
If you prefer to not work in Binary, the decimal value for each drive letter is:
Drive Letter Decimal Value Binary Value Z 33554432 10000000000000000000000000 Y 16777216 1000000000000000000000000 X 8388608 100000000000000000000000 W 4194304 10000000000000000000000 V 2097152 1000000000000000000000 U 1048576 100000000000000000000 T 524288 10000000000000000000 S 262144 1000000000000000000 R 131072 100000000000000000 Q 65536 10000000000000000 P 32768 1000000000000000 O 16384 100000000000000 N 8192 10000000000000 M 4096 1000000000000 L 2048 100000000000 K 1024 10000000000 J 512 1000000000 I 256 100000000 H 128 10000000 G 64 1000000 F 32 100000 E 16 10000 D 8 1000 C 4 100 B 2 10 A 1 1 Putting “0”s for the drives to not be hidden results in:
00000000101000000001011011
ZYXWVUTSRQPONMLKJIHGFEDCBA
The binary string is 101000000001011011. Converted to decimal is 163,931.
If you prefer to work with decimal, add up the value for each drive letter:
A 1 B 2 D 8 E 16 G 64 P 32768 R 131072 163931 This is where everything changes from the original article. The Hide Drives and Prevent Access policy settings are now in WindowsExplorer.admx and WindowsExplorer.adml.
What I did was to make a copy of the two WindowsExplorer files and rename them to HideDrives.admx and HideDrives.adml. I then trimmed all the other stuff out that did not pertain to the Hide Drives and Prevent Access sections. I then kept experimenting until I received no errors in the Group Policy Management Console (GPMC) and the new policy settings showed in the GPMC. This was more work than I thought it would take. ADMX/ADML files are picky little suckers.
Here is my HideDrives.admx file:
12345678910111213141516171819202122232425262728293031323334353637383940414243444546474849505152535455565758596061626364656667<?xmlversion="1.0"encoding="utf-8"?><!-- (c) 2006 Microsoft Corporation --><policyDefinitionsxmlns:xsd="http://www.w3.org/2001/XMLSchema"xmlns:xsi="http://www.w3.org/2001/XMLSchema-instance"revision="1.0"schemaVersion="1.0"xmlns="http://schemas.microsoft.com/GroupPolicy/2006/07/PolicyDefinitions"><policyNamespaces><targetprefix="hidedrives"namespace="HideDrives"/><usingprefix="windows"namespace="Microsoft.Policies.Windows"/></policyNamespaces><resourcesminRequiredRevision="1.0"/><categories><categoryname="WindowsComponents"displayName="$(string.WindowsComponents)"/><categoryname="WindowsExplorer"displayName="$(string.WindowsExplorer)"><parentCategoryref="WindowsComponents"/></category></categories><policies><policyname="NoDrives"class="User"displayName="$(string.NoDrives)"explainText="$(string.NoDrives_Help)"presentation="$(presentation.NoDrives)"key="Software\Microsoft\Windows\CurrentVersion\Policies\Explorer"><parentCategoryref="windows:WindowsExplorer"/><supportedOnref="windows:SUPPORTED_Win2k"/><elements><enumid="NoDrivesDropdown"valueName="NoDrives"required="true"><itemdisplayName="$(string.ALLDrives)"><value><decimalvalue="67108863"/></value></item><itemdisplayName="$(string.RestNoDrives)"><value><decimalvalue="0"/></value></item>#insert the drives you want to hide here#what goes after string. must exist in the matching adml file<itemdisplayName="$(string.ABDEGPROnly)"><value><decimalvalue="163931"/></value></item></enum></elements></policy><policyname="NoViewOnDrive"class="User"displayName="$(string.NoViewOnDrive)"explainText="$(string.NoViewOnDrive_Help)"presentation="$(presentation.NoViewOnDrive)"key="Software\Microsoft\Windows\CurrentVersion\Policies\Explorer"><parentCategoryref="windows:WindowsExplorer"/><supportedOnref="windows:SUPPORTED_Win2k"/><elements><enumid="NoDrivesDropdown"valueName="NoViewOnDrive"required="true"><itemdisplayName="$(string.ALLDrives)"><value><decimalvalue="67108863"/></value></item><itemdisplayName="$(string.RestNoDrives)"><value><decimalvalue="0"/></value></item>#insert the drives you want to prevent access to here#what goes after string. must exist in the matching adml file<itemdisplayName="$(string.ABDEGPROnly)"><value><decimalvalue="163931"/></value></item></enum></elements></policy></policies></policyDefinitions>And my HideDrives.adml file:
123456789101112131415161718192021222324252627282930313233343536373839404142434445464748495051525354<?xmlversion="1.0"encoding="utf-8"?><!-- (c) 2006 Microsoft Corporation --><policyDefinitionResourcesxmlns:xsd="http://www.w3.org/2001/XMLSchema"xmlns:xsi="http://www.w3.org/2001/XMLSchema-instance"revision="1.0"schemaVersion="1.0"xmlns="http://schemas.microsoft.com/GroupPolicy/2006/07/PolicyDefinitions"><displayName>Hide specified drives in Citrix, RDS, Horizon, or Parallels session's My Computer</displayName><description>Hide specified drives in Citrix, RDS, Horizon, or Parallels session's My Computer</description><resources><stringTable><stringid="WindowsComponents">WindowsComponents</string><stringid="WindowsExplorer">WindowsExplorer</string>#here is where you insert the string label you added to the admx file<stringid="ABDEGPROnly">Restrict A, B, D, E, G, P, and R drives only</string><stringid="ALLDrives">Restrict all drives</string><stringid="RestNoDrives">Do not restrict drives</string><stringid="NoDrives">Hide specified drives in Citrix, RDS, Horizon, or Parallels session's My Computer</string><stringid="NoDrives_Help">This policy setting allows you to hide specified drives in Citrix, RDS, Horizon, or Parallels session's My Computer.This policy setting allows you to remove the icons representing selected hard drives from My Computer and File Explorer. Also, the drive letters representing the selected drives do not appear in the standard Open dialog box.If you enable this policy setting, select a drive or combination of drives in the drop-down list.Note: This policy setting removes the drive icons. Users can still gain access to drive contents by using other methods, such as by typing the path to a directory on the drive in the Map Network Drive dialog box, in the Run dialog box, or in a command window.Also, this policy setting does not prevent users from using programs to access these drives or their contents. And, it does not prevent users from using the Disk Management snap-in to view and change drive characteristics.If you disable or do not configure this policy setting, all drives are displayed, or select the "Do not restrict drives" option in the drop-down list.Also, see the "Prevent access to drives from Citrix, RDS, Horizon, or Parallels session's My Computer" policy setting.</string><stringid="NoViewOnDrive">Prevent access to drives from Citrix, RDS, Horizon, or Parallels session's My Computer</string><stringid="NoViewOnDrive_Help">Prevents users from using Citrix, RDS, Horizon, or Parallels session's My Computer to gain access to the content of selected drives.If you enable this setting, users can browse the directory structure of the selected drives in My Computer or File Explorer, but they cannot open folders and access the contents. Also, they cannot use the Run dialog box or the Map Network Drive dialog box to view the directories on these drives.To use this setting, select a drive or combination of drives from the drop-down list. To allow access to all drive directories, disable this setting or select the "Do not restrict drives" option from the drop-down list.Note: The icons representing the specified drives still appear in My Computer, but if users double-click the icons, a message appears explaining that a setting prevents the action.Also, this setting does not prevent users from using programs to access local and network drives. And, it does not prevent them from using the Disk Management snap-in to view and change drive characteristics.Also, see the "Hide specified drives in Citrix, RDS, Horizon, or Parallels session's My Computer" setting.</string></stringTable><presentationTable><presentationid="NoDrives">#I set noSort to false so the strings in the dropdown list are sorted in alphabetical ascending order#defaultItem is array based and starts at 0 for the first item in the dropdown list<dropdownListrefId="NoDrivesDropdown"noSort="false"defaultItem="0">Pick one of the following combinations</dropdownList></presentation><presentationid="NoViewOnDrive">#I set noSort to false so the strings in the dropdown list are sorted in alphabetical ascending order#defaultItem is array based and starts at 0 for the first item in the dropdown list<dropdownListrefId="NoDrivesDropdown"noSort="false"defaultItem="0">Pick one of the following combinations</dropdownList></presentation></presentationTable></resources></policyDefinitionResources>Here are my HideDrive ADMX and ADML files.
Download the Zip file, extract the two files contained in the Zip, and copy the two files to where you keep your ADMX and ADML files. Make any modifications you need to the two files.
In the GPMC, I created a GPO named Hide Drives. Edit the GPO and navigate to User Configuration/Policies/Administrative Templates/Windows Components/File Explorer as shown in Figure 1.
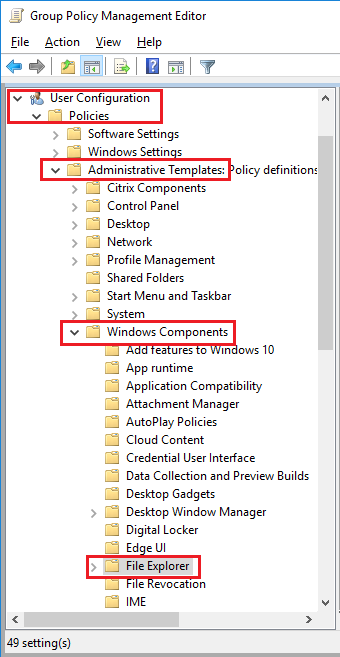
Figure 1 In the right pane, you will see the two settings from the HideDrives.admx file as shown in Figure 2.
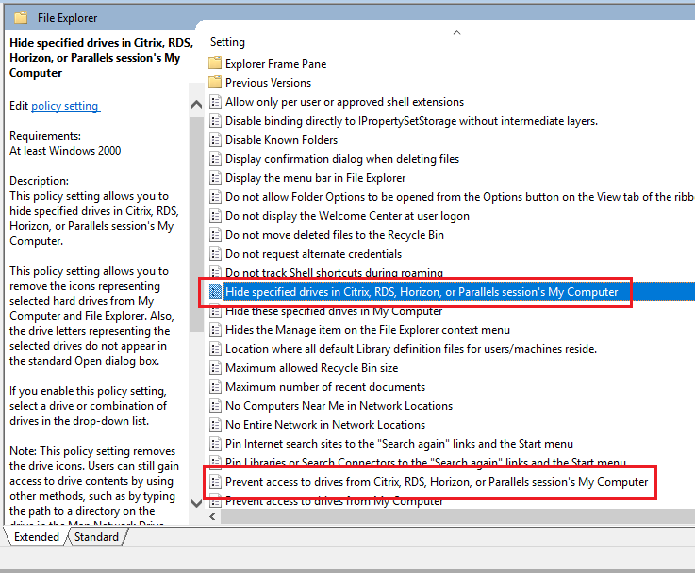
Figure 2 Double-click the Hide specified drives in Citrix, RDS, Horizon, or Parallels session’s My Computer as shown in Figure 3.
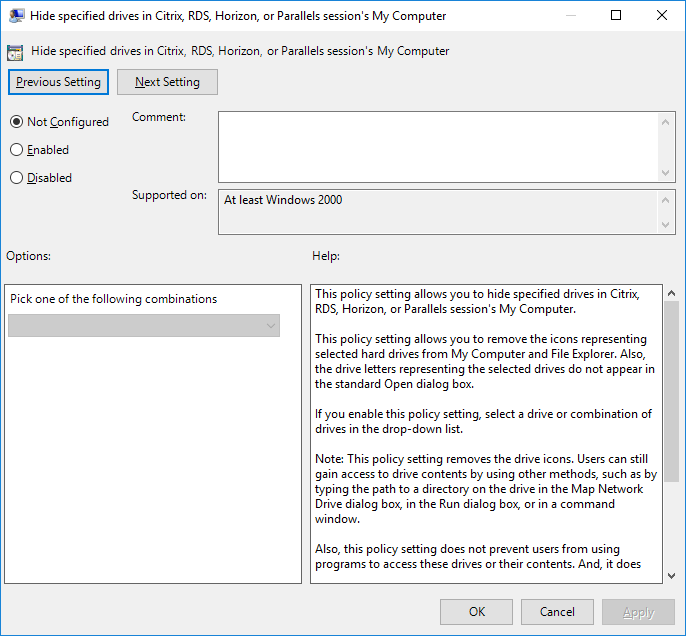
Figure 3 Select Enabled, and click the drop-down box as shown in Figure 4.
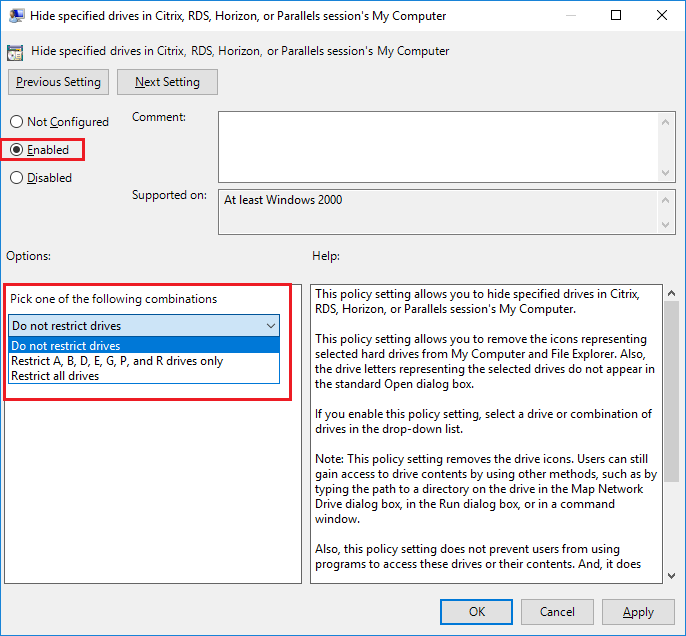
Figure 4 You can see the changes I made for the drives to restrict, the title of the policy setting, and the help text. You can also see that the list of items in the drop-down is in alphabetical order.
When you go mucking around with the ADMX and ADML files, only make one change at a time and test. It is easy to make it where the files will not work and the settings cannot be found except to look in All Settings.
One question I get asked is why I don’t provide more sample drive exclusions? Simple, there are a LOT of drive letter combinations.
You can have from None to All possible drive letters. There are 26 drive letters from A to Z. If you take the None plus 26, there are 27 possible scenarios with various combinations. I checked with a Ph.D. to get the correct mathematical formula. It is:
27 + 26^2 + 25^3 + 24^4 + 23^5… 4^24 + 3^25 + 2^26
In other words, there are more possible combinations of drive letters than I want to take the time to figure out. Plus, I seriously doubt the drop-down box would handle that many items in its array.
Some of you might say that you can do this with Citrix Workspace Environment Management (WEM). Why yes, you can. But, not everyone uses or is entitled to Citrix WEM.
If you have any questions, email me webster@carlwebster.com.
Thanks
Webster
Subscribe
Subscribe to our e-mail newsletter to receive updates.


4 Responses to “How To Hide Additional Drive Letters On A Server Updated for ADMX/ADML”
June 13, 2019 at 5:30 am
Thanks for sharing this; Microsoft certainly didn’t try too hard to make stuff easy for admins. A lot of stuff now is trial and error, especially compared with how stuff worked before. Adm was simple to use, and central policies were propagated by default.
August 15, 2018 at 1:44 pm
Great article! I was bored so I did the calculations and this is what I came up with.
27 + 26^2 + 25^3 + 24^4 + 23^5 + 22^6 + 21^7 + 20^8 + 19^9 + 18^10 + 17^11 + 16^12 + 15^13 + 14^14 + 13^15 + 12^16 + 11^17 + 10^18 + 9^19 + 8^20 + 7^21 + 6^22 + 5^23 + 4^24 + 3^25 + 2^26 = 4,961,039,091,344,431,215
Or just under 5 quintillion.
August 22, 2018 at 12:44 pm
Yeah, I doubt the drop-down list would handle an array of that size and I doubt I could type fast enough to create the list before I died of old age.
Webster
August 12, 2018 at 11:00 pm
Funny – I always use Group Policy Preferences to hide the drives but this would be cool to restrict them completely.