-
Inside Webster’s Lab: Installing a Domain Controller Using PowerShell
With all the writing I do for my website and customers, I frequently recreate my Windows Server 2012 R2 Active Directory (AD) environment. I thought I would show you how I use PowerShell to install and configure my Domain Controller.
First things first, install Windows Server 2012 R2 and configure the server as you require. i.e., time zone, static IP, Internet Explorer Enhanced Security, etc.
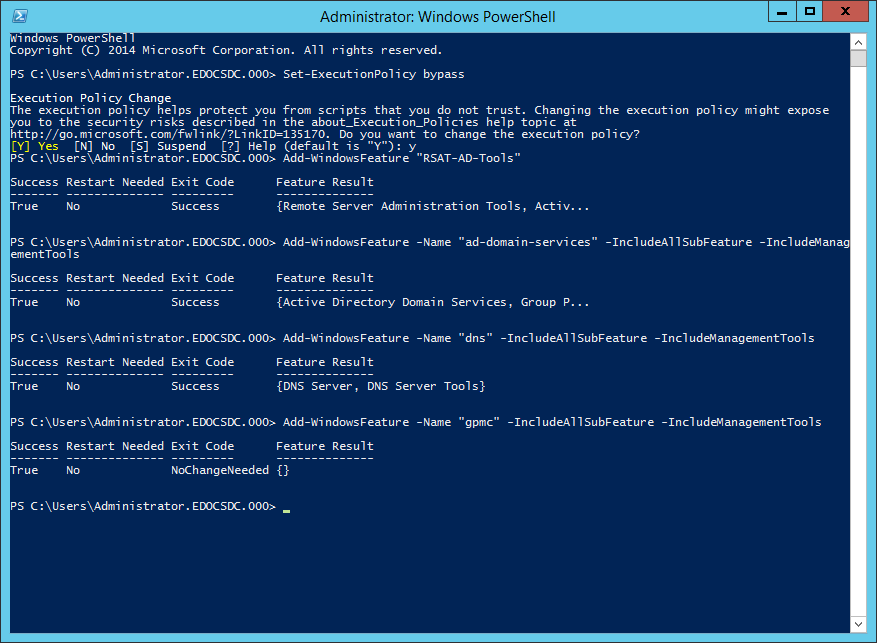
Start a PowerShell session and run the following PowerShell cmdlets one at a time, as shown in Figure 1.
Set-ExecutionPolicy bypass

Add-WindowsFeature "RSAT-AD-Tools"
Add-WindowsFeature -Name "ad-domain-services" -IncludeAllSubFeature -IncludeManagementTools
Add-WindowsFeature -Name "dns" -IncludeAllSubFeature -IncludeManagementTools
Add-WindowsFeature -Name "gpmc" -IncludeAllSubFeature -IncludeManagementTools

Figure 1 Now that the necessary Roles and Features are installed, you can promote the server to a domain controller.
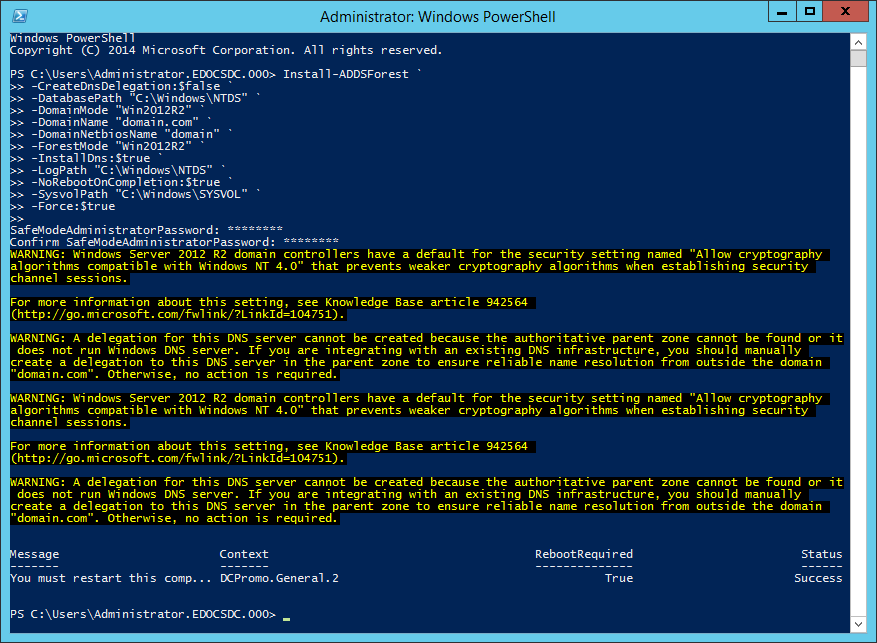
Run the following cmdlet as shown in Figure 2.
Note: I set the NoRebootOnCompletion parameter to $True when I ran the cmdlet to make sure I got a screenshot before the server restarted.
Install-ADDSForest `
-CreateDnsDelegation:$false `
-DatabasePath "C:\Windows\NTDS" `
-DomainMode "Win2012R2" `
-DomainName "labaddomain.com" `
-DomainNetbiosName "labaddomain" `
-ForestMode "Win2012R2" `
-InstallDns:$true `
-LogPath "C:\Windows\NTDS" `
-NoRebootOnCompletion:$false `
-SysvolPath "C:\Windows\SYSVOL" `
-Force:$true
You will be prompted for the Safe Mode password. Password must meet complexity requirements.

Figure 2 The server will automatically restart (I had to restart the server since I set the NoRebootOnCompletion to True).
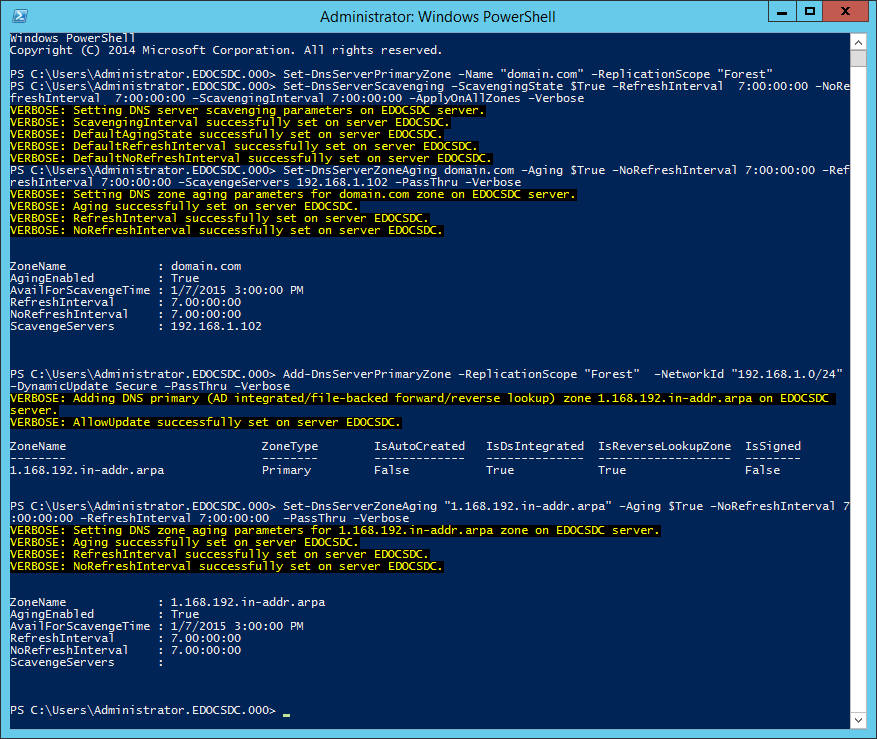
Log back into the server, start a PowerShell session and run the following PowerShell cmdlets one at a time, as shown in Figure 3.
Set-DnsServerPrimaryZone –Name "labaddomain.com" –ReplicationScope "Forest"
Set-DnsServerScavenging –ScavengingState $True –RefreshInterval  7:00:00:00 –NoRefreshInterval  7:00:00:00 –ScavengingInterval 7:00:00:00 –ApplyOnAllZones –Verbose
Set-DnsServerZoneAging labaddomain.com –Aging $True –NoRefreshInterval 7:00:00:00 –RefreshInterval 7:00:00:00 –ScavengeServers 192.168.1.102 –PassThru –Verbose
Add-DnsServerPrimaryZone –ReplicationScope "Forest"  –NetworkId "192.168.1.0/24" –DynamicUpdate Secure –PassThru –Verbose
Set-DnsServerZoneAging "1.168.192.in-addr.arpa" –Aging $True –NoRefreshInterval 7:00:00:00 –RefreshInterval 7:00:00:00  –PassThru –Verbose

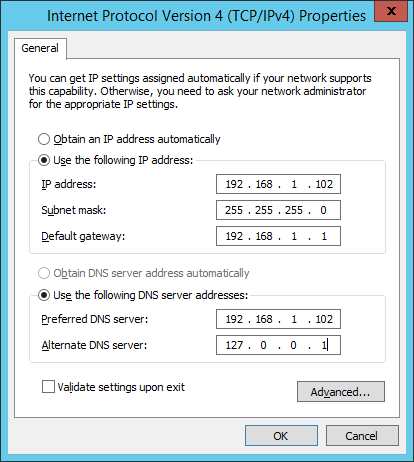
Figure 3 The domain controller needs to have its DNS server settings corrected. The primary DNS server should be its IP address, and the secondary DNS server should be 127.0.0.1, as shown in Figure 4.

Figure 4 Now you have a domain controller installed with basic configuration ready to go.
Thanks
Webster


December 31, 2014
Active Directory, PowerShell