-
01 Building Webster’s Lab V1 – Introduction
Updated 12-Dec-2019
I started work on rebuilding my lab in June 2018, and then life happened. During the 2019 New Year’s holiday break, I finally got back to working on the lab rebuild, but still ran into issues. Finally, in August 2019, someone on Twitter gave me a possible solution for my lab issues. His suggestion worked, and now 15 months after beginning, I can finish my lab rebuilding.
Before going on with this introduction article, let me explain the products and technology that I list below. Not everyone has years of virtualization experience and virtualization knowledge. I spend many hours answering questions that come to me in emails, and I also answer questions asked on Experts Exchange. There are many people new to the world of Citrix, Microsoft, Parallels, VMware, hypervisors and application, desktop and server virtualization.
There are two types of hypervisors: Type 1 and Type 2.
Type 1 hypervisors run directly on or take complete control of the system hardware (aka bare metal hardware). These include, but are not limited to:
Citrix Hypervisor (Formerly Citrix XenServer, which is the name I still use)
Type 2 hypervisors run under a host operating system. These include, but are not limited to:
VMware Workstation for Windows
Other terminology and abbreviations:
Virtualization Host: a physical computer that runs the Type 1 hypervisor.
Virtual Machine (VM): an operating system environment composed entirely of software which runs its operating system and applications just as if it were a physical computer. A VM behaves like a physical computer and contains its virtual processors (CPU), memory (RAM), hard disk, and networking (NIC).
Cluster or Pool: a single managed entity that binds together multiple physical hosts running the same Type 1 hypervisor and the VMs of those hosts.
Datastore or Storage Repository (SR): a storage container that stores one or more virtual hard disks.
Virtual Hard Disk: A virtual hard disk is a type of disk drive that has similar functionalities as a typical hard drive but is accessed, managed, and installed on a virtual machine infrastructure.
Server Virtualization: Server virtualization is the masking of server resources, including the number and identity of individual physical servers, processors, and operating systems, from server users.
Application Virtualization: Application virtualization is the separation of an installation of an application from the client computer accessing the application.
Desktop Virtualization: Desktop virtualization is the concept of isolating a logical operating system (OS) instance from the client that is used to access it.
There are several products mentioned and used in this article series:
Citrix Virtual Apps and Desktops (CVAD, formerly XenApp and XenDesktop).
Microsoft Remote Desktop Services (RDS)
Parallels Remote Application Server (RAS)
VMware Horizon (Horizon)
Citrix uses XenCenter to manage XenServer resources, and VMware uses vCenter to manage vSphere resources. Both XenCenter and vCenter are centralized, graphical consoles for managing, automating, and delivering virtual infrastructures.
In Webster’s Lab, I try to always use the latest versions of Citrix XenServer, VMware Workstation, and VMware vSphere. Last year, because of some issues not related to vSphere, I rebuilt my vSphere 6.0 cluster with XenServer. Michael Bates had helped me build my original vSphere 6.0 cluster. Unfortunately, I didn’t record the GoToMeeting where Michael did all the networking and storage configuration. When it came time to build a vSphere 6.7 cluster, I was clueless and lost when it came to configuring networking. I am not a networking guru. Building a vSphere cluster from scratch is something I have never previously done. This article series records the adventures of a networking amateur building a vSphere 6.7 cluster from start to finish.
Like most Citrix and Active Directory (AD) consultants, I can work with the various vSphere and vCenter clients. I can create and work with virtual machines (VMs), snapshots, templates, cloning, customization templates, etc. It is the installation and configuring of new ESXi hosts, vCenter, networking, and storage that most of us consultants don’t regularly do which can be confusing, at least the first few times.
I found much misinformation on the Internet as well as many helpful blogs on this journey. I ran into so much grief along the way that I thought that sharing this learning experience with the community was a good idea.
Have I got this all figured out? I seriously doubt it. Have I built the VMware part of the lab the best way possible? Again, I doubt it. To figure this out, I experienced trials-and-errors (mainly errors!) in many scenarios. What I found were many videos and articles that used a single “server” with a single NIC. That meant there was essentially no network configuration to do once the installation of ESXi is complete. Many people used VMware Workstation and nested ESXi VMs. I never saw a video or article where the author used a real server with multiple NICs and went through the configuration of networking and storage.
If you want to offer advice on my lab build, please email me at webster@carlwebster.com.
On this journey, I watched many videos — some useless and rife with editing errors, some very useful and extremely polished. The three most helpful video series came from Pluralsight. Disclaimer: As a Citrix Technology Professional (CTP), I receive a free subscription to Pluralsight as a CTP Perk.
VMware vSphere 6 Data Center Virtualization (VCP6-DCV) by Greg Shields
https://www.pluralsight.com/paths/vsphere-6-dcv
What’s New in vSphere 6.5 by Josh Coen
https://www.pluralsight.com/courses/whats-new-vsphere-6-5
VMware vSphere 6.5 Foundations by David Davis
The physical servers I use as my VMware and XenServer hosts are from TinkerTry and Wired Zone.
Supermicro Mini Tower Intel Xeon D-1541 Bundle 2 – US Version
Paul Braren at TinkerTry takes great pride in the servers he recommends and has a very informative blog.
For the ESXi hosts, I have six
fourof the 8-core servers with the following specifications:- Mini tower case
- Intel Xeon D-1541 processor
- 64GB DDR4 RAM
- Two 1Gb NIC
- Two 10Gb NIC
- Crucial BX300 120GB SSD (ESXi install)
- Samsung 970 EVO 500GB NVMe PCIe M.2 SSD (Local datastore)
- Crucial MX500 250GB SSD (Host cache)
For the XenServer hosts, I have four
threeof the 12-core servers with the following specifications:- Mini tower case
- Intel Xeon D-1541 processor
- 64GB DDR4 RAM
- Two 1Gb NIC
- Two 10Gb NIC (Not used because of a firmware bug that causes random dropped connections)
- Samsung 970 EVO 500GB NVMe PCIe M.2 SSD (XenServer install and local SR)
- Samsung 860 EVO 1TB 2.5 Inch SATA III Internal SSD (Local SR for VMs)
For VMware product licenses, I used VMUG Advantage and the EVALExperience. If you would like to try EVALExperience, Paul Braren has a 10% discount code on his site.
For Citrix product licenses, I am fortunate in that Citrix supplies CTPs with basically an unrestricted license file that works with most on-premises products.
Decisions, Decisions, Decisions
After all my trials and errors, I decided to go with ESXi 6.7 Update 3 and vCenter 6.7 Update 3. CVAD 7.15 Long-Term Service Release (LTSR) CU3 added support for 6.7. I used to maintain CVAD versions 7.0 through the most recent Current Release (CR) version in the lab for the documentation scripts. That was very cumbersome and time-consuming. Now I maintain 7.15 LTSR and the two most recent CR versions.
For XenServer, I went with XenServer 8.0, the CR version, because nothing was restricting or limiting me to use the XenServer LTSR version.
For storage, I decided to go with Network File System (NFS) instead of the Internet Small Computer Systems Interface (iSCSI). Gregory Thompson was the first to tell me to use NFS instead of iSCSI for VMware. If you Google “VMware NFS iSCSI”, you find many articles that explain why NFS is better than iSCSI for VMware environments. For me, NFS is easier to configure on an ESXi host than iSCSI. I also found out my Synology 1817+ storage unit supported NFS. I wasted three days discovering that fact because of a blatantly incorrect blog article on configuring my specific Synology device for NFS and ESXi 6.5. I do not provide a link to that article because the article is just wrong, and I don’t want to embarrass the author. After three days of emails with Synology support (I believe they only answer one email a day!), I found out the author was incorrect. The author stated Synology does not support NFS 4.1 and if you use NFS, you forgo VMware vSphere Storage APIs Array Integration (VAAI) support. What the author got wrong was that the Synology 1817+ does support NFS 4.1 and Synology has provided a VAAI plug-in for NFS since 2014.
The issue I ran into was that I kept trying to use NFS 4.1 only to find it just didn’t work once I installed vCenter. The solution @faherne offered on Twitter was simple; I can’t believe I never thought of it. Use NFS 3, not NFS 4.1. DOH! Once I tried that, I had no issues once I installed vCenter. So, for this article series, I decided to use only NFS 3 for both vSphere and XenServer.
For XenServer, NFS is also simple to configure and use and requires no additional drivers or software.
After watching the excellent video series by Greg Shields on Pluralsight, the following is a noncomprehensive list of some of the activities my article series covers as I have the time to do them:
- Install and configure the first ESXi host
- Install and configure the vCenter appliance
- Create a Datacenter, Cluster, Networking, Storage
- Join vCenter to an AD domain
- Add an AD domain as a Single Sign-On source
- and much more
There are two classes of VMs in my lab. Those which are permanent VMs and those which are temporary VMs. The permanent VMs are, for example, the domain controllers, CA, file server, SQL server, utility server, management PC, and others. The permanent VMs reside in Citrix XenServer and VMware Workstation, and I use the vSphere cluster for the virtual desktops and servers created by the various virtualization products. All the Microsoft related infrastructure servers reside in XenServer.
Since I have built and rebuilt my hosts several times in this learning experience, below is the lab configuration.
Name IP Address (Purpose) NETGEAR 48-port 10Gb Switch 192.168.1.251 NETGEAR 48-port 1Gb Switch 192.168.1.250 Synology1817+ 192.168.1.253 (NFS Storage) Synology1817 192.168.1.254 (Contains all downloaded ISOs) ESXiHost1 192.168.1.53 (Management) 192.168.1.54 (IPMI)
192.168.1.55 (vMotion)
192.168.1.56 (NFS)
ESXiHost2 192.168.1.57 (Management) 192.168.1.58 (IPMI)
192.168.1.59 (vMotion)
192.168.1.60 (NFS)
ESXiHost3 192.168.1.61 (Management) 192.168.1.62 (IPMI)
192.168.1.63 (vMotion)
192.168.1.64 (NFS)
ESXiHost4 192.168.1.65 (Management) 192.168.1.66 (IPMI)
192.168.1.67 (vMotion)
192.168.1.68 (NFS)
ESXiHost5 192.168.1.69 (Management) 192.168.1.70 (IPMI)
192.168.1.71 (vMotion)
192.168.1.72 (NFS)
ESXiHost6 192.168.1.73 (Management) 192.168.1.74 (IPMI)
192.168.1.75 (vMotion)
192.168.1.76 (NFS)
XenServer1 192.168.1.80 (Management) 192.168.1.81 (IPMI)
XenServer2 192.168.1.82 (Management) 192.168.1.83 (IPMI)
XenServer3 192.168.1.84 (Management) 192.168.1.85 (IPMI)
XenServer4 192.168.1.86 (Management) 192.168.1.87 (IPMI)
Citrix App Layering Appliance 192.168.1.91 vCenter Server Appliance 192.168.1.90 NFS Server on the Synology 1817+ NAS 192.168.1.253 NFS Shares /volume1/ISOs /volume1/VMwareVMs
/volume1/XSVMs
Table 1 Lab Configuration
Note: You may notice my lab uses flat networking where all traffic is on the same network, and there are no VLANs. Why? I know what VLANs are and why I should use them, but with my limited networking knowledge, I don’t know how to create or configure VLANs. Both of my switches support VLANs, so the capability is there. If you want to help improve the lab setup but helping me implement VLANs, email me at webster@carlwebster.com.
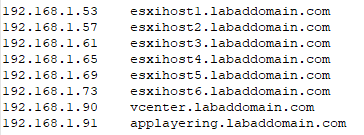
I have DHCP running in my AD, so when DHCP assigns an IP address, DHCP appends the AD domain name to the device’s hostname. For example, when I built the host ESXiHost1, it was given an IP address of 192.168.1.107. I then give the host a static IP address of 192.168.1.53. When I connect to that host using Google Chrome, the hostname is shown as ESXiHost1.LabADDomain.com even though the host is not a member of the LabADDomain.com domain.
Something you may want to consider to work around the initial self-signed certificate issues when connecting to a host using a browser is adding the Fully Qualified Domain Name (FQDN) of the various hosts to your AD’s DNS (if you are using AD, DNS, and DHCP). If your computer, like mine, is not domain joined, you should also consider adding the IP address and FQDN to your computer’s hosts file (located in c:\Windows\System32\Drivers\etc).
Figures 1 through 3 show my DNS Forward and Reverse Lookup Zones and my computer’s hosts file.

Figure 1 
Figure 2 
Figure 3 Once I complete the lab build and find the time, I add CVAD, Horizon, RDS, and RAS to the lab.
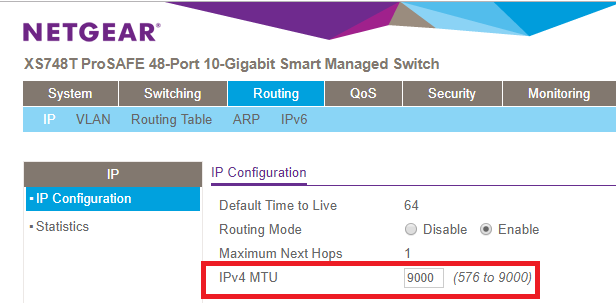
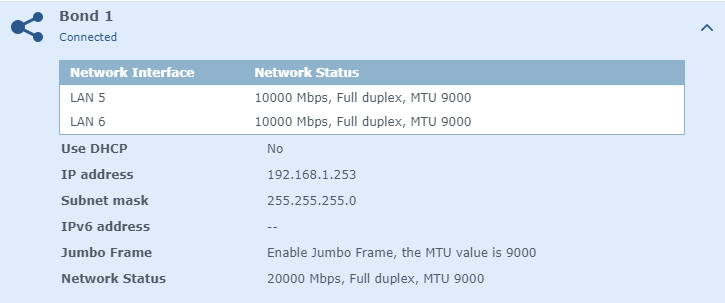
Since I have a 10Gb switch and my Synology 1817+ NAS supports 10Gb; I use Jumbo Frames. After much research, asking NETGEAR support, and talking with friends who know networking, I configured the following Maximum Transmission Unit (MTU) sizes:
- 10G Switch: 9000 as shown in Figure 4
- Synology 1817+: 9000 as shown in Figure 5
- (When created) 10G related Virtual Switch: 9000
- (When created) VMkernel NICs that connect to the 10G Virtual Switch: 9000

Figure 4 
Figure 5 This foray into installing and configuring the VMware Lab has been a painful but rewarding learning experience. I hope that through all my pain and errors, you can also gain from my experiences.
Along the way, several community members helped provide information, answered questions, and even did remote sessions with me when I ran into stumbling blocks.
- Abdullah Abdullah
- Geert Braakhekke
- Greg Shields
- Gregory Thompson
- Jarian Gibson
- Paul Braren
- Tobias Kreidl
This article series is better because of the grammar, spelling, punctuation, style, and technical input from Michael B. Smith, Tobias Kreidl, and Abdullah Abdullah.
Up next: Configuring a Synology 1817+ NAS for NFS, ESXi 6.7, and XenServer 8.0.
One Response to “01 Building Webster’s Lab V1 – Introduction”


December 13, 2019 at 5:45 am
Nice and detailed as usual Carl, thank you. I wish I had so many cool servers like you. Need to save a small fortune for the amount of hosts you have. Nevertheless very cool.