-
Learning to Install Adobe Acrobat Reader DC
September 13, 2018
Citrix Virtual Apps and Desktops, XenApp, XenApp/XenDesktop 7.0 - 7.7, XenDesktop 5.x
Back in April 2009, I wrote an article on installing Adobe Acrobat Reader. A reader reported to me that the process does not work for Adobe Acrobat Reader DC. There were enough changes to the process, I worked through and documented the process so the reader could get Acrobat Reader DC installed.
Portable Document Format (PDF) files are a popular way to transfer documents between computer users. A PDF file presents documents, including formatting and images, independent of software, hardware, and operating systems. There are over 10,000 free viewers available on http://www.download.com which allows the viewing of PDF files.
In this article, you will learn:
- how to sign up to distribute the free Adobe Acrobat Reader DC version
- download the distributable file
- download the Adobe Customization Wizard
- extract the Acrobat Reader MSI file
- customize the MSI file
- install the customized file on your master image
- remove additional menu items using JavaScript
Note: This article has been updated three times with feedback from the community. Scroll down to the bottom to see the updates.
While it may be less time consuming to download the free Acrobat Reader and use that MSI file, Adobe requires any entity that will install the program for multiple users to agree to the Adobe Reader Distribution Agreement.
Many things have changed in the world of virtualization since April 2009. The process outlined in this article can be used for Citrix Virtual Apps and Desktops, Microsoft Remote Desktop Services, Parallels Remote Access Server, and VMware Horizon.
For this article, I used a master Microsoft Windows Server 2016 image usable by all four technologies list above.
To get started, open your browser and go to http://www.adobe.com (Figure 1).
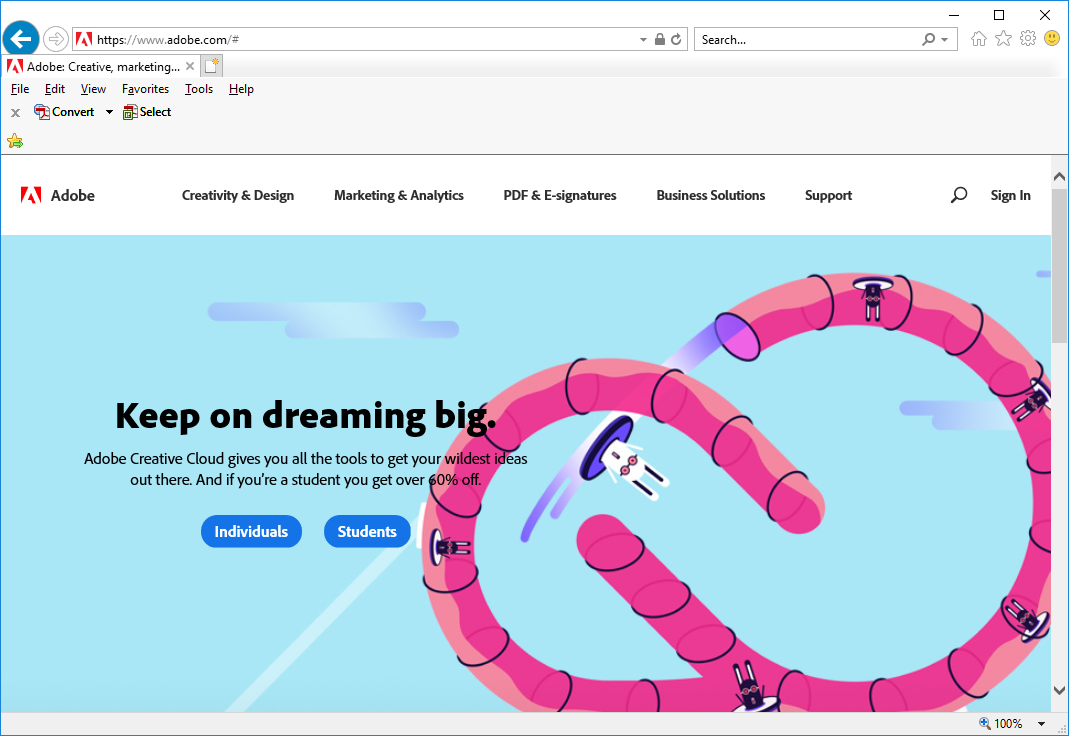
Figure 1 Scroll down and click on the Adobe Acrobat Reader DC link (Figure 2).
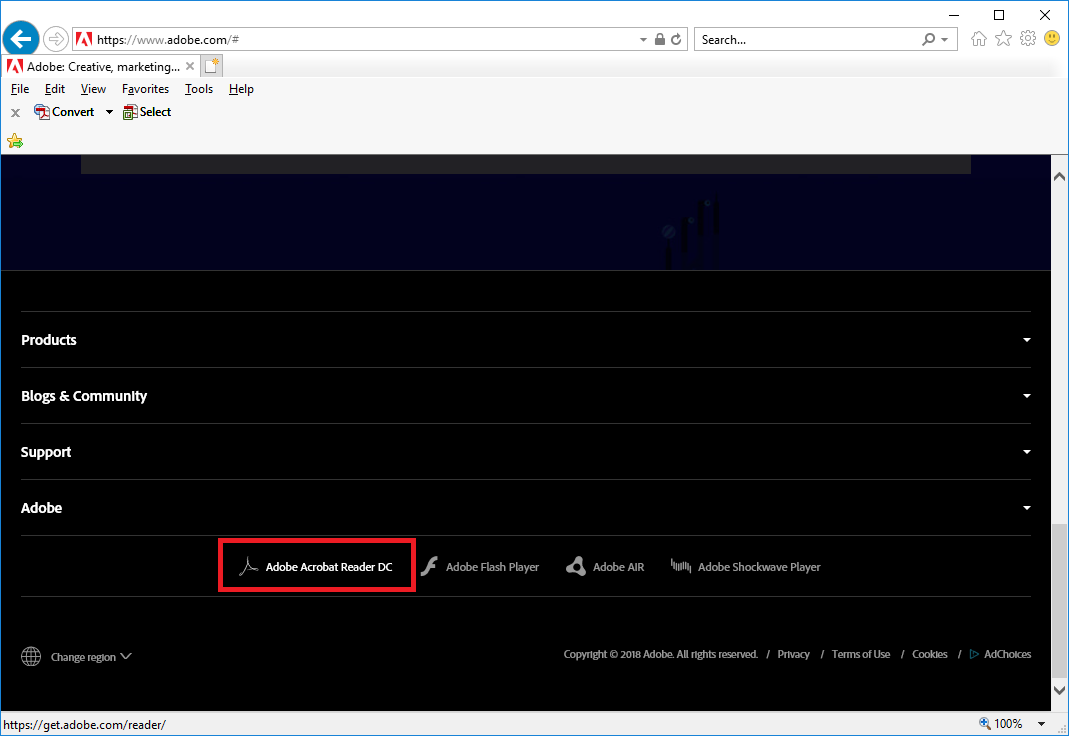
Figure 2 Click Are you an IT manager or OEM (Figure 3).
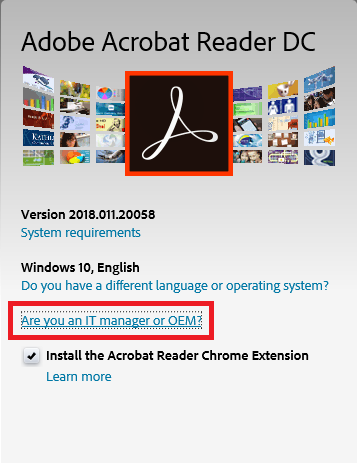
Figure 3 A new browser window opens. Click distributing Adobe Acrobat Reader DC (Figure 4).

Figure 4 A new browser tab opens. Scroll down and click on Apply now under Apply for a desktop license (Figure 5).
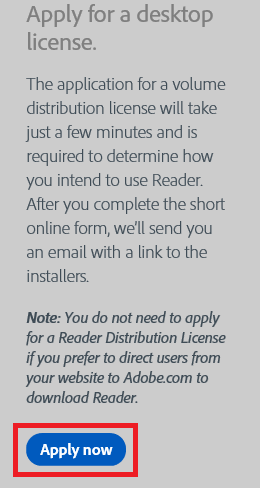
Figure 5 Another browser tab opens. If you have an Adobe ID, sign in with it. If you do not have an Adobe ID, create an Adobe ID, and then continue with this process (Figure 6).
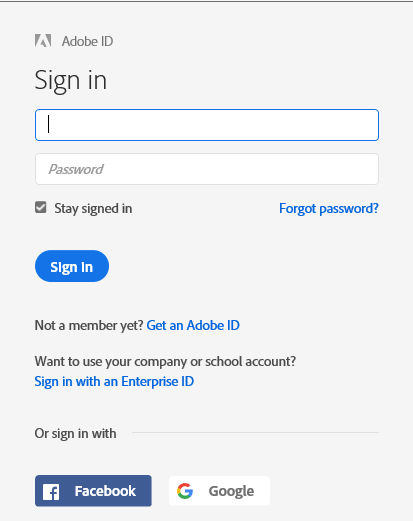
Figure 6 Fill in the necessary information (Figure 7).
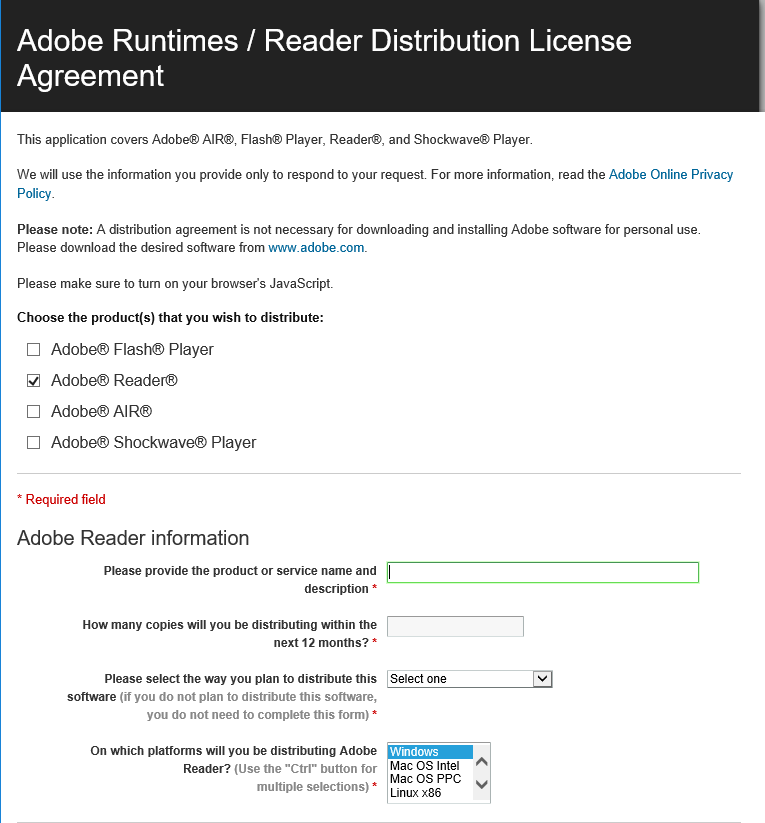
Figure 7 Then click Accept and Submit (Figure 8).
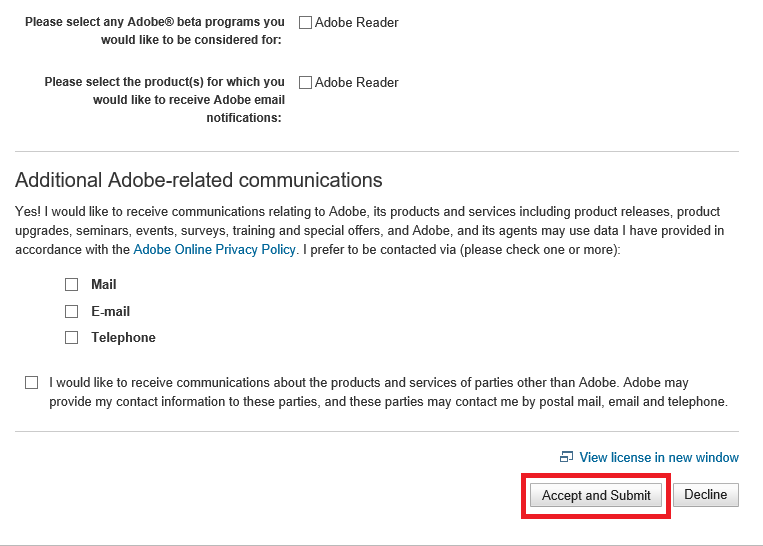
Figure 8 You will receive an e-mail from Adobe to verify the e-mail address you entered. Click the verification link in the e-mail. Adobe will send you another e-mail with the information necessary to download the Redistributable version of Acrobat Reader DC. In the second e-mail, click the link to download the full installer for Adobe Reader DC. My email says Adobe Acrobat Reader XI, but the download is for Acrobat Reader DC.
Select the operating system and language that matches your destination operating system, select the download product, and click Download now (Figure 9).
Note: Adobe does not list options for Windows Server 2012 R2 or Windows Server 2016.
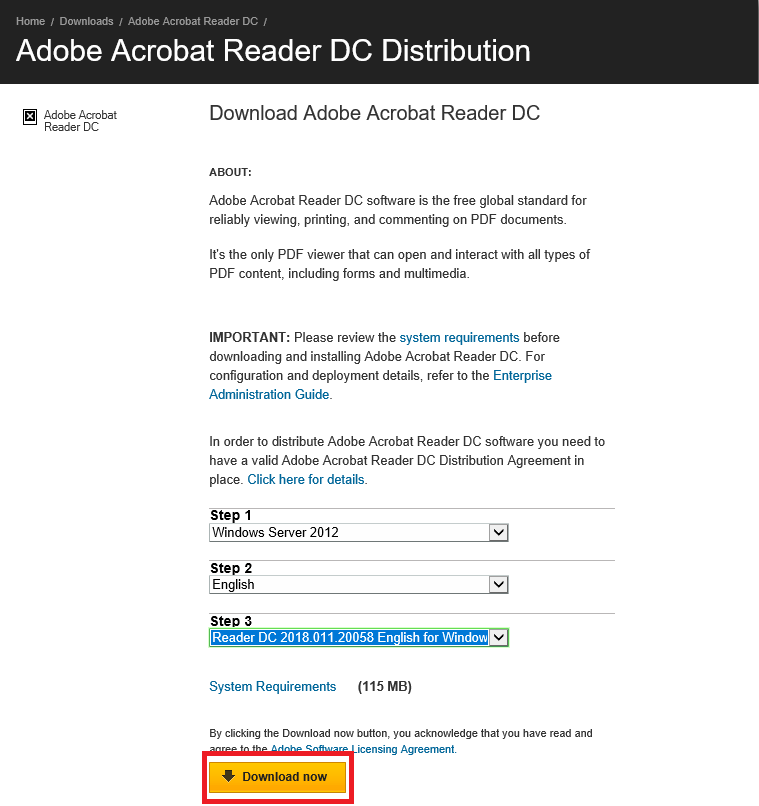
Figure 9 Save the file to a central location (Figure 10).
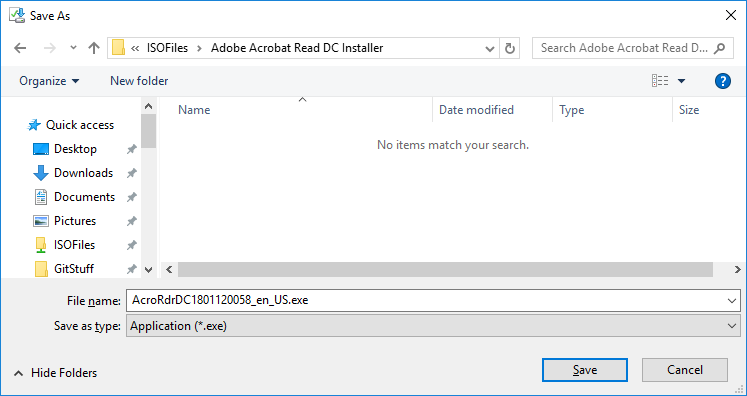
Figure 10 In the second e-mail from Adobe, click the link for Adobe enterprise deployment tools.
Click IT Tools (Figure 11).
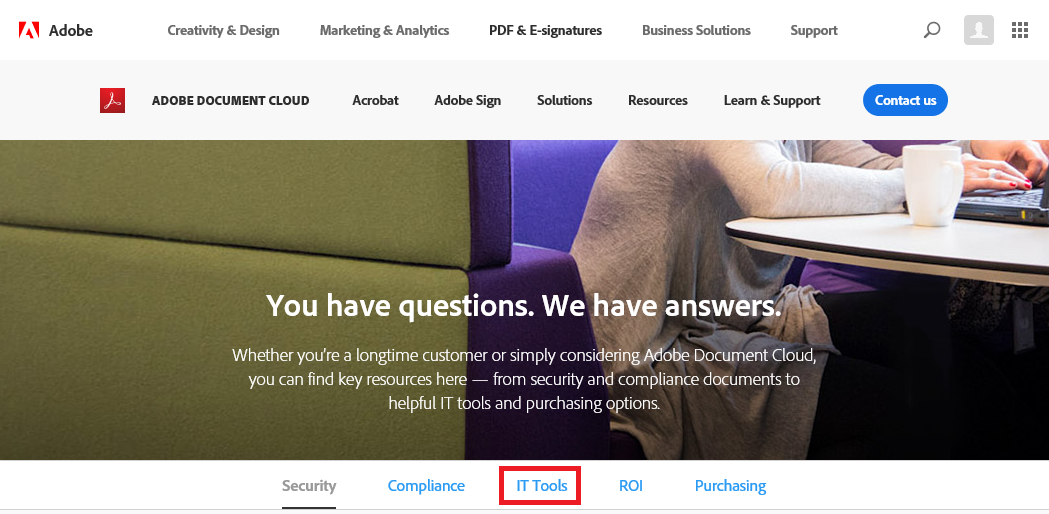
Figure 11 Scroll down and click on Customization Wizard (Figure 12).
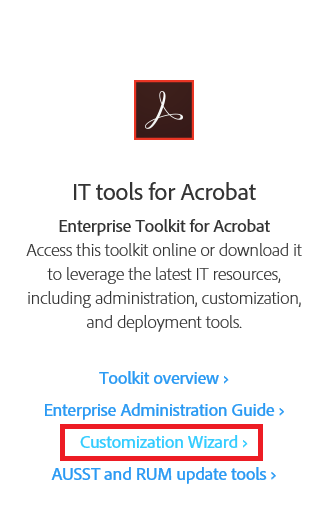
Figure 12 On the Customization Wizard Home page, under Wizard Downloads, click on DC Windows (Both tracks) (Figure 13).
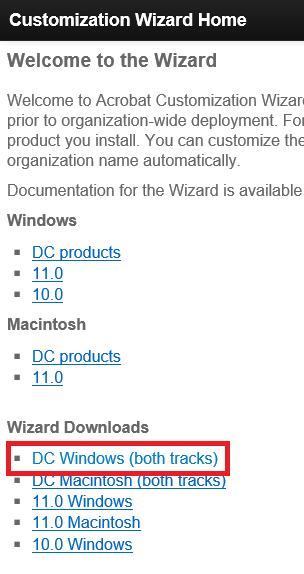
Figure 13 Click on CustWiz1502020039_en_US_DC.exe (Figure 14).

Figure 14 Save the file to a central location (Figure 15).
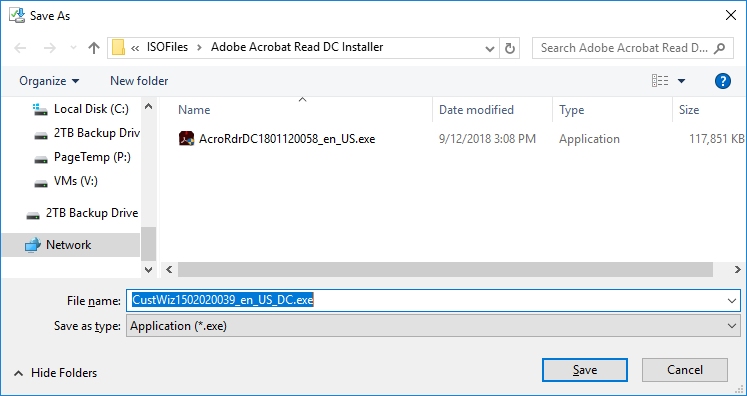
Figure 15 Exit your browser.
Double-click CustWiz1502020039_en_US_DC.exe to install the Customization Wizard. Accept all the defaults during the installation.
Extract the Acrobat Reader MSI file. Click Start, Run, type in “<path to download\ AcroRdrDC1801120058_en_US.exe” -sfx_o”<extractFolder> –sfx_ne and press Enter.
For example (Figure 16),
“\192.168.1.254\ISOFiles\Adobe Acrobat Read DC Installer\AcroRdrDC1801120058_en_US.exe” -sfx_o”e:\adobe” -sfx_ne
Note: There is no space in -sfx_o”e:\adobe”
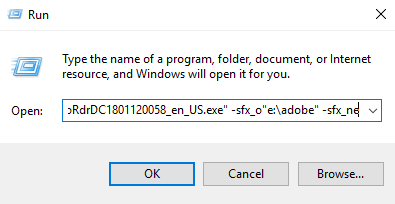
Figure 16 Note: See this Adobe link for more information. https://www.adobe.com/devnet-docs/acrobatetk/tools/Wizard/basics.html#expanding-exe-packages
Click Start, Adobe Customization Wizard DC, and Run as administrator (Figure 17).
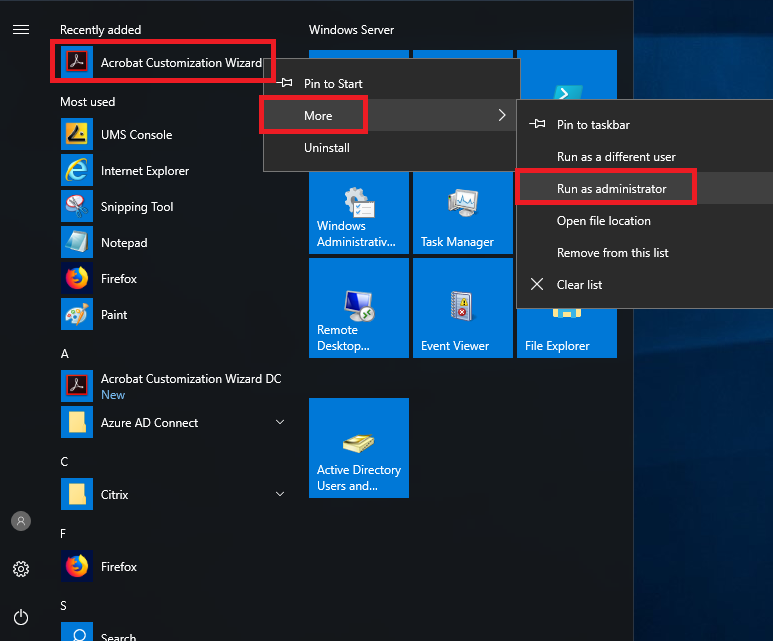
Figure 17 Click File, Open Package, type in <Path>\AcroRead.msi, and press Enter (Figure 18).
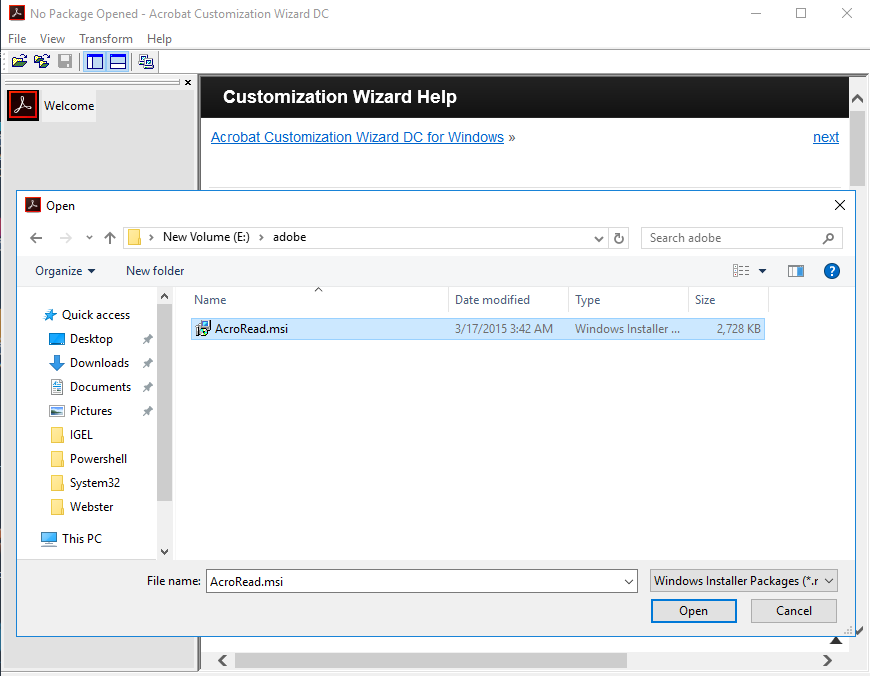
Figure 18 Click Personalization Options and select Suppress display of End User License Agreement (EULA) (Figure 19). Selecting this option will prevent the EULA Agreement page from being displayed for every user the first time Acrobat Reader runs.
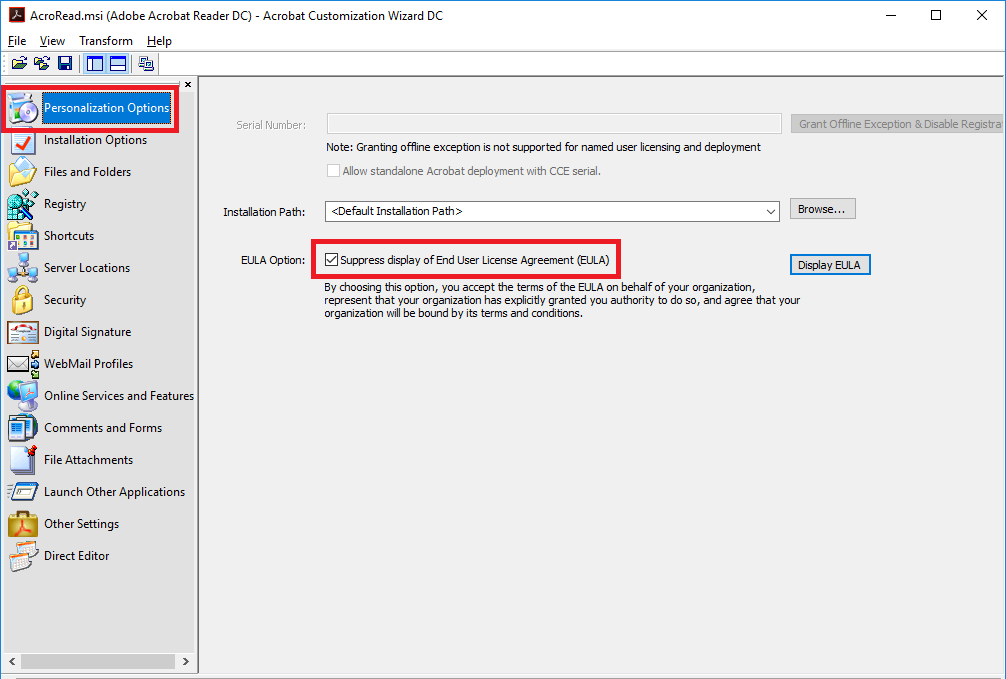
Figure 19 Click Installation Options in Figure 20. If you use both full Adobe Acrobat and Acrobat Reader, select which one will be the default. Select any other options you require. Since you will be installing a customized Acrobat Reader, you can ignore the options Run Installation and If reboot required at the end of installation.
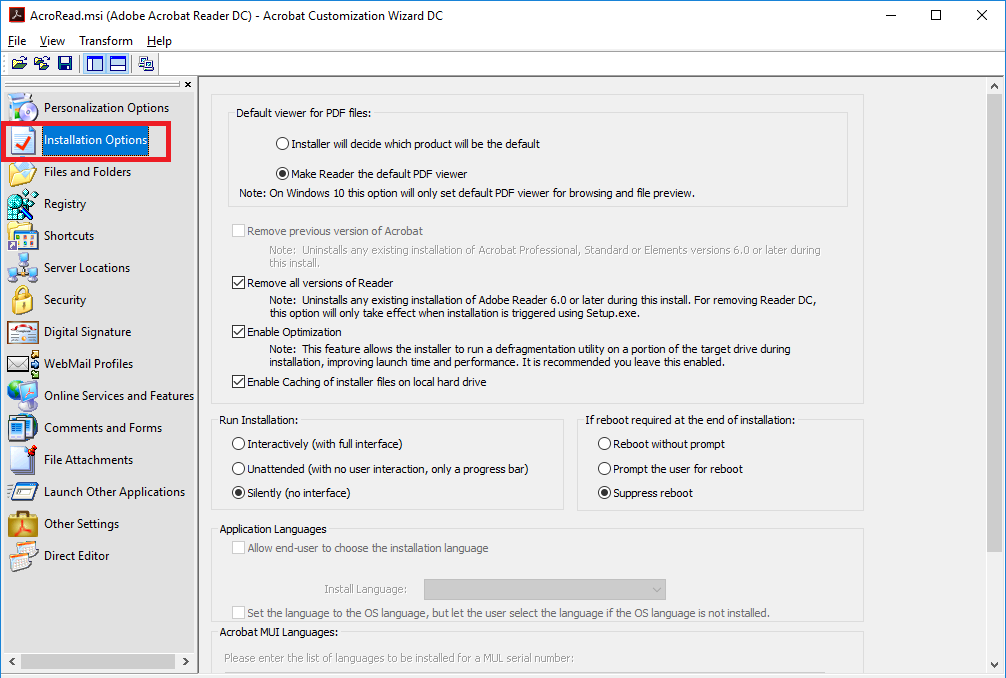
Figure 20 Click Online Services and Features (Figure 21). Select Disable product updates and Disable Upsell. Select any other options you need disabled.
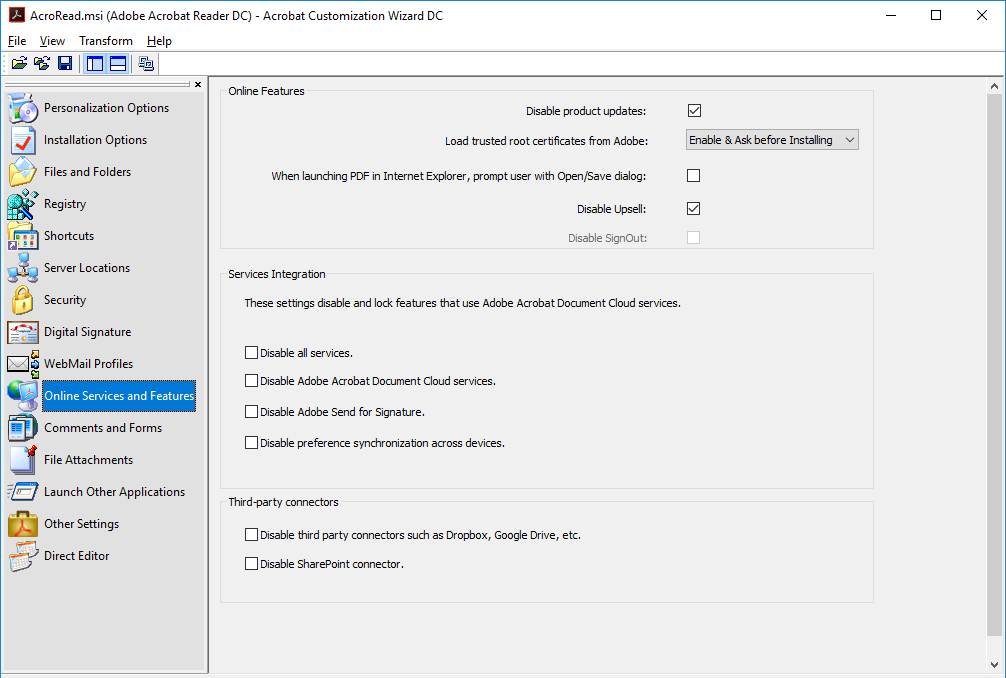
Figure 21 Click Transform, Generate Transform (Figure 22).

Figure 22 Name the Transform file and save it (Figure 23).
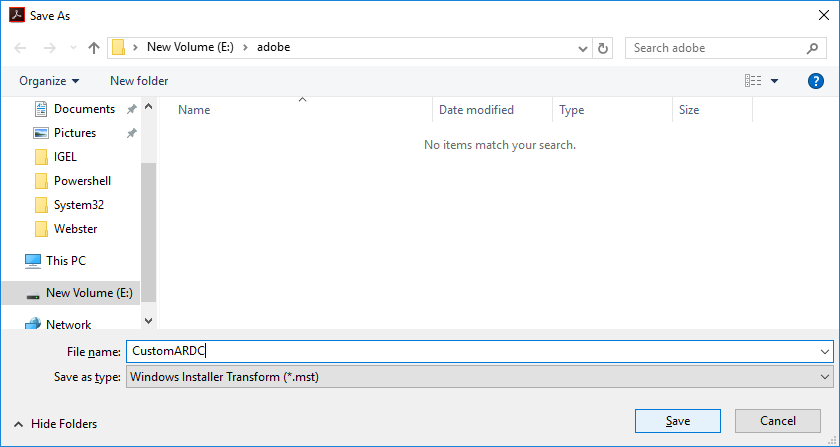
Figure 23 Note: If you get an error about access to setup.ini is denied, that means you did not start the wizard as administrator.
Exit the Adobe Customization Wizard DC program.
To install Acrobat Reader DC with your customizations:
Click Start, Run, type in msiexec /i “<path>\acroread.msi” TRANSFORMS=”<path>\CustomARDC.mst” and press Enter.
Note: TRANSFORMS must be in upper case.
Start Acrobat Reader DC and the EULA Agreement page is not displayed.
Click the Help menu, and you will see two options you do not want in a multi-user or non-persistent desktop environment: Repair Adobe Reader Installation and Online Support (Figure 24).
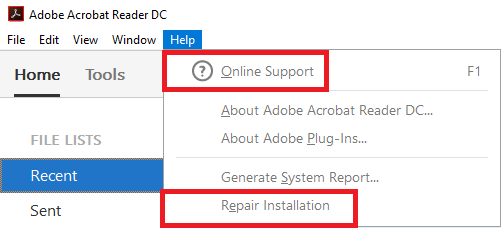
Figure 24 Note: The following information is adapted from https://stealthpuppy.com/deploying-adobe-reader-81/ and still works for Acrobat Reader DC.
There is no way to remove those options from the customization wizard or via a registry key. To remove the options, you need to create a JavaScript file and place it in the C:\Program Files (x86)\Adobe\Acrobat Reader DC\Reader\Javascripts folder.
12345//HideMenu.js//Hides Help – Repair Adobe Reader Installationapp.hideMenuItem(“DetectAndRepair”);//Help – Online Supportapp.hideMenuItem(“OnlineSupport”);When Acrobat Reader starts, it may take a few seconds for the JavaScript file to remove the Help menu items (Figure 25).

Figure 25 Many menu items can be removed using the JavaScript file. See the link “JavaScript to Hide Menu Items” at https://stealthpuppy.com/deploying-adobe-reader-81/.
You have now successfully customized your Acrobat Reader DC to work better in a virtualized application, desktop, and server environment.
UPDATE 1
Thanks to Citrix Technology Advocate DJ Eshelman, I realized I forgot to add that Adobe now has Group Policy ADM/ADMX files available.
Back in Figures 13 and 14, where you downloaded the Adobe Customization Wizard, there is a file that contains the Group Policy files (Figure 26).
Click on AcrobatADMTemplate.zip and save the file to a central location.

Figure 26 Extract the files (Figure 27).

Figure 27 Copy the required file(s) to where you store ADM or ADMX/ADML files. Create a Group Policy and you can see the settings that Adobe makes available as shown in Figures 28 through 32.
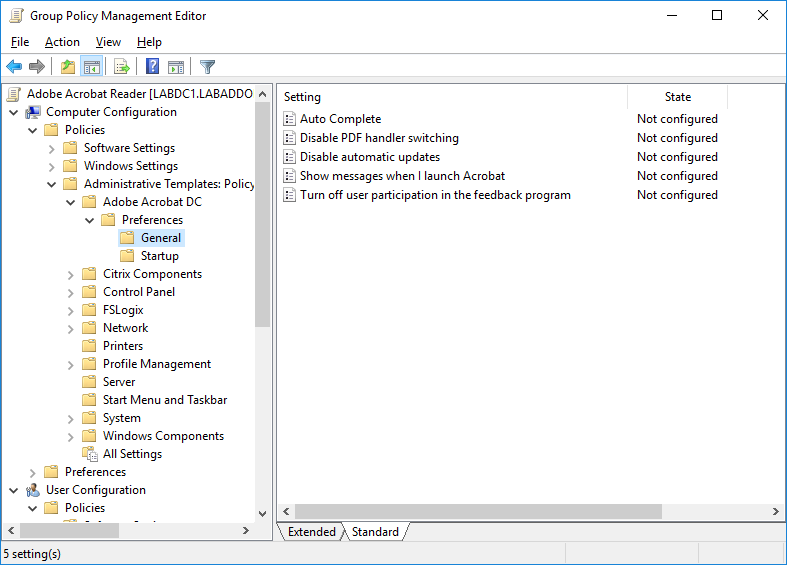
Figure 28 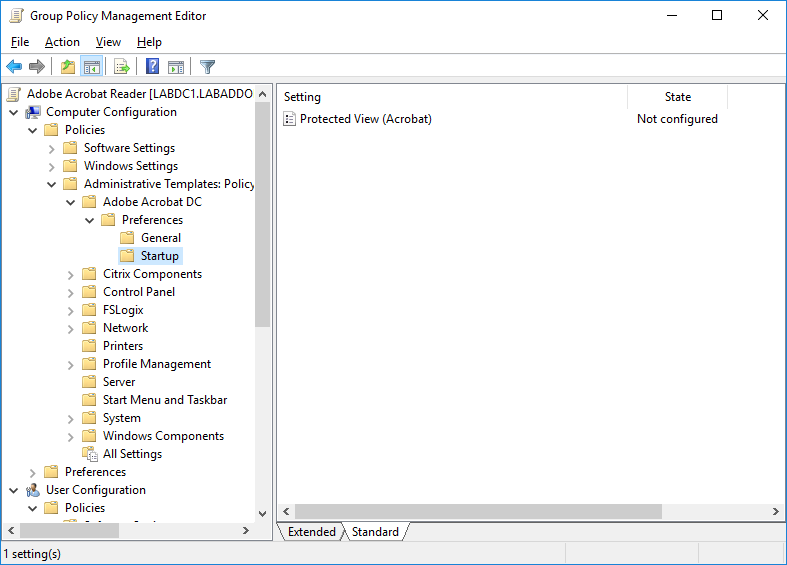
Figure 29 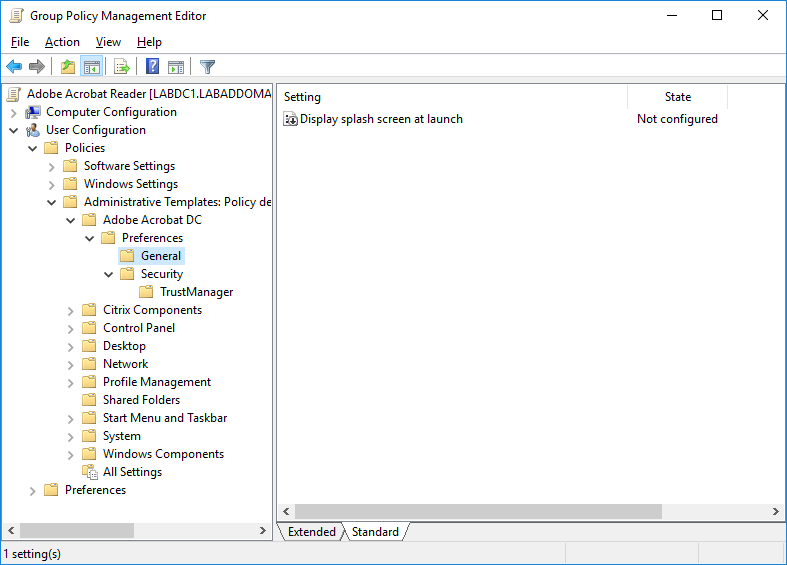
Figure 30 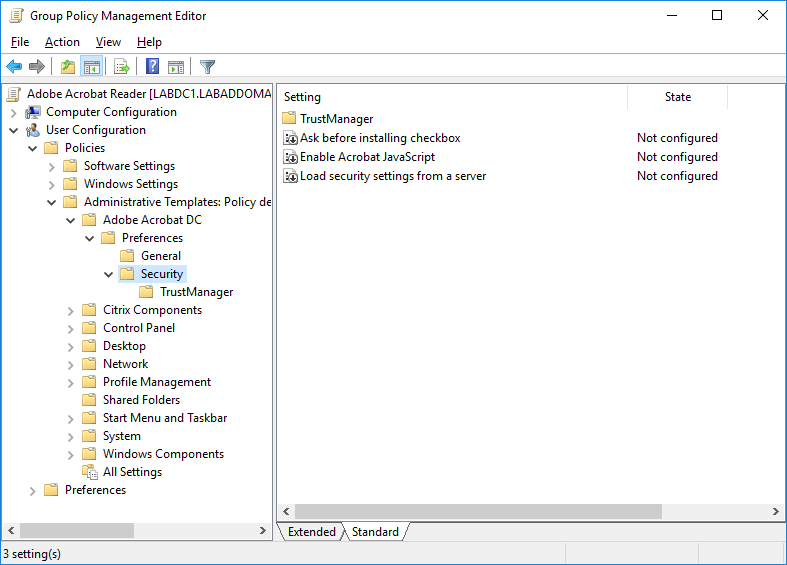
Figure 31 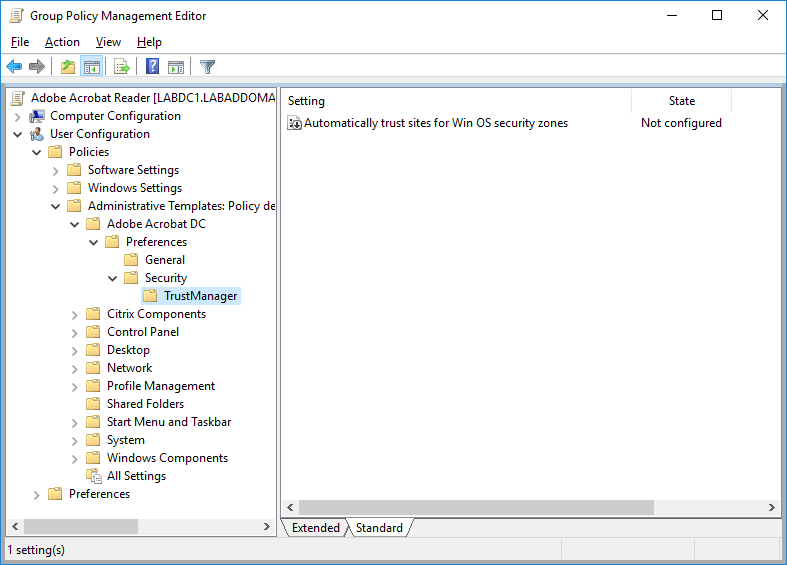
Figure 32 Update 2
This update comes from Microsoft Exchange MVP (and a personal friend and mentor) Michael B. Smith.
I found the transform unnecessary. This is just another way.
AcroRdrDC1801120058_en_US.exe /sAll /rs /msi /q DISABLE_DISTILLER=YES DISABLE_ASIAN_FONTS=YES EULA_ACCEPT=YES OWNERSHIP_STATE=2 DISABLE_PDFMAKER=YES DISABLEDESKTOPSHORTCUT=0 UPDATE_MODE=3
For all the cmd line options: https://www.adobe.com/devnet-docs/acrobatetk/tools/AdminGuide/properties.html#command-line-example
Update 3
This update comes from CTA Carl Behrent.
Carl recommends setting the Adobe IPM (In Product Management) (Figure 33) registry keys via a Group Policy Preference (GPP).
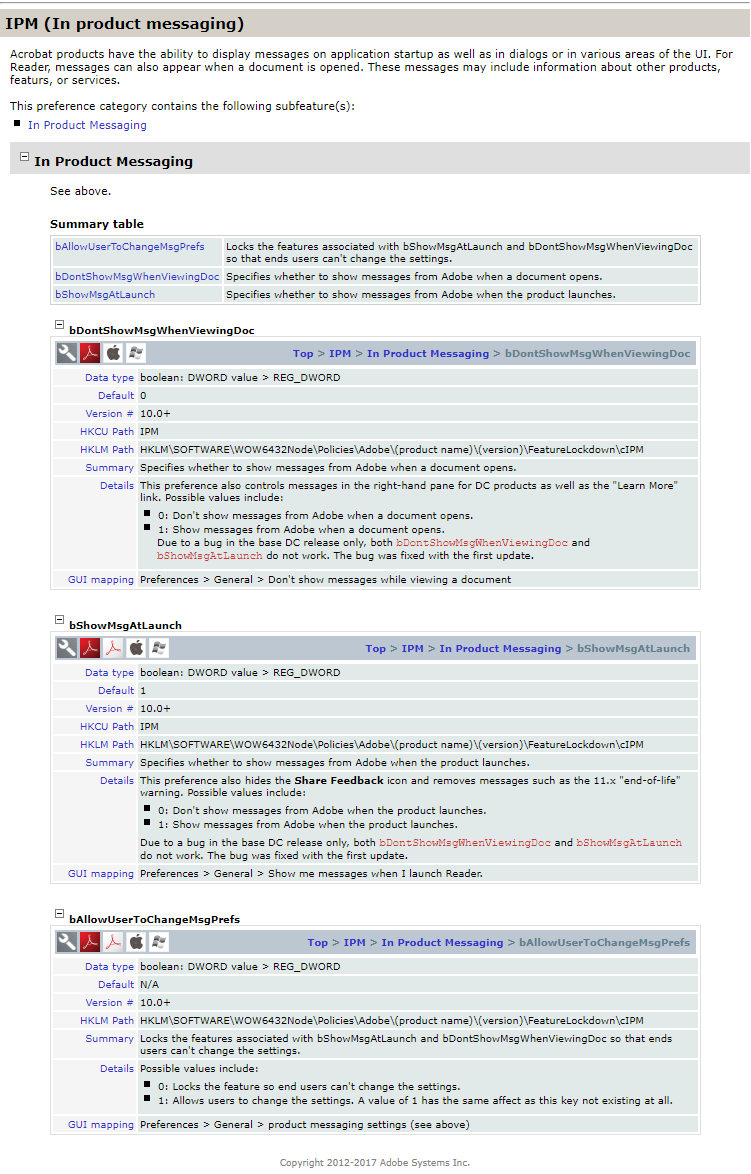
Figure 33 You can set these via a GPP, or, you set these in your master image’s registry and update your transform file. Before we update the transform file, there is one other registry setting to make.
Even though back in Figure 21 we disabled product updates, there is still one setting for updates that is set to Automatically download and install updates (Figure 34)!
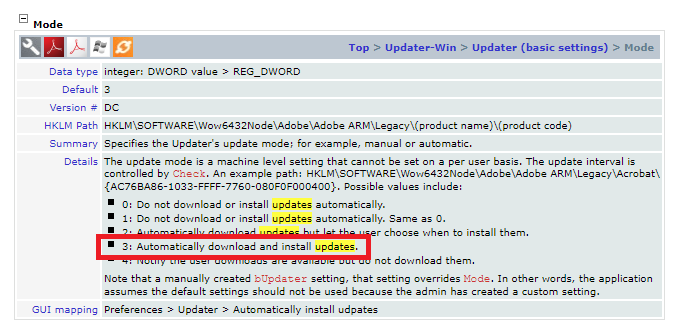
Figure 34 Sure enough, after installing Adobe Acrobat Read DC using the customized transform file with product updates disabled, this registry key is still set to Automatically download and install updates (Figure35).

Figure 35 You can either set that value to 0 in a GPP or set it in your master image and update your transform file.
If you want to update your master image and then update the transform file, make the necessary changes in the master image’s registry, start the Adobe Customization Wizard, open the MSI file, and then load your customized transform file.
Click on Registry (Figure 36).
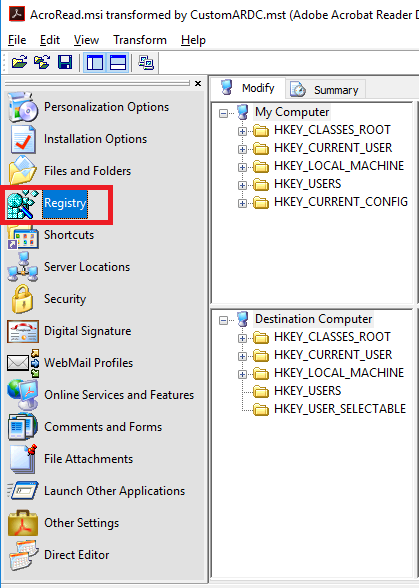
Figure 36 Expand HKLM/SOFTWARE/WOW6432Node/Adobe/Adobe ARM/Legacy/Reader/{GUID}
Click on the Mode value and drag and drop it into the Destination Computer window into HKLM/Software/Adobe/Adobe ARM/Legacy/Reader/[ProductCode] (Figure 37).
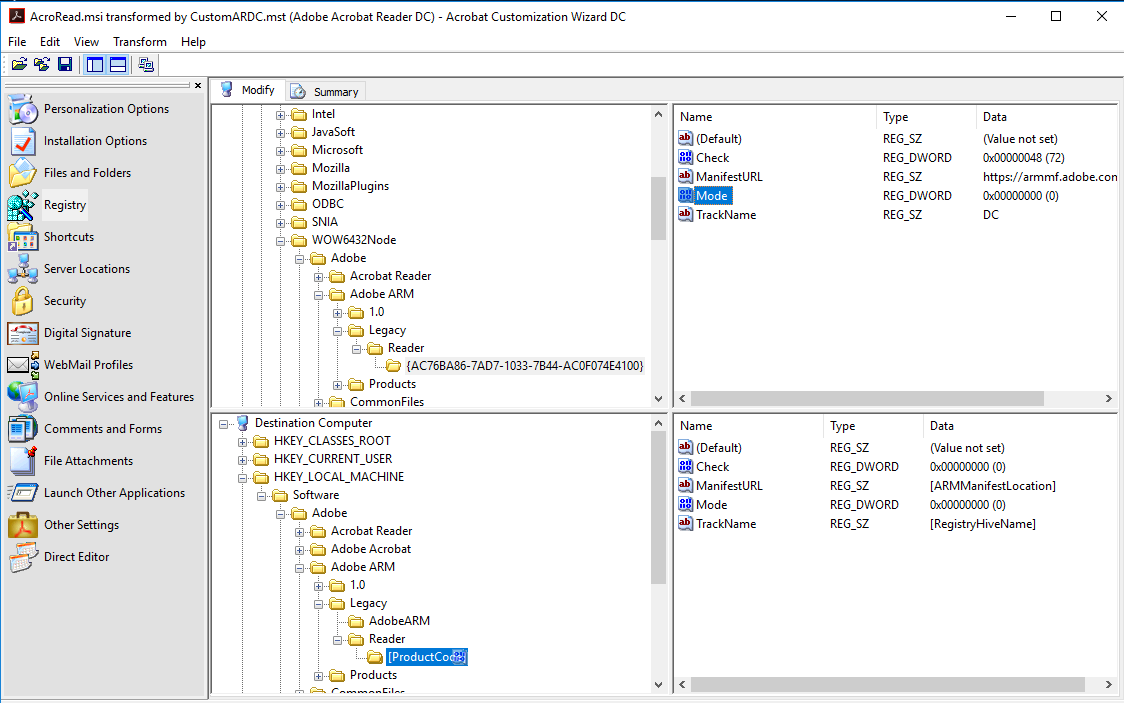
Figure 37 Even after all these changes, we are still not done. Adobe keeps the Adobe Acrobat Update Service set to Automatically start (Figure 38).

Figure 38 Again, this is something you can fix with a GPP or Stop and Disable the service in your master image.
After you make all the changes Carl Behrent recommends, you should be able to rest better knowing your users should not see any Adobe messages, and updates to Adobe Reader DC should not happen.
In this article, you learned to:
- sign up to distribute the free Adobe Acrobat Reader version DC
- download the distributable file
- download the Adobe Customization Wizard
- extract the Acrobat Reader MSI file
- customize the MSI file
- install the customized file on your master image
- remove additional menu items using JavaScript
Thanks
Webster
7 Responses to “Learning to Install Adobe Acrobat Reader DC”


October 3, 2019 at 7:19 pm
Hi
I followed this papear step by step for VDI master image, but when I start adobe for first time I have to accept de License agreement.
I´m already setup mst file for s uppress display of End User License Agreement (EULA), any suggestion?
Best Regards
October 4, 2019 at 6:23 am
I’ve not had that issue. Have you tried using what Michael B. Smith suggests in Update 2?
You can also set the regkey via a GPP or your preferred registry update product.
User registry\AdobeViewer
Key: Software\Adobe\Adobe Acrobat\
Type: REG_DWORD
Value: EULAAcceptedForBrowser
Data: 1
Computer registry\Adobe\Viewer
Hive: HKEY_LOCAL_MACHINE
Key: Software\Adobe\Adobe Acrobat\
Type: REG_DWORD
Value: EULAAcceptedForBrowser
Data: 1
Hive: HKEY_LOCAL_MACHINE\Adobe\Viewer
Key: Software\Wow6432Node\Adobe\Adobe Acrobat\
Type: REG_DWORD
Value: EULAAcceptedForBrowser
Data: 1
Webster
August 26, 2019 at 9:29 am
Hi Carl,
Customization Wizard saves MST file as AcroRead.mst in same folder as MSI file.
If you run setup.exe, instead of AcroRead.msi, you don’t need to specify any transformation options.
if you want apply latest patch at installation time, you need to copy patch file (for example AcroRdrDCUpd1901220040.msp) into Acroread.msi folder and change/edit the setup.ini file as well
Thanks,
David
May 20, 2019 at 8:59 am
this is not working for me. I have to continuously change it. I don’t understand why it’s not working. Can you please help? Thanks.
May 27, 2019 at 7:32 am
You don’t provide enough information for me to help you.
Webster
November 21, 2018 at 7:36 pm
I am creating a transform for DC 19 19.008.20071.
I would like to suppress the “Repair Installation” and “Online Support” .
I followed the instructions you included above. The HideMenu.js file does not seem to suppress these menu items. Could the items have different names in the new version?
hideMenuItem(“DetectAndRepair”)
hideMenuItem(“OnlineSupport”)
Any guidence would be appreciated.
Thank you,
Pete Brown
November 27, 2018 at 12:41 pm
They appear to be the same name in my Adobe Acrobat DC.
[cName:DetectAndRepair]
[cName:OnlineSupport]
I no longer have my testing VM for this article so I can’t verify this right now.
If you are on Twitter, you may want to reach out to fellow CTP Aaron Parker @StealthPuppy.
Webster