-
19 Building Webster’s Lab V2 – Create Additional Servers
[Updated 8-Nov-2021]
With the base of the Vmware infrastructure, Active Directory (AD), Certification Authority (CA), and Group Policy (GPO) built, the next step is to create additional server VMs from the Server 2019 template. We use the VMs built in this article for additional Microsoft infrastructure servers. My lab’s infrastructure VMs reside in my XenServer pool, as explained in the Introduction article. Building a server VM from the Server 2019 template was covered earlier.
From the introduction article, these are the VMs we are building.
Name Description IP Address LabFS File Server 192.168.1.204 LabSQL SQL Server 192.168.1.205 Follow the earlier process to build the two servers above, but do not power on the servers. Before we power on the new servers, we need an additional hard drive on each server. For LabFS, that drive is for shared files and folders and LabSQL, SQL databases.
Follow these steps to add the second drive.
VMware
In vCenter, right-click a VM and click Edit Settings…, as shown in Figure 1.
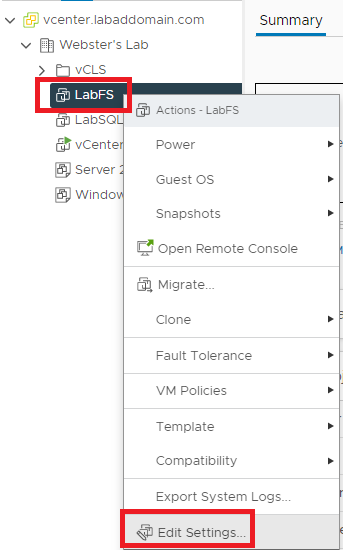
Figure 1 Click ADD NEW DEVICE and click Hard Disk, as shown in Figure 2.
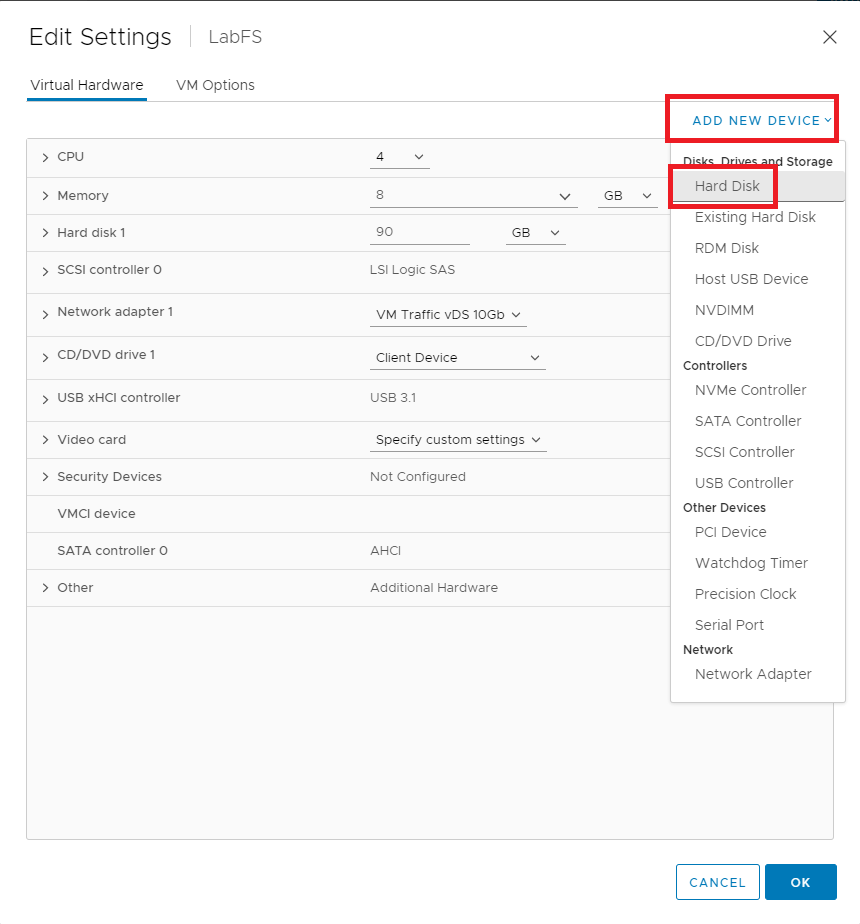
Figure 2 For New Hard disk*, enter 100 for the size in GB and click OK, as shown in Figure 3.
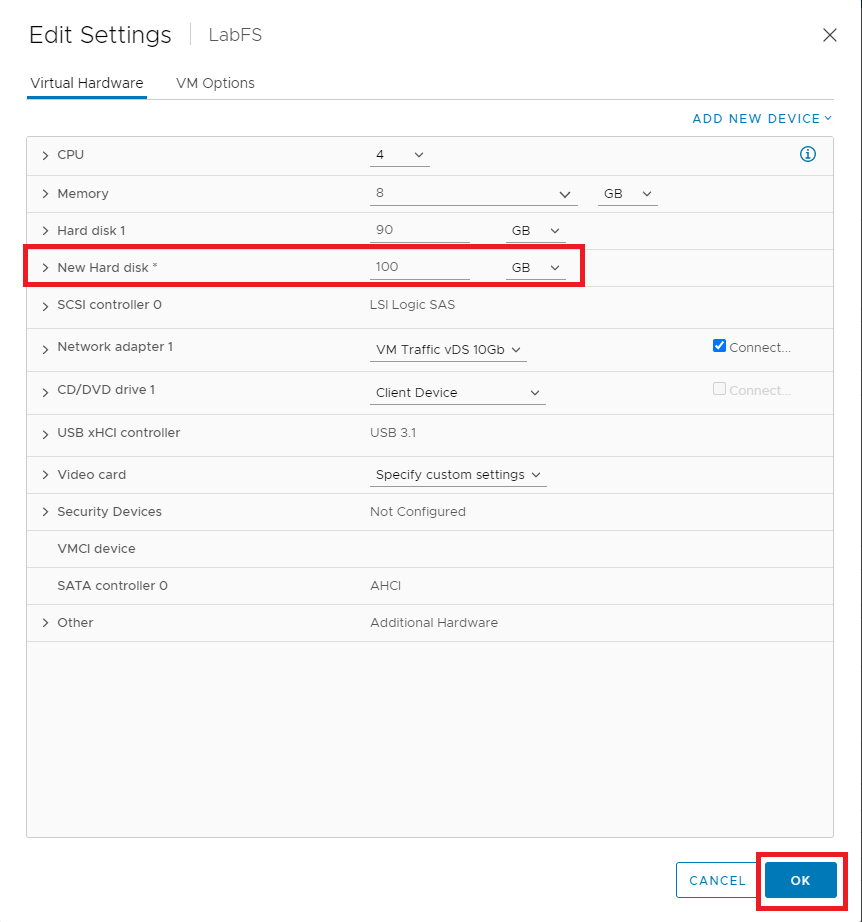
Figure 3 Expand VM Hardware and see both hard disks, as shown in Figure 4.
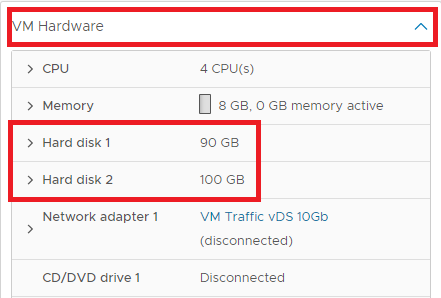
Figure 4 Repeat for the other server.
Power on both VMs.
XenServer
In XenCenter, select a VM in the left pane and click the Storage tab in the right pane, as shown in Figure 5.
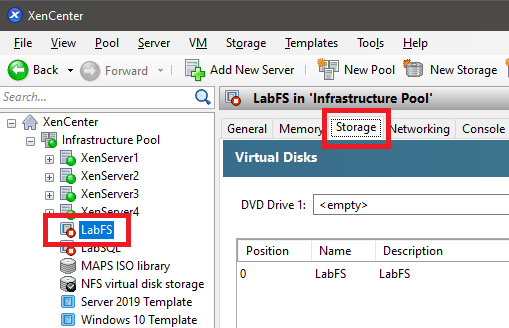
Figure 5 Click Add, as shown in Figure 6.
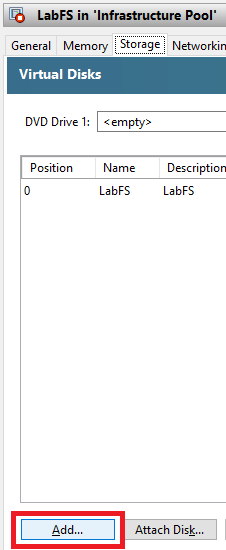
Figure 6 Enter a Name, Description, type 100 for the Size, and click Add, as shown in Figure 7.
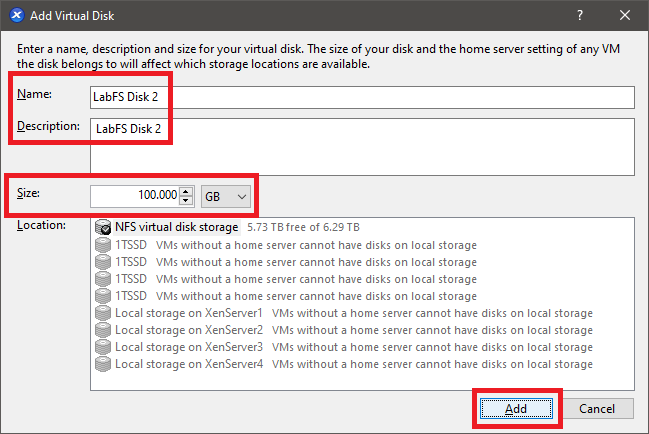
Figure 7 XenCenter shows both hard disks, as shown in Figure 8.

Figure 8 Repeat for the other server.
Power on both VMs.
File Server (LabFS)
The first thing we need to do is join our File Server to the domain.
If you remember, when we created Active Directory in Part 14, I placed all my Microsoft infrastructure servers in a specific OU.
Lab
Infrastructure
Microsoft
Open a PowerShell session and type in the following from one of the domain controllers, as shown in Figure 9.
1Get-ADOrganizationalUnit-filter{Name-eq"Microsoft"}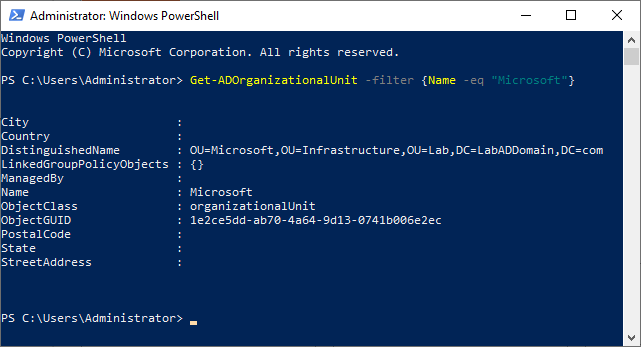
Figure 9 Copy the DistinguishedName property to the clipboard.
We use PowerShell to install and configure the File Server.
Use mstsc to remote into the VM that is our File Server.
Exit Server Manager and start an elevated PowerShell session, as shown in Figure 10.
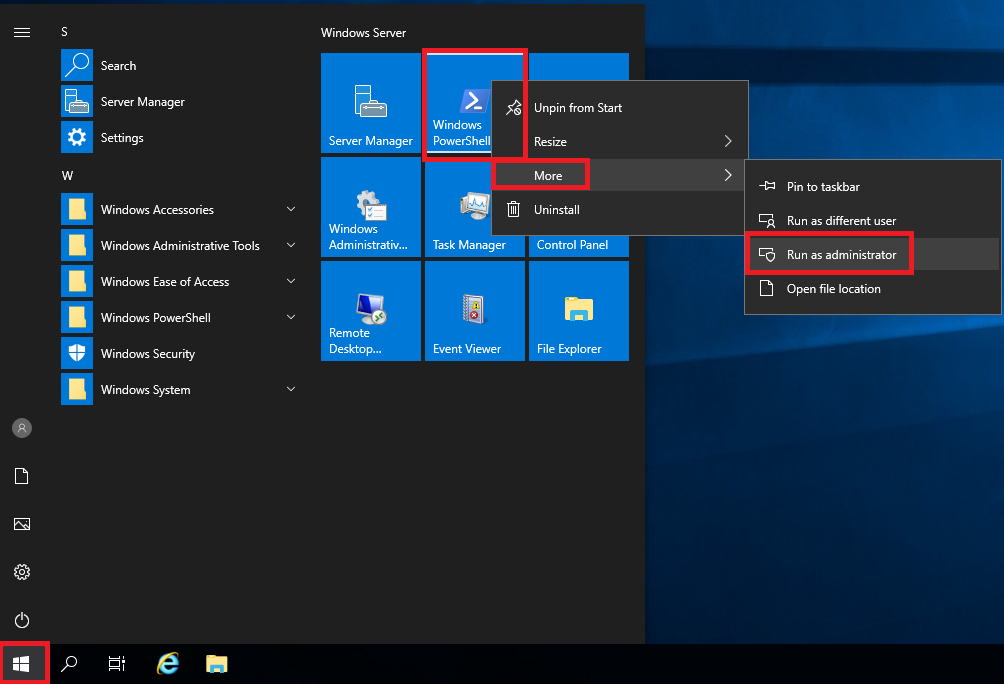
Figure 10 Copy and paste the following into the elevated PowerShell session and press Enter. The process took less than the blink of an eye to happen, which is why there is no screenshot.
Remember to set the values you need.
Note: Lines may wrap
123456789#Join the computer to the domain</strong>add-computer-CredentialLabADDomain\Administrator `-DomainName"LabADDomain.com"`-OUPath"OU=Microsoft,OU=Infrastructure,OU=Lab,DC=LabADDomain,DC=com"`-Force`-Restart#server rebootsAfter the VM restarts, log in using the domain’s Administrator account and password.
Right-click the Start menu and click Disk Management, as shown in Figure 11.
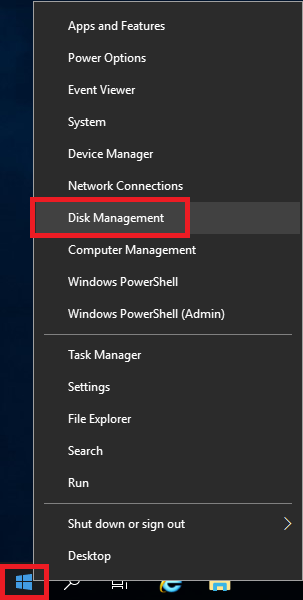
Figure 11 Select MBR (Master Boot Record) and click OK, as shown in Figure 12.
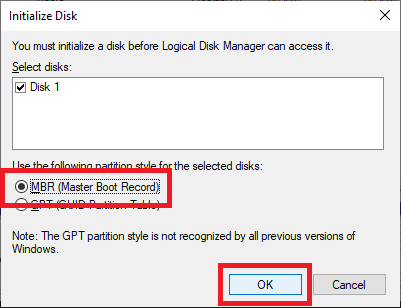
Figure 12 Right-click the 100GB Unallocated drive and click New Simple Volume…, as shown in Figure 13.
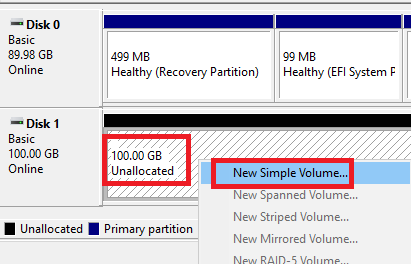
Figure 13 Click Next, as shown in Figure 14.
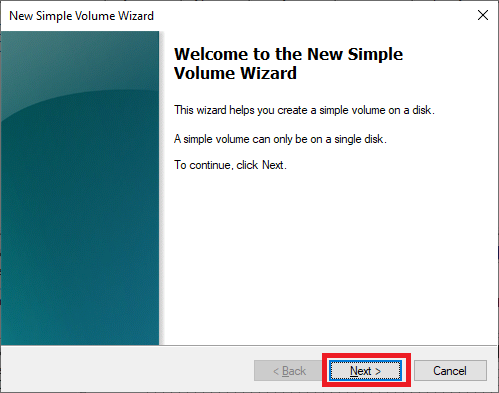
Figure 14 Click Next, as shown in Figure 15.
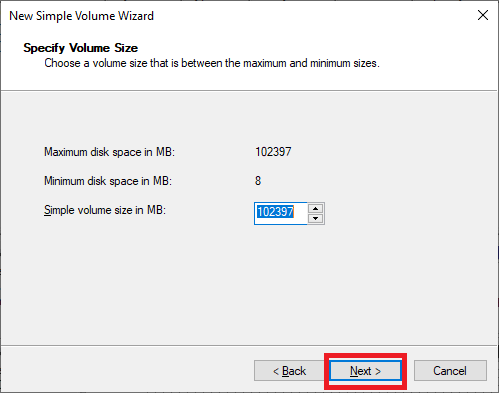
Figure 15 Select the drive letter to use and click Next, as shown in Figure 16.
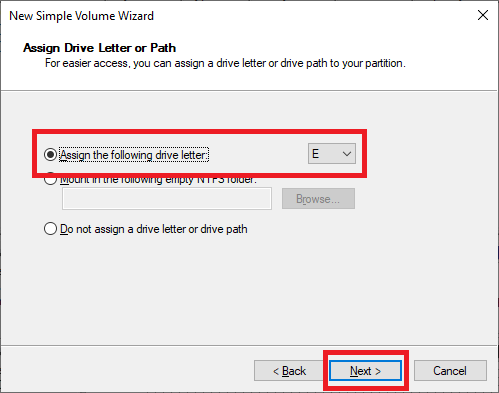
Figure 16 Type in a meaningful Volume label and click Next, as shown in Figure 17.
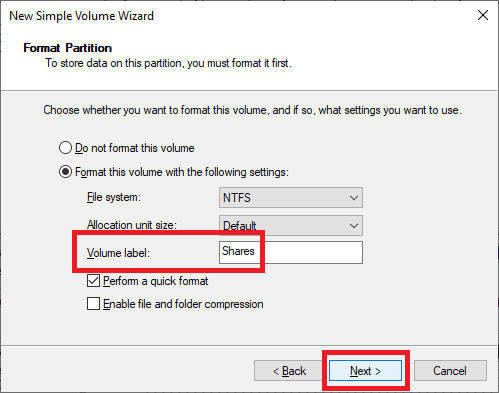
Figure 17 Click Finish, as shown in Figure 18.
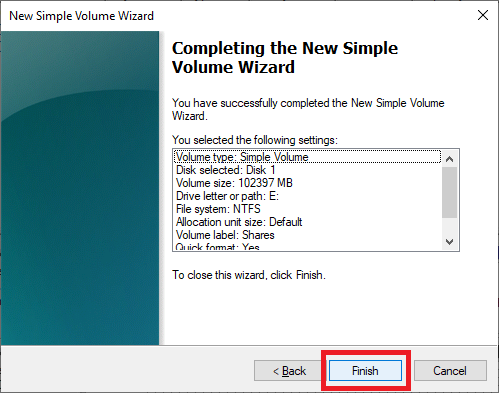
Figure 18 In a few seconds, Disk Management shows the new drive, as shown in Figure 19.
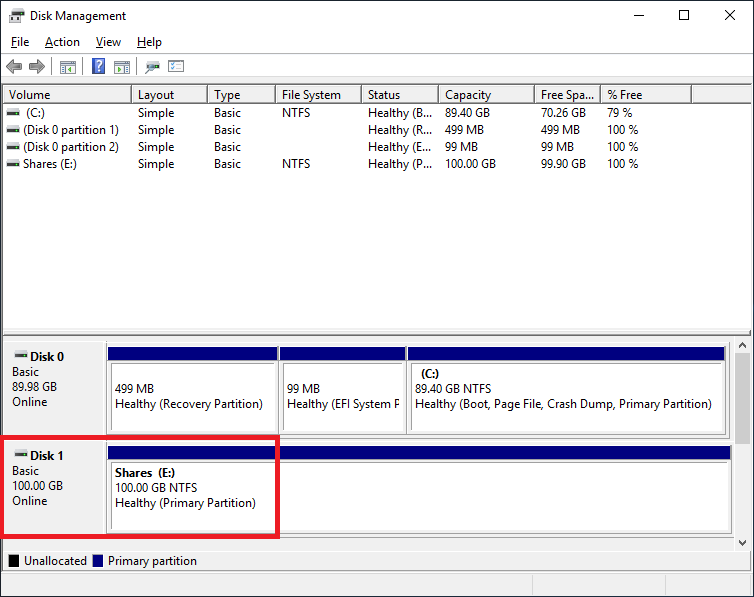
Figure 19 Now to install the server certificate from the CA.
Save the following to a file name c:\CertFiles\computer-request.inf.
I want to thank Michael B. Smith for creating this INF file for me.
Use the data needed for your environment.
123LabFS = the name of your File ServerLabADDomain.com = your domain name"LabCA\LabDomain CA Root" = the name of your CA server and the name of your CA.12345678910111213141516171819202122232425262728293031323334353637383940414243;----------------- computer-request.inf -----------------; LabFS.LabADDomain.com;; certreq -new computer-request.inf computer-request.req; certreq -submit -config "LabCA\LabDomain CA Root" computer-request.req computer-request.cer; certreq -accept -config "LabCA\LabDomain CA Root" computer-request.cer;[Version]Signature = "$Windows NT$"[NewRequest]Subject = "CN=LabFS.LabADDomain.com" ; replace with the FQDN of the File ServerFriendlyName = "Computer (Machine) for LabFS.LabADDomain.com"KeyLength = 2048; Can be 1024, 2048, 4096, 8192, or 16384.; Larger key sizes are more secure but have a greater impact on performance.KeySpec = 1 ; AT_KEYEXCHANGEExportable = TRUE ; private-key is exportableMachineKeySet = TRUE ; goes in machine store instead of user's personal storeSMIME = False ; cannot be used for signing S/MIME messagesPrivateKeyArchive = FALSEHashAlgorithm = sha256 ; "certutil -oid 1 | findstr pwszName" -- gives a list (including sha1)UserProtected = FALSEUseExistingKeySet = FALSE ; we are not renewing a key that already existsProviderName = "Microsoft RSA SChannel Cryptographic Provider"ProviderType = 12 ; for ProviderName and ProviderType, see "certutil -csplist"RequestType = PKCS10 ; if empty or set to "CERT" then a self-signed cert is createdKeyUsage = 0xa0 ; 0xa0 - CERT_DIGITAL_SIGNATURE_KEY_USAGE + CERT_KEY_ENCIPHERMENT_KEY_USAGE[EnhancedKeyUsageExtension]OID=1.3.6.1.5.5.7.3.1 ; this is for Server Authentication - PKIX_KP_SERVER_AUTH[Extensions]; Note: 2.5.29.17 is the OID for a SAN extension.2.5.29.17 = "{text}"_continue_ = "dns=LabFS.LabADDomain.com"[RequestAttributes]CertificateTemplate = "Server Template";-----------------------------------------------Open an elevated command prompt.
Type in cd c:\CertFiles and press Enter.
The three commands we need to run are at the top of the computer-request.inf file.
Type in notepad computer-request.inf and press Enter.
Copy the line certreq -new computer-request.inf computer-request.req, paste it in the elevated command prompt, and press Enter.
Copy the line certreq -submit -config “LabCA\LabDomain CA Root” computer-request.req computer-request.cer, paste it in the elevated command prompt, and press Enter.
Note: If you get a warning similar to the following, you can ignore the warning. The warning tells you that the certificate request validity period is past the lifetime of the CA’s root certificate lifespan.
Certificate retrieved(Issued)Issued The certificate validity period will be shorter than the Server Template Certificate Template specifies because the template validity period is longer than the maximum certificate validity period allowed by the CA. Consider renewing the CA certificate, reducing the template validity period, or increasing the registry validity period.
Copy the line certreq -accept -config “LabCA\LabDomain CA Root” computer-request.cer, paste it in the elevated command prompt, and press Enter.
Figure 20 shows the results of running the certificate request commands.
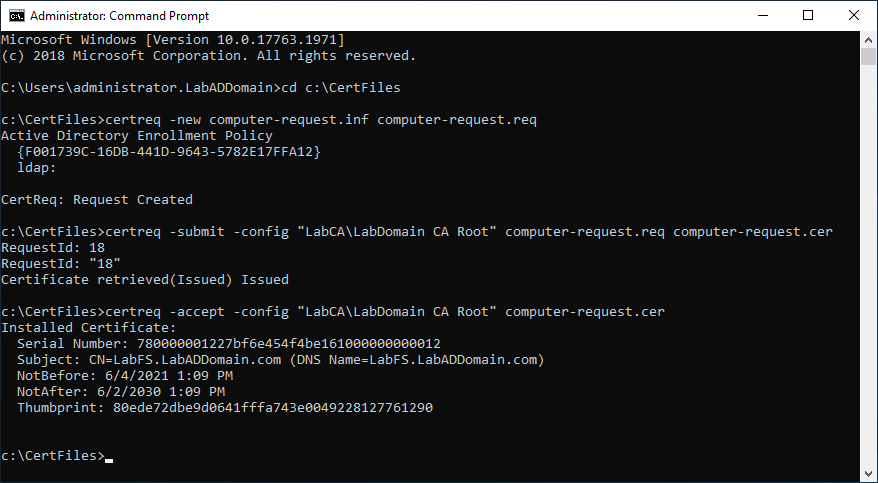
Figure 20 There is nothing else to do with the File Server VM at this point in this article series.
SQL Server (LabSQL)
Follow the same steps as the File Server to join the domain and provision the 100GB hard disk.
There are several pieces of information needed before installing Microsoft SQL Server.
- Applications used in the lab
- What versions of Microsoft SQL Server do the applications support?
- Do the applications require any unique configuration in SQL Server?
In my lab, the products that use Microsoft SQL Server are Citrix Virtual Apps and Desktops (CVAD), Citrix Provisioning Services (PVS), and VMware Horizon. Both vendors provide documentation on the supported version of SQL Server.
Note: Parallels uses SQL Server for Parallels RAS Reporting, which I don’t use in the lab.
Supported Databases for Citrix Virtual Apps and Desktops and Provisioning Services
VMware Product Interoperability Matrix
In my lab, I run the latest version of each product.
- CVAD 2103
- PVS 2012
- VMware Horizon 8 2106
Using the links above, we can see that the current version of SQL Server supported is 2019.
Note: Starting with CVAD 2003, Citrix removed support for versions of SQL Server before SQL Server 2016. That leaves three versions of SQL Server supported: 2016, 2017, and 2019.
Figure 21 shows CVAD and PVS.

Figure 21 Figure 22 shows VMware Horizon 8 2106. Unfortunately, the VMware Product Interoperability Matrix does not allow you to select “Microsoft SQL Server”, nor does it allow you to sort the results. Yes, I left feedback on these shortcomings. Since I initially published this article, VMware added the capability to select a specific database version. I selected SQL Server 2019 Standard.
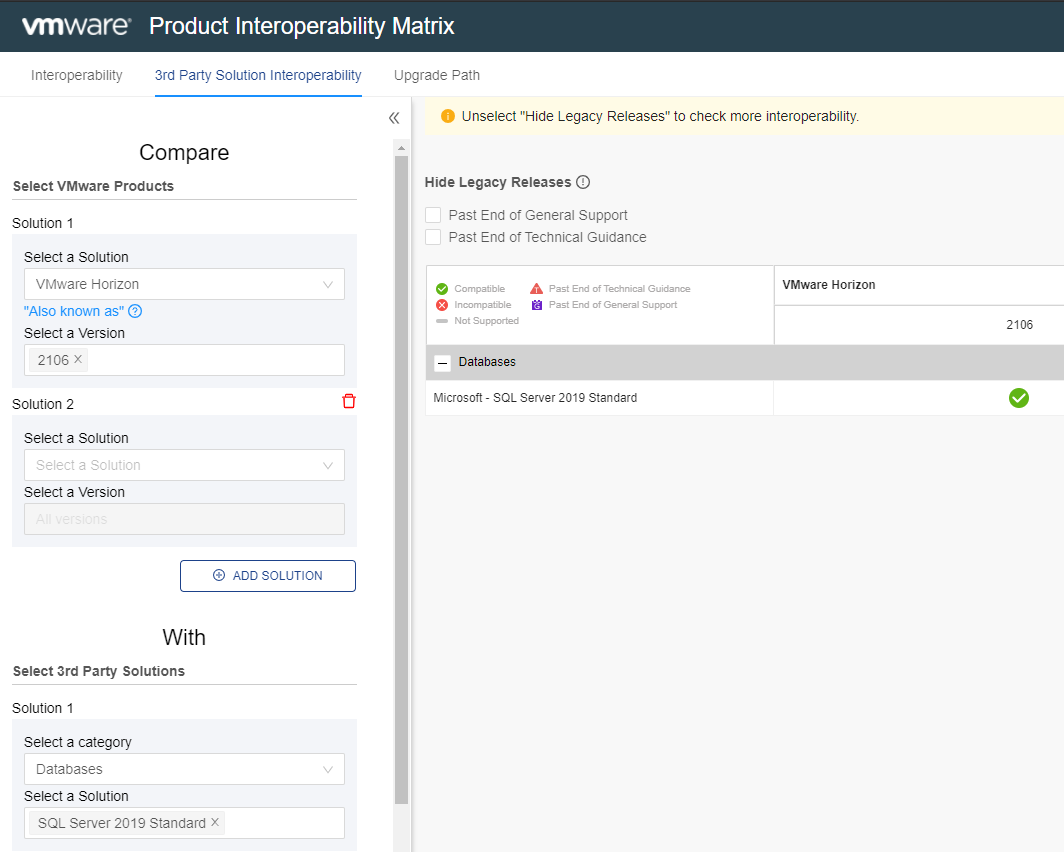
Figure 22 From both images, all the products support SQL Server 2019. Now, are there any particular configuration options required?
CVAD from https://docs.citrix.com/en-us/citrix-virtual-apps-desktops/technical-overview/databases.html:
Windows authentication is required for connections between the Controller and the SQL Server site database.
Each database must have the following characteristics:
- Use a collation that ends with _CI_AS_KS. Citrix recommends using a collation that ends with _100_CI_AS_KS.
- For optimum performance, enable the SQL Server Read-Committed Snapshot. For details, see CTX 137161.
PVS from https://docs.citrix.com/en-us/provisioning/current-release/system-requirements.html:
When configuring databases for provisioning, consider that no preference exists for any specific SQL collation. Collation supports the standard method recommended by Citrix Virtual Apps and Desktops when using the configuration wizard. The administrator creates the database with a collation that ends with _CI_AS_KS. Citrix recommends using a collation that ends with _100_CI_AS_KS.
VMware Horizon from https://docs.vmware.com/en/VMware-Horizon/2103/horizon-installation.pdf:
Prepare an SQL Server Database for Event Reporting in Horizon Console
Before you can use Horizon Console to configure an event database on Microsoft SQL Server, you must configure the correct TCP/IP properties and verify that the server uses SQL Server Authentication.
Prerequisites
- Create an SQL Server database for event reporting. See Add a Database and Database User for VMware Horizon Events in Horizon Console.
- Verify that you have the required database privileges to configure the database.
- Verify that the database server uses the SQL Server Authentication method of authentication. Do not use Windows Authentication.
From these requirements, we know the following.
- SQL Server must use both SQL Server and Windows Authentication
- Enable SQL Server Read-Committed Snapshots
- When creating a database for CVAD or PVS, make sure the database uses a collation that ends with _100_CI_AS_KS
Install Microsoft SQL Server 2019
Evaluation SQL Server 2019
You can download a 180-day evaluation copy of Microsoft SQL Server 2019 from the Microsoft Evaluation Center.
Copy the SQL2019-SSEI-Eval.exe file to the LabSQL server in C:\SQL2019.
Right-click SQL2019-SSEI-Eval.exe and click Run as administrator, as shown in Figure 23.
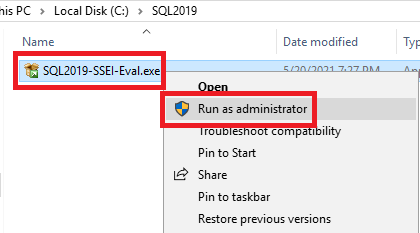
Figure 23 Click Download Media, as shown in Figure 24.
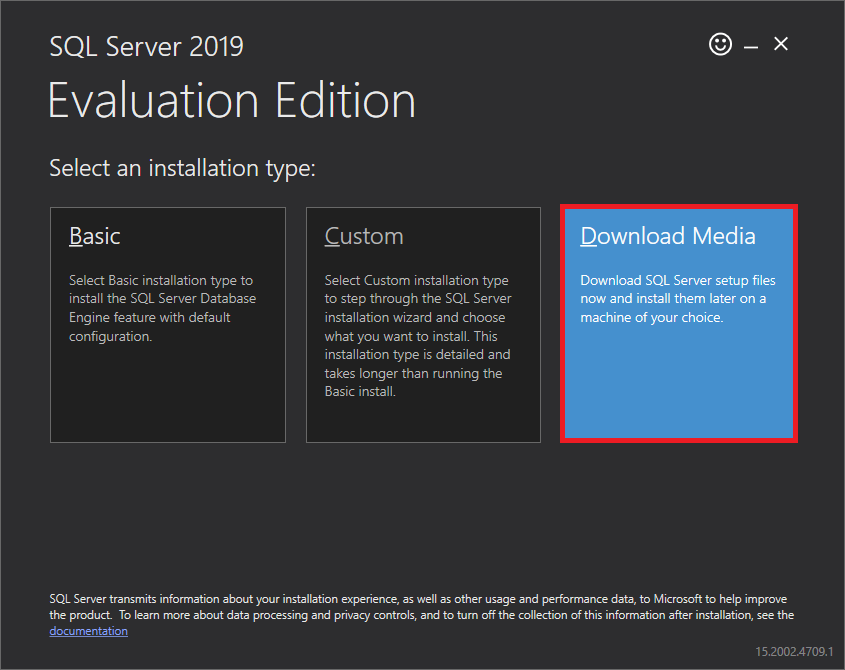
Figure 24 Select ISO, type in C:\SQL2019 for SELECT DOWNLOAD LOCATION, and click Download, as shown in Figure 25.
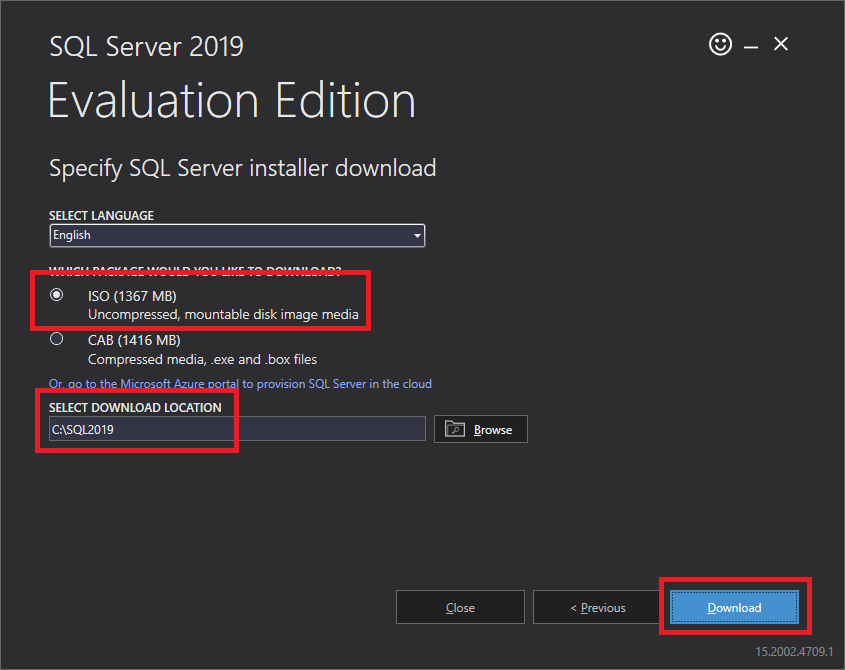
Figure 25 After the download completes, click Open folder, as shown in Figure 26.
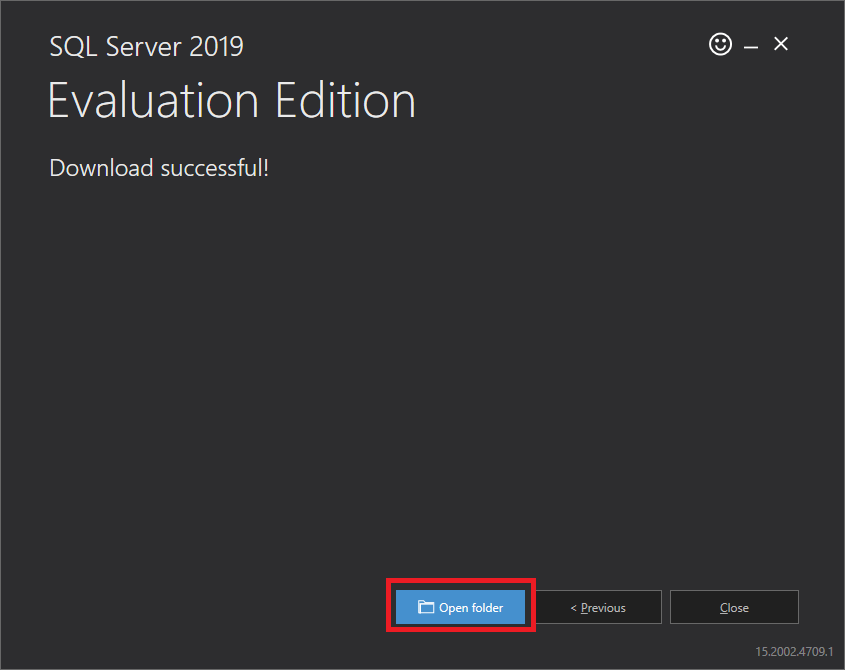
Figure 26 Right-click the ISO file and click Mount, as shown in Figure 27.
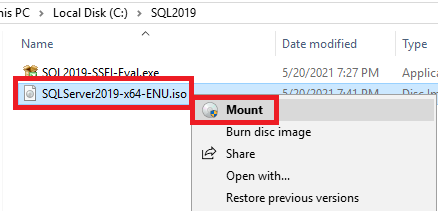
Figure 27 Right-click setup.exe and click Run as administrator, as shown in Figure 28.
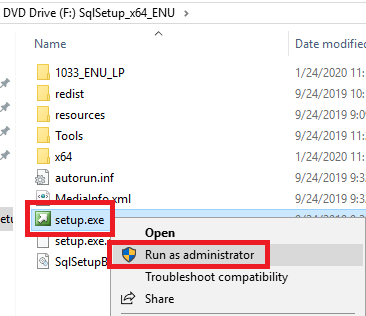
Figure 28 In the left pane, click Installation and in the right pane, click New SQL Server stand-alone installation or add features to an existing installation, as shown in Figure 29.
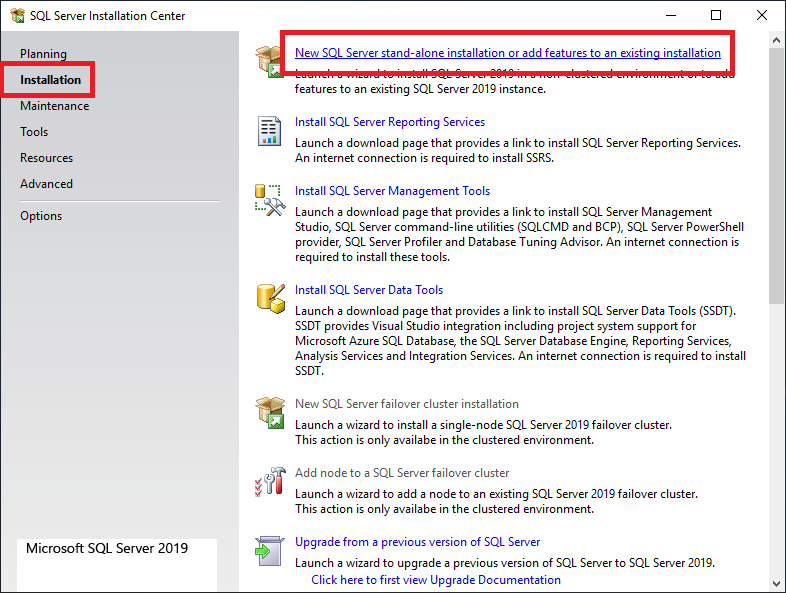
Figure 29 Click Next, as shown in Figure 30.
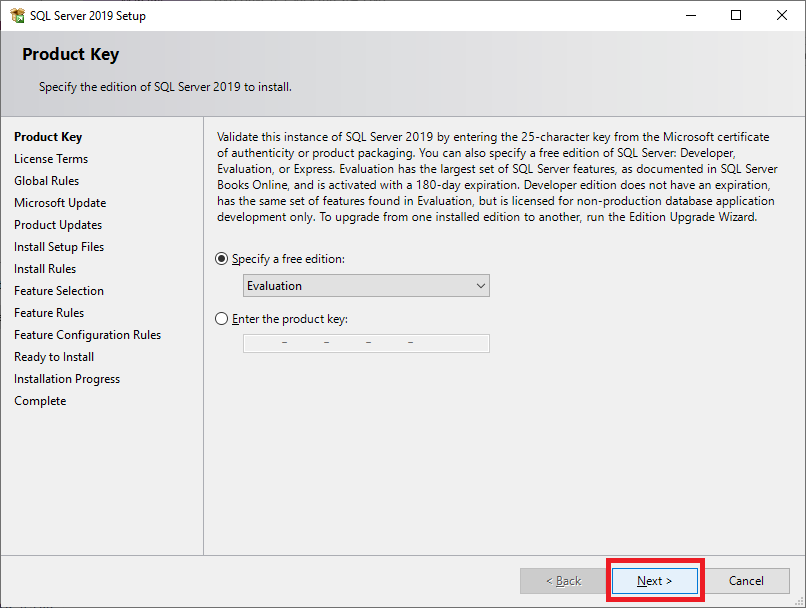
Figure 30 Select I accept the license terms and and click Next, as shown in Figure 31.
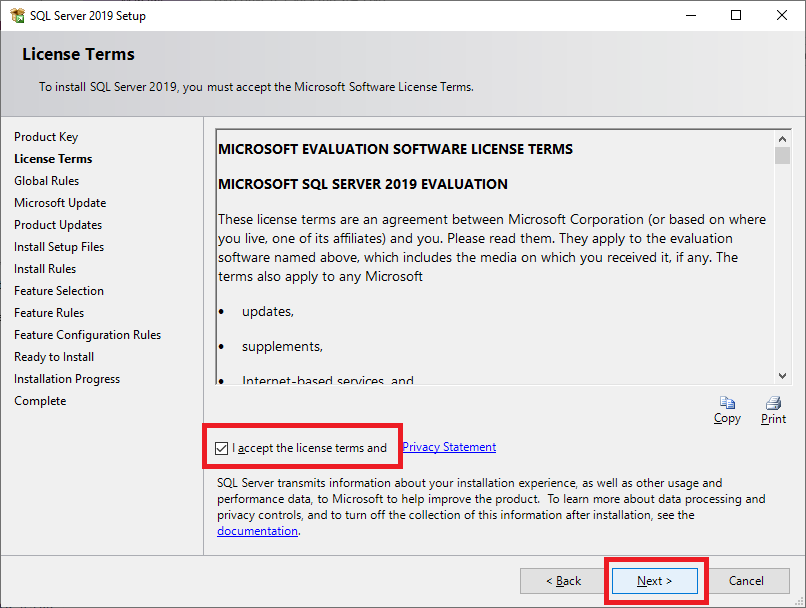
Figure 31 Select Use Microsoft Update to check for updates (recommended) and click Next, as shown in Figure 32.
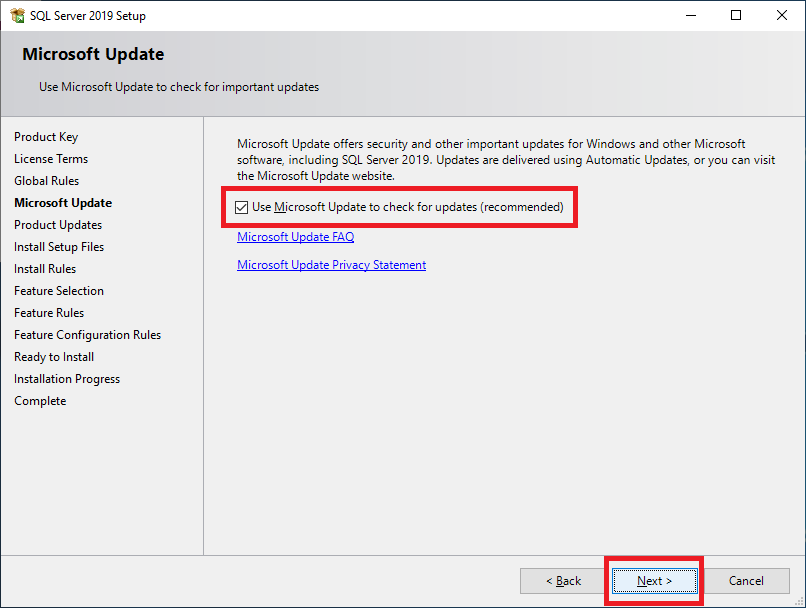
Figure 32 Ignore the Windows Firewall warning and click Next, as shown in Figure 33.
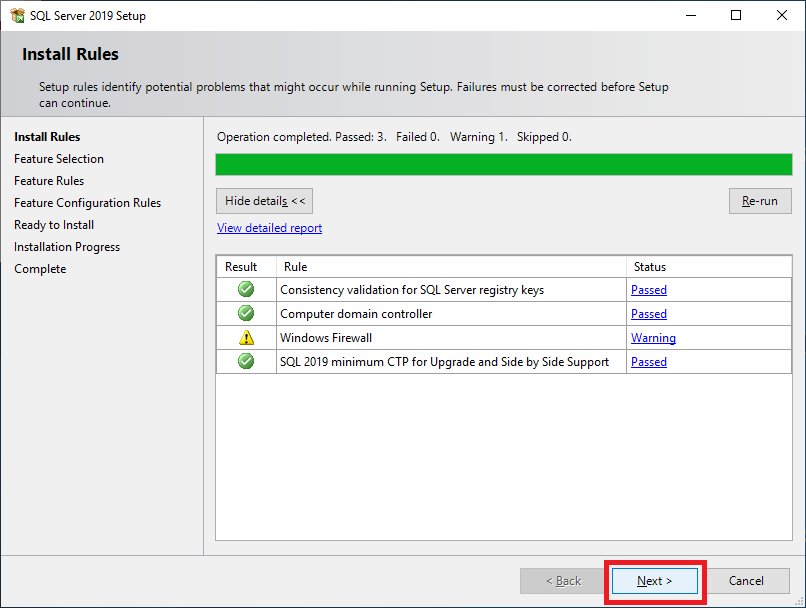
Figure 33 Select Database Engine Services, as shown in Figure 34.
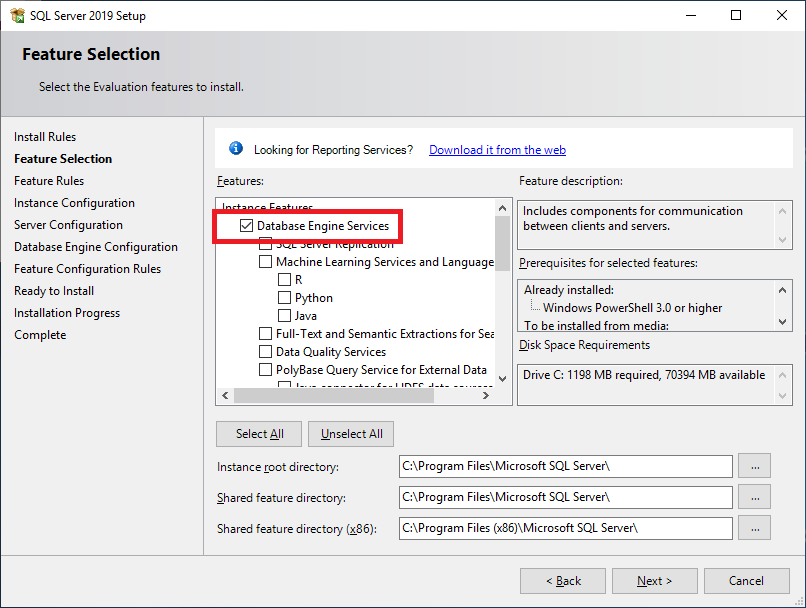
Figure 34 Scroll down and select Client Tools Connectivity and click Next, as shown in Figure 35.
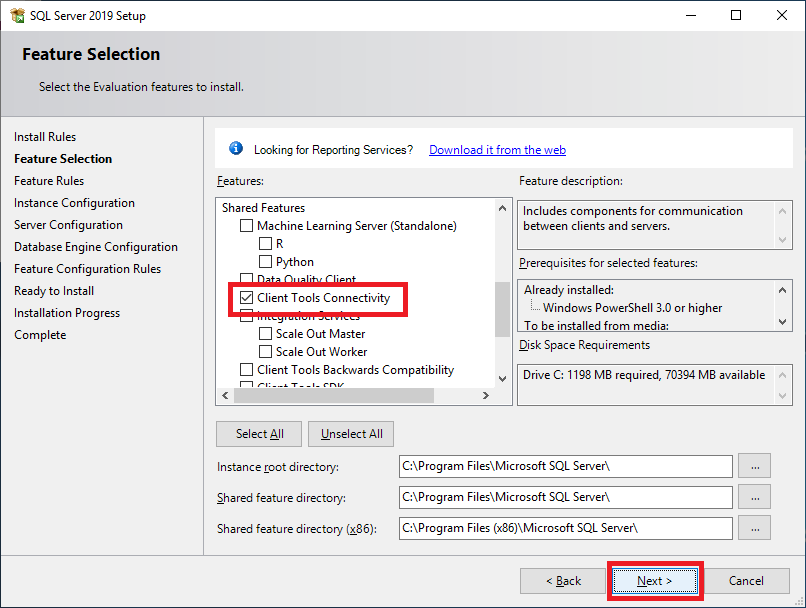
Figure 35 Click Next, as shown in Figure 36.
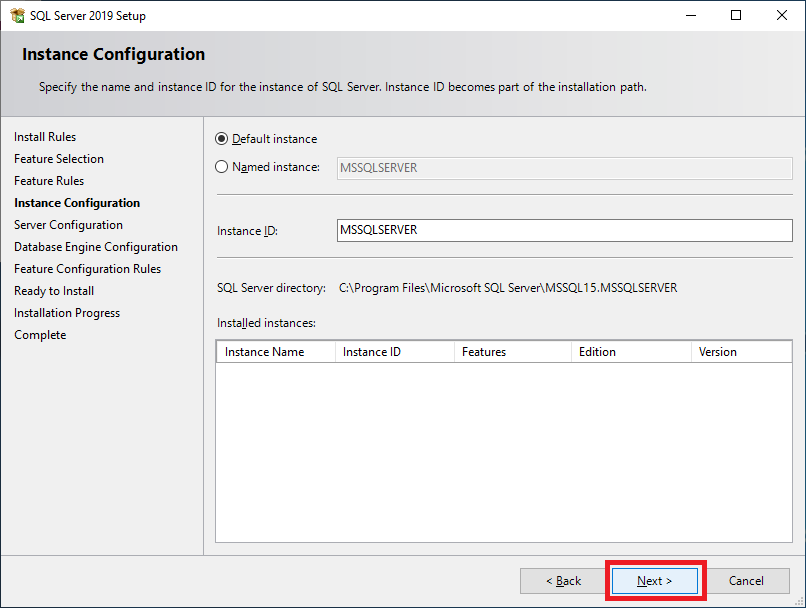
Figure 36 Click the Collation tab and click Customize…, as shown in Figure 37.
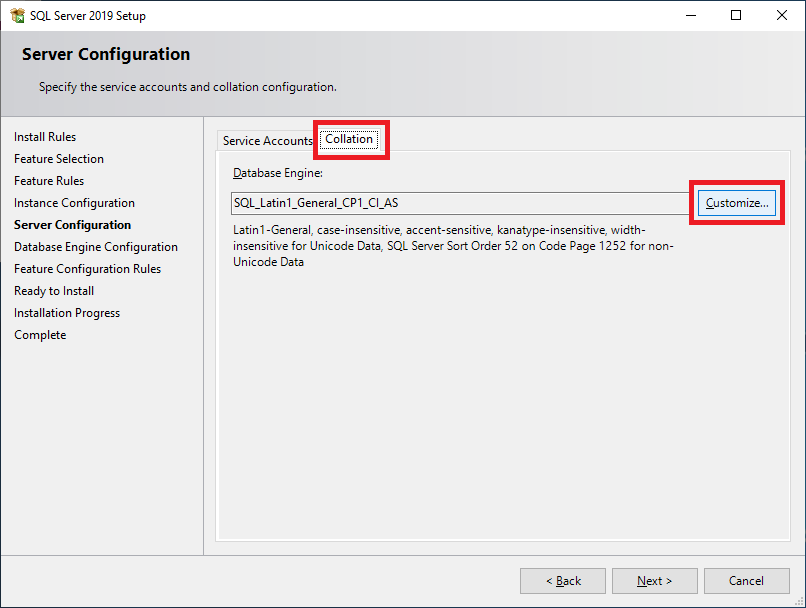
Figure 37 Citrix requires a particular collation. Select Windows collation designator and sort order, and scroll down to select Latin1_General_100, as shown in Figure 38.
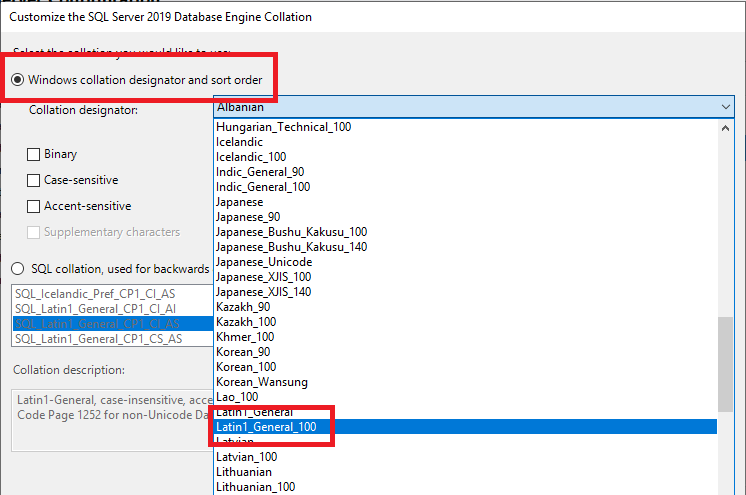
Figure 38 Select Accent-sensitive and Kana-sensitive, and click OK, as shown in Figure 39.
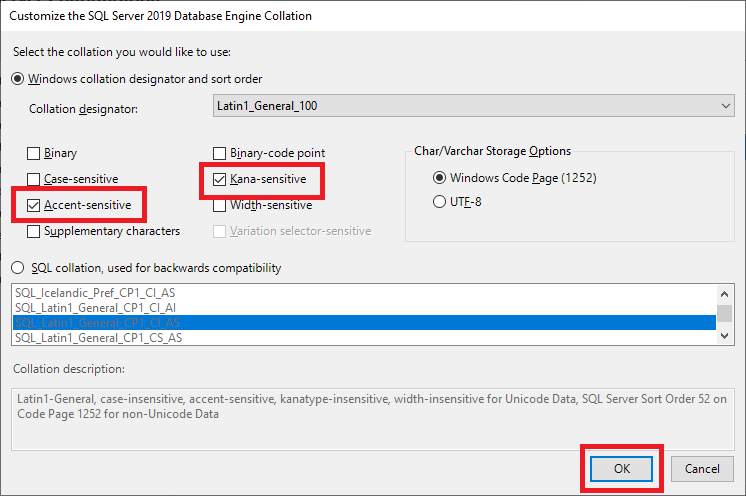
Figure 39 Notice the Collation is Latin1_General_100_CI_AS_KS, as recommended by Citrix.
“Citrix recommends using a collation that ends with _100_CI_AS_KS”
Click Next, as shown in Figure 40.
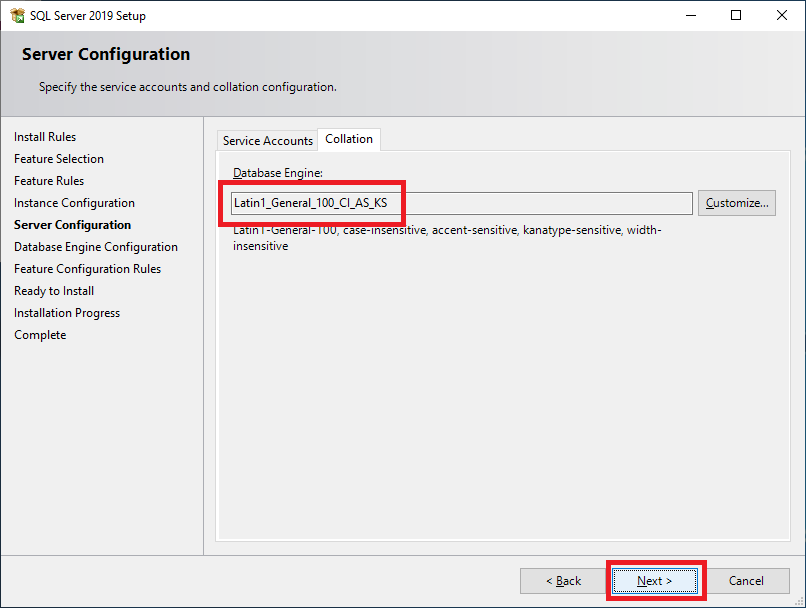
Figure 40 Because VMware requires SQL authentication and Citrix requires Windows authentication, select Mixed Mode (SQL Server authentication and Windows authentication), enter a password for the SQL Server’s sa account, and click Add Current User, as shown in Figure 41.
Clicking the Add Current User adds the domain’s administrator account as a SQL Server administrator.
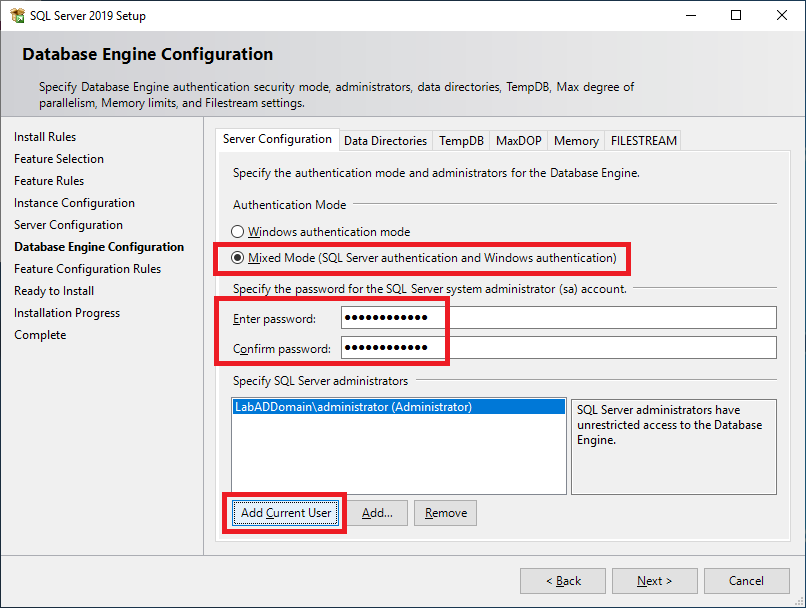
Figure 41 Click Add, as shown in Figure 42.
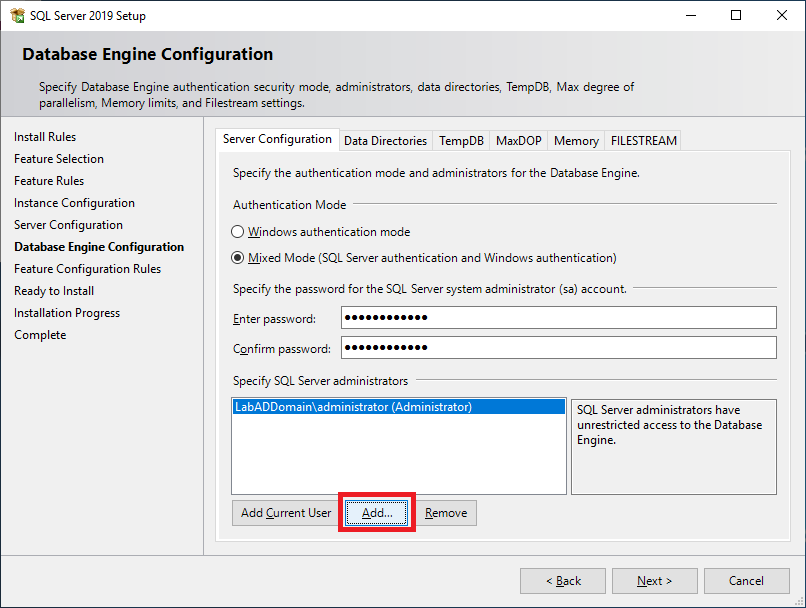
Figure 42 We created two service accounts earlier—one for Citrix and one for VMware. Add the two service accounts and other required accounts or groups and click OK, as shown in Figure 43.
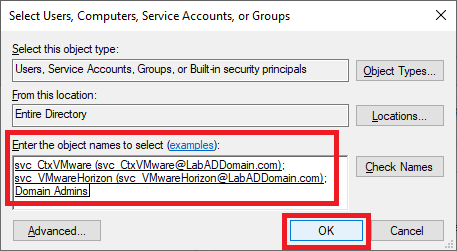
Figure 43 Click the Data Directories tab, change the Data root directory to the drive letter assigned to the second hard disk on the SQL server, and click Next, as shown in Figure 44.
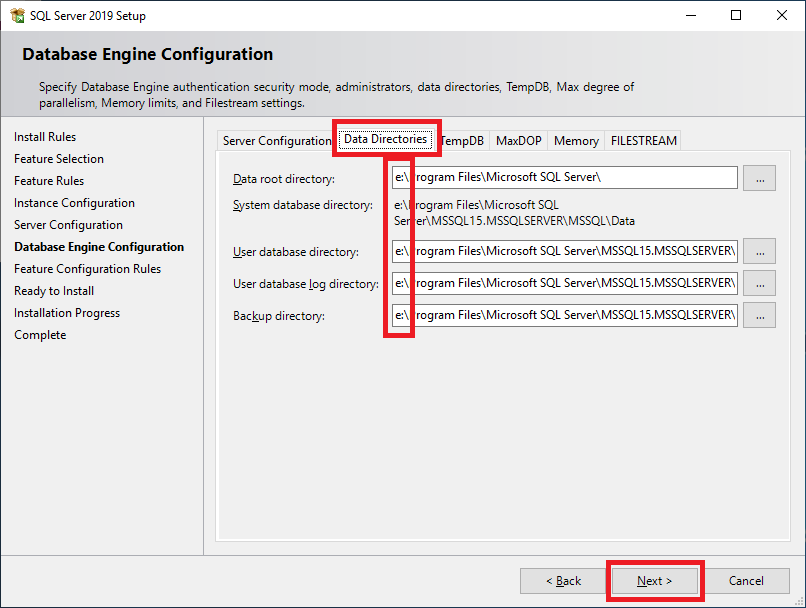
Figure 44 Verify all the information is correct and click Install, as shown in Figure 45. If any information is not correct, click Back, correct the information, and then continue.
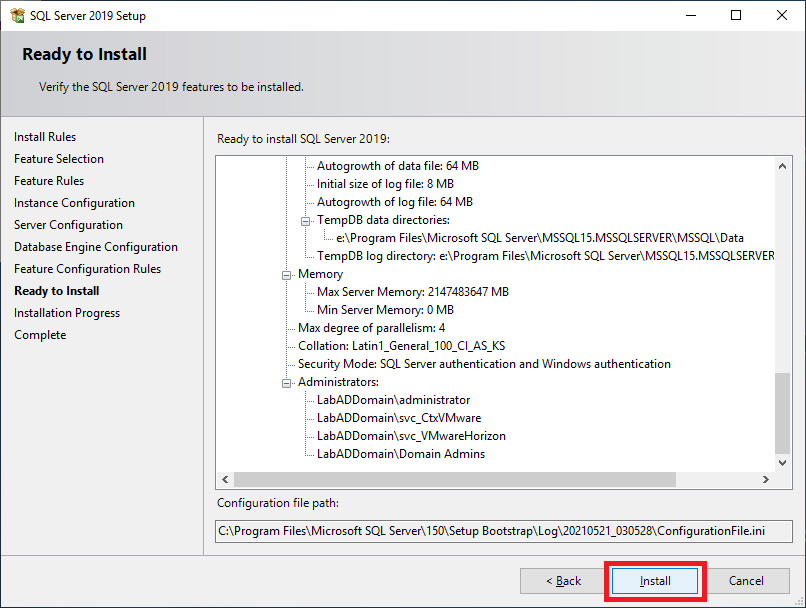
Figure 45 As shown in Figure 46, the SQL Server installation begins.
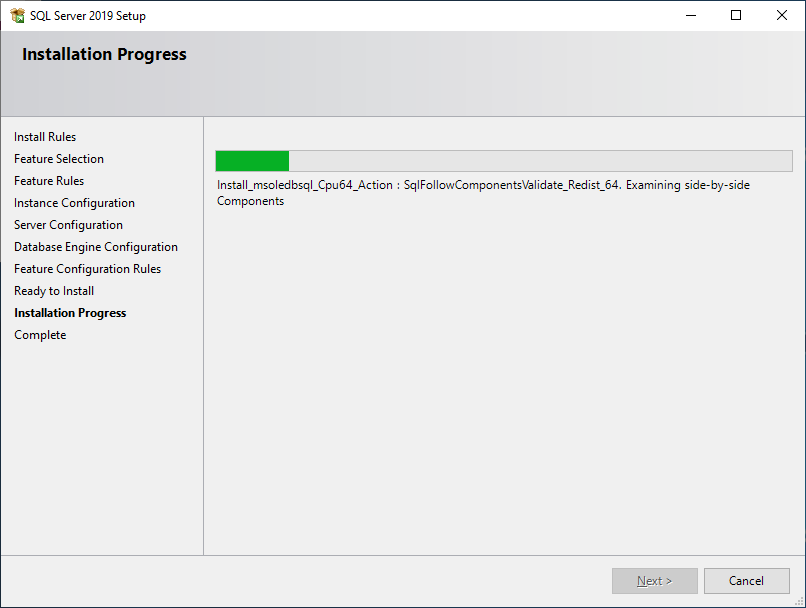
Figure 46 Once the installation completes, click Close, as shown in Figure 47.
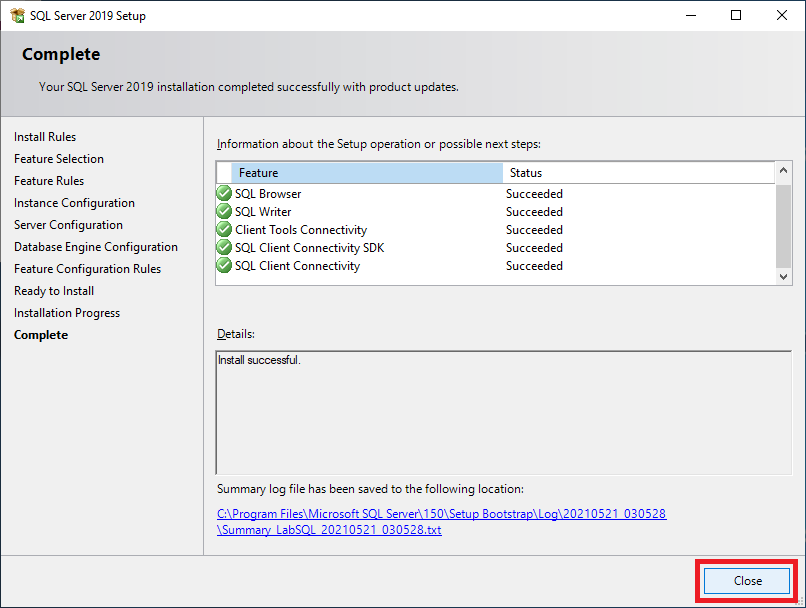
Figure 47 Close all windows.
Full SQL Server 2019
Mount the SQL Server 2019 ISO to the VM.
Change to the D drive (or the CD/DVD drive where the ISO is mounted), right-click setup.exe, and click Run as administrator, as shown in Figure 48.
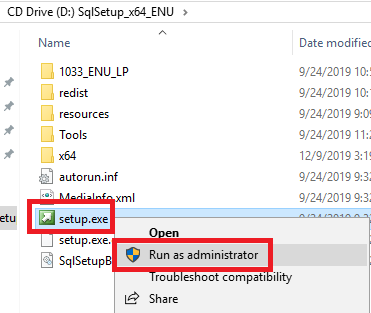
Figure 48 In the left pane, click Installation and in the right pane, click New SQL Server stand-alone installation or add features to an existing installation, as shown in Figure 49.
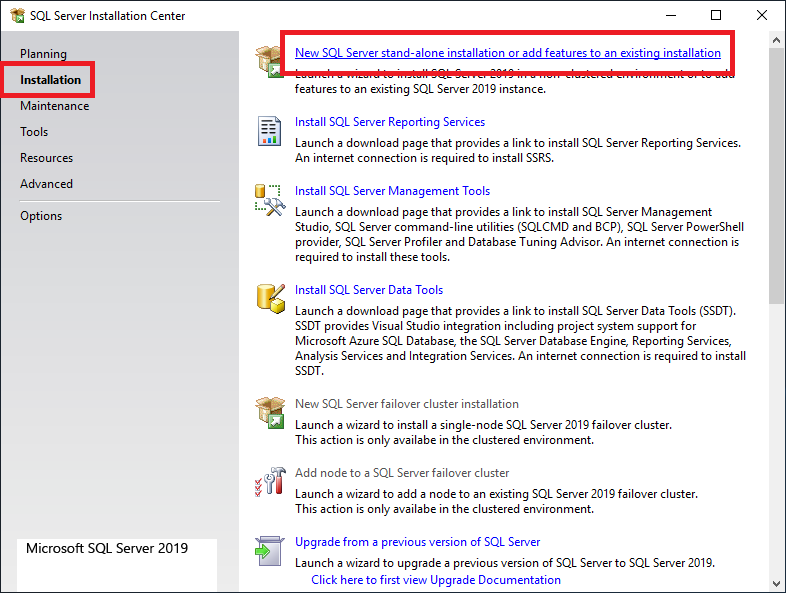
Figure 49 Click Next, as shown in Figure 50.
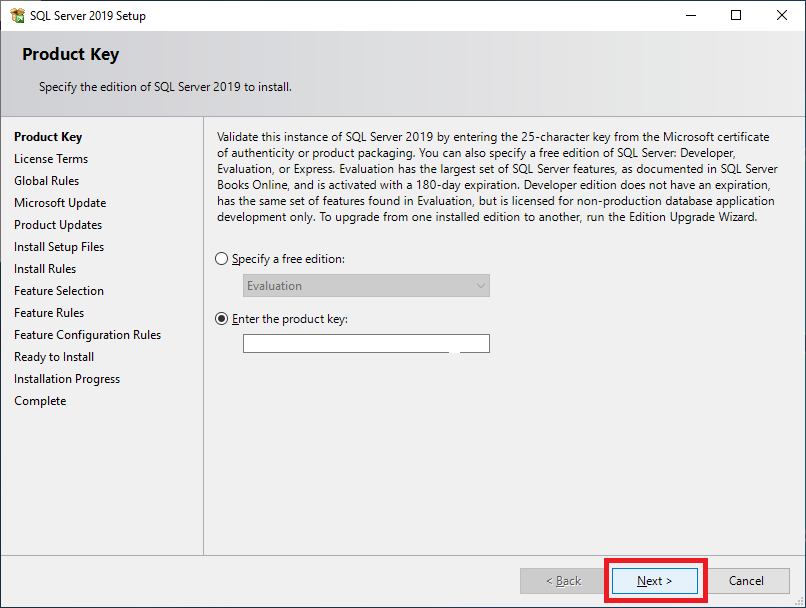
Figure 50 Select I accept the license terms and and click Next, as shown in Figure 51.
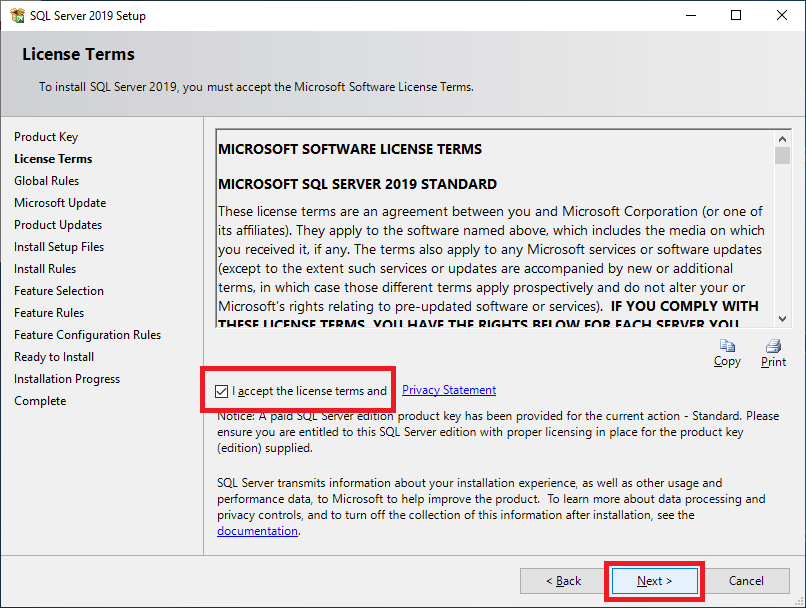
Figure 51 Follow the process as shown in Figures 32 through 47.
Now to install the server certificate from the CA.
Save the following to a file name c:\CertFiles\computer-request.inf.
I want to thank Michael B. Smith for creating this INF file for me.
Use the data needed for your environment.
123LabSQL = the name of your SQL ServerLabADDomain.com = your domain name"LabCA\LabDomain CA Root" = the name of your CA server and the name of your CA.12345678910111213141516171819202122232425262728293031323334353637383940414243;----------------- computer-request.inf -----------------; LabSQL.LabADDomain.com;; certreq -new computer-request.inf computer-request.req; certreq -submit -config "LabCA\LabDomain CA Root" computer-request.req computer-request.cer; certreq -accept -config "LabCA\LabDomain CA Root" computer-request.cer;[Version]Signature="$Windows NT$"[NewRequest]Subject = "CN=LabSQL.LabADDomain.com" ; replace with the FQDN of the SQL ServerFriendlyName = "Computer (Machine) for LabSQL.LabADDomain.com"KeyLength = 2048; Can be 1024, 2048, 4096, 8192, or 16384.; Larger key sizes are more secure but have a greater impact on performance.KeySpec = 1 ; AT_KEYEXCHANGEExportable = TRUE ; private-key is exportableMachineKeySet = TRUE ; goes in machine store instead of user's personal storeSMIME = False ; cannot be used for signing S/MIME messagesPrivateKeyArchive = FALSEHashAlgorithm = sha256 ; "certutil -oid 1 | findstr pwszName" -- gives a list (including sha1)UserProtected = FALSEUseExistingKeySet = FALSE ; we are not renewing a key that already existsProviderName = "Microsoft RSA SChannel Cryptographic Provider"ProviderType = 12 ; for ProviderName and ProviderType, see "certutil -csplist"RequestType = PKCS10 ; if empty or set to "CERT" then a self-signed cert is createdKeyUsage = 0xa0 ; 0xa0 - CERT_DIGITAL_SIGNATURE_KEY_USAGE + CERT_KEY_ENCIPHERMENT_KEY_USAGE[EnhancedKeyUsageExtension]OID=1.3.6.1.5.5.7.3.1 ; this is for Server Authentication - PKIX_KP_SERVER_AUTH[Extensions]; Note: 2.5.29.17 is the OID for a SAN extension.2.5.29.17 = "{text}"_continue_ = "dns=LabSQL.LabADDomain.com"[RequestAttributes]CertificateTemplate = "Server Template";-----------------------------------------------Open an elevated command prompt.
Type in cd c:\CertFiles and press Enter.
The three commands we need to run are at the top of the computer-request.inf file.
Type in notepad computer-request.inf and press Enter.
Copy the line certreq -new computer-request.inf computer-request.req, paste it in the elevated command prompt, and press Enter.
Copy the line certreq -submit -config “LabCA\LabDomain CA Root” computer-request.req computer-request.cer, paste it in the elevated command prompt, and press Enter.
Note: If you get a warning similar to the following, you can ignore the warning. The warning tells you that the certificate request validity period is past the lifetime of the CA’s root certificate lifespan.
Certificate retrieved(Issued)Issued The certificate validity period will be shorter than the Server Template Certificate Template specifies because the template validity period is longer than the maximum certificate validity period allowed by the CA. Consider renewing the CA certificate, reducing the template validity period, or increasing the registry validity period.
Copy the line certreq -accept -config “LabCA\LabDomain CA Root” computer-request.cer, paste it in the elevated command prompt, and press Enter.
Figure 52 shows the results of running the certificate request commands.
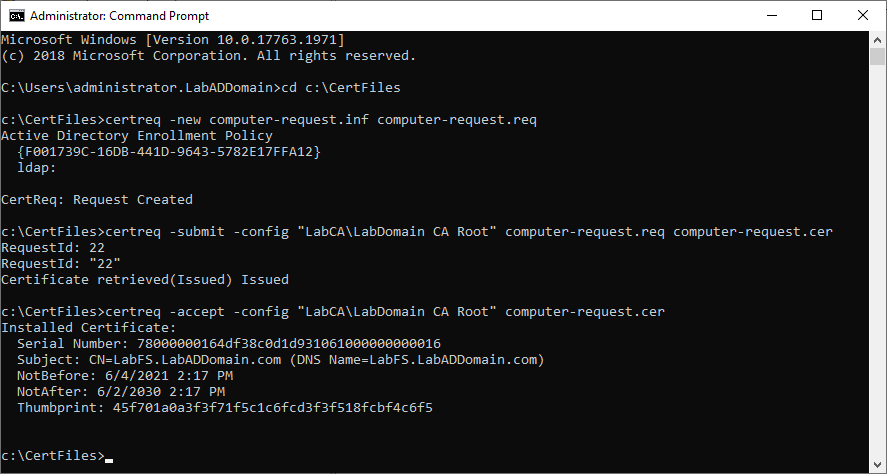
Figure 52 We need to configure a firewall rule to allow TCP port 1433 Inbound. If we don’t, when we create the management computer and install the SQL Server Management Studio, we can’t connect from the management computer to the SQL Server.
Please see Configure the Windows Firewall to Allow SQL Server Access.
Copy the following into the elevated command prompt and press Enter, as shown in Figure 53.
1netsh advfirewall firewall add rule name = "SQL Server TCP Port 1433 Inbound" dir = in protocol = tcp action = allow localport = 1433 remoteip = localsubnet profile = Any
Figure 53 In the elevated command prompt, type in wf.msc, and press Enter to start Windows Defender Firewall with Advanced Security, as shown in Figure 54.
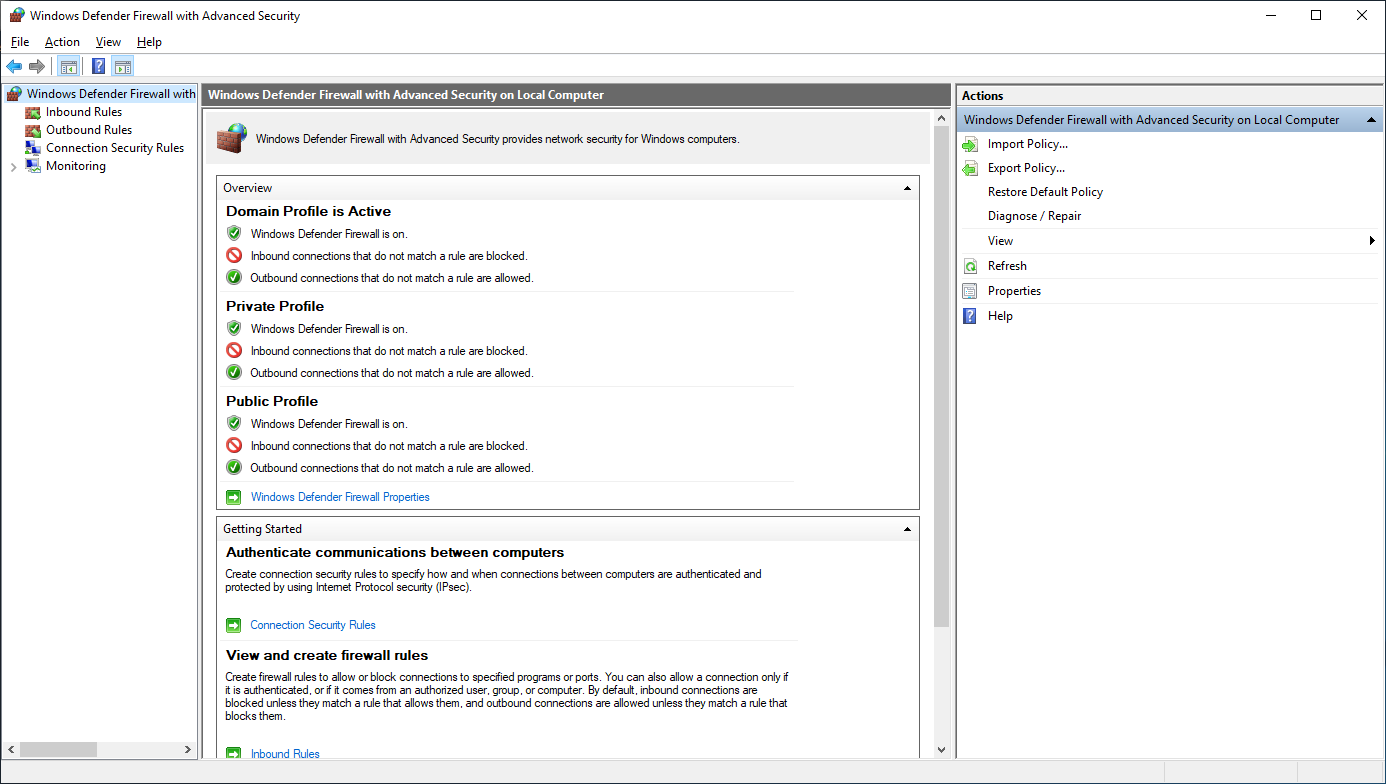
Figure 54 In the left pane, click Inbound Rules, and you see the new SQL Server firewall rule in the middle pane, as shown in Figure 55.

Figure 55 License Server
I use the second domain controller (DC), LabDC2, as my lab’s Citrix and Remote Desktop license server. Both components are lightweight and place no processing or security burden on the DC.
Remote Desktop Licensing
If you do not have a Microsoft Action Pack Subscription (MAPS) for Remote Desktop licenses, never fear as there is a 120-day grace period for clients that connect to a Remote Desktop Session Host server (RDSH).
License your RDS deployment with client access licenses (CALs)
There is a licensing grace period of 120 days, during which no license server is required. Once the grace period ends, clients must have a valid RDS CAL issued by a license server before they can log on to an RD Session Host server.
Until Citrix develops a community license program as Microsoft and VMware have, you have a 30-day grace period (provided you can find a CVAD product ISO to download).
To install Remote Desktop Licensing on LabDC2, start an elevated PowerShell session and enter the following command, as shown in Figure 56.
1Install-WindowsFeature RDS-Licensing –IncludeAllSubFeature-IncludeManagementTools
Figure 56 Leave the PowerShell session open.
Click the Start Menu, expand Windows Administrative Tools, and click Remote Desktop Licensing Manager, as shown in Figure 57.
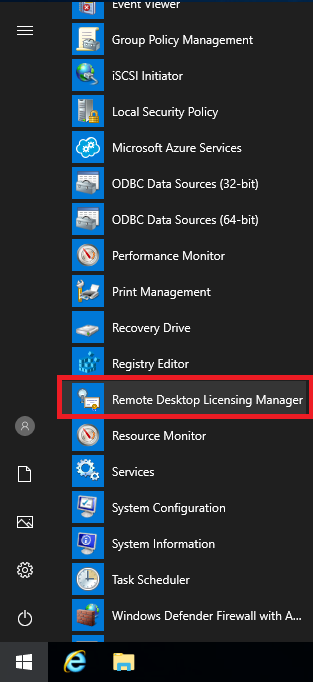
Figure 57 Expand All servers, right-click LabDC2, and click Activate Server, as shown in Figure 58.
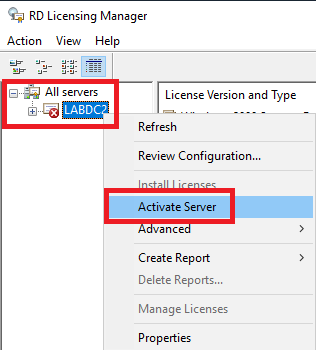
Figure 58 Click Next, as shown in Figure 59.
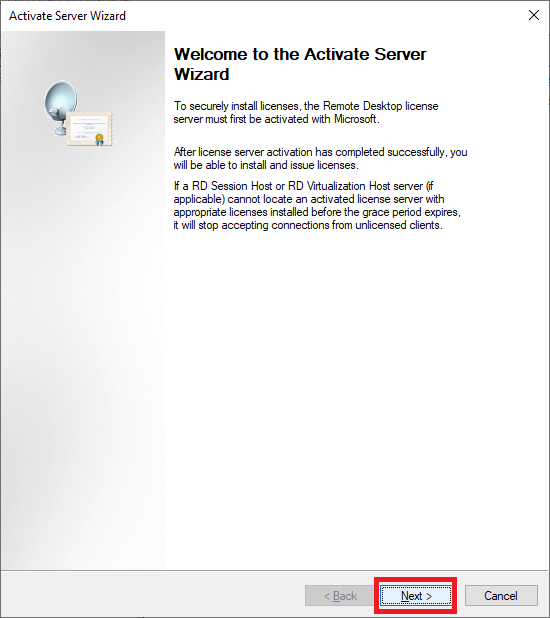
Figure 59 Verify that the Connection method is Automatic connection and click Next, as shown in Figure 60.
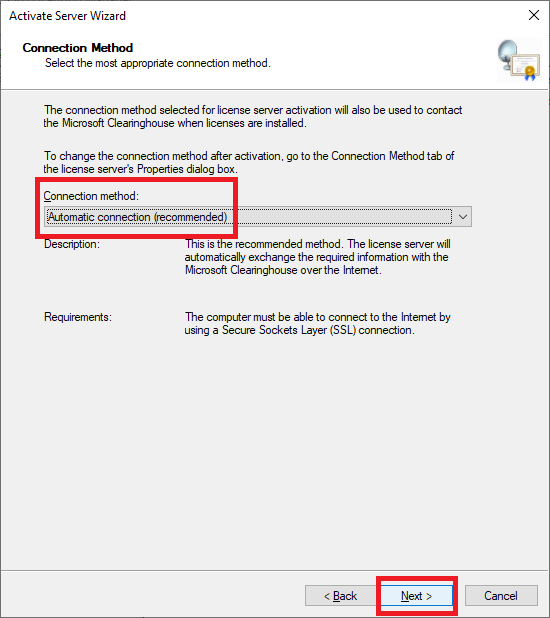
Figure 60 Enter the required information and click Next, as shown in Figure 61.
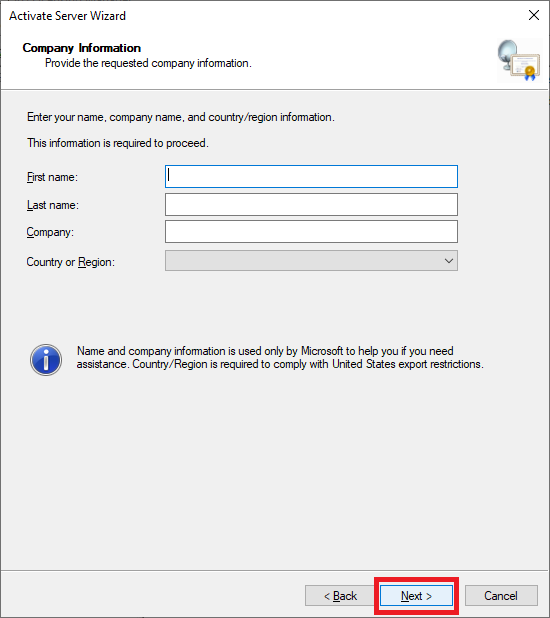
Figure 61 If you wish, enter the optional information and click Next, as shown in Figure 62.
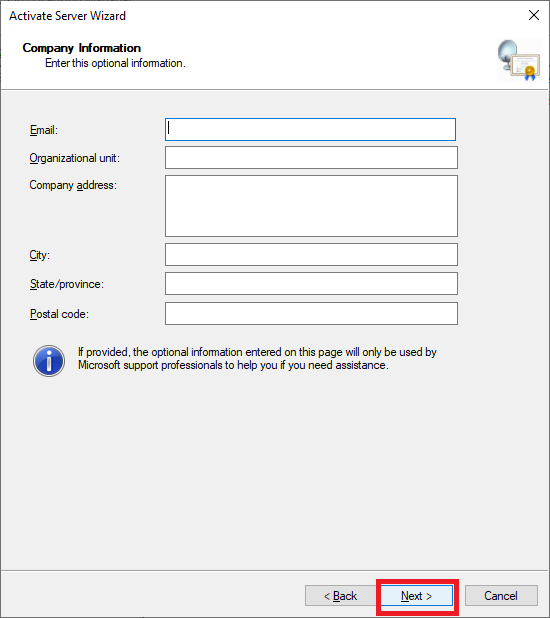
Figure 62 Leave Start Install License Wizard now selected and click Next, as shown in Figure 63.
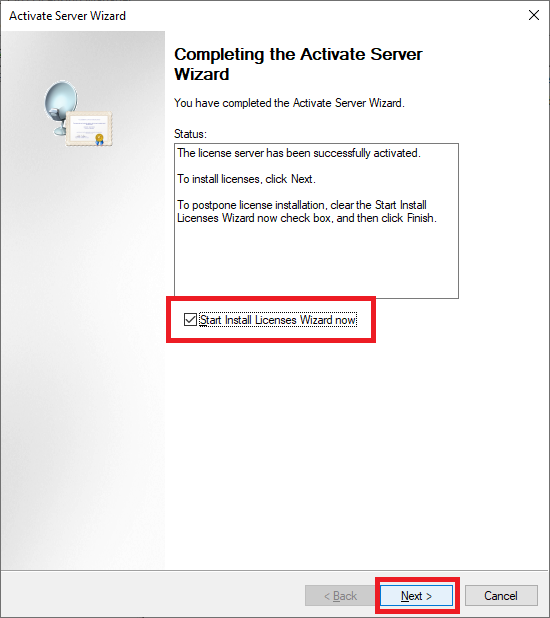
Figure 63 Click Next, as shown in Figure 64.
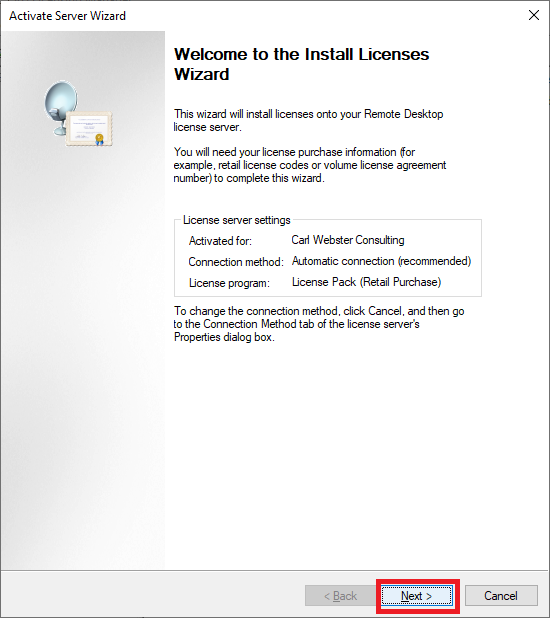
Figure 64 For MAPS RDS CALs, verify the License program is License Pack (Retail Purchase) and click Next, as shown in Figure 65.
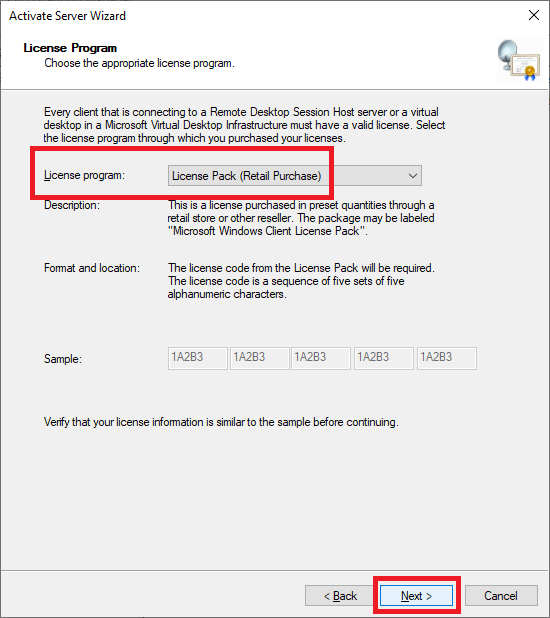
Figure 65 Enter your MAPS RDS CALs, click Add, and click Next, as shown in Figure 66.
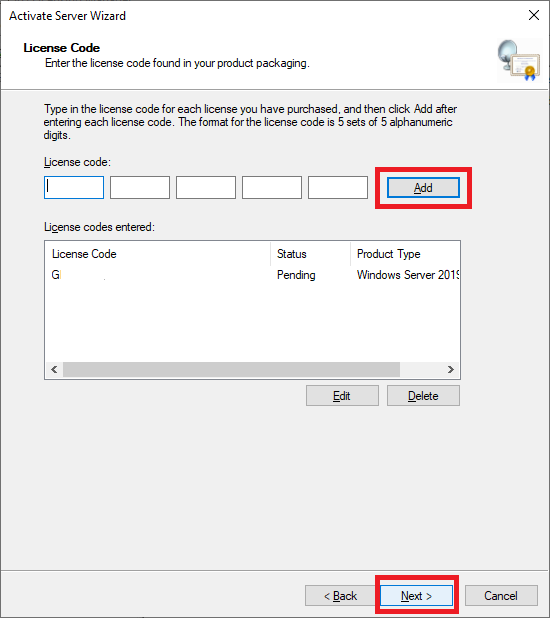
Figure 66 After the license is installed, click Finish, as shown in Figure 67.
If your license did not install, either retry the installation or call the Microsoft Clearinghouse. The most frequent error I see is when someone moves RDS CALs to another server without deactivating the original server first.
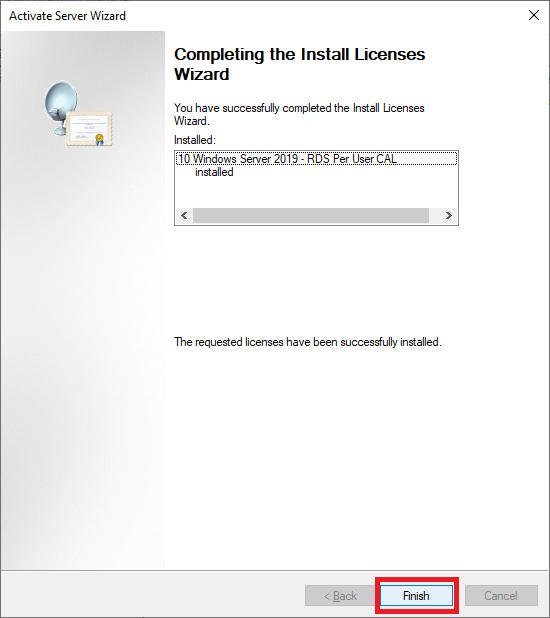
Figure 67 Still in the RD Licensing Manager console, right-click LabDC2 and click Review Configuration, as shown in Figure 68.
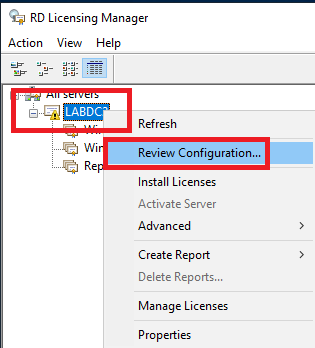
Figure 68 Click Add to Group, as shown in Figure 69.
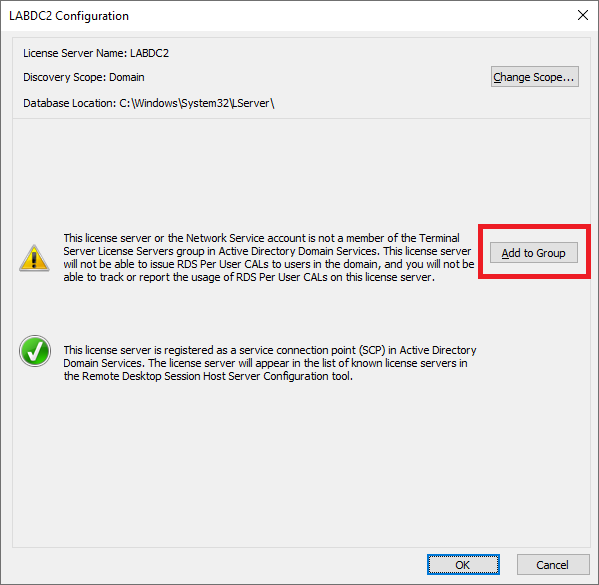
Figure 69 Click Continue, as shown in Figure 70.
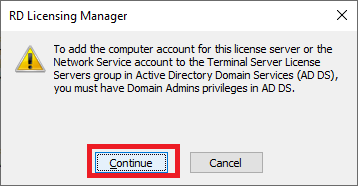
Figure 70 Click OK, as shown in Figure 71.
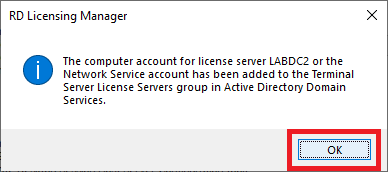
Figure 71 We get a notice that the Remote Desktop Licensing service requires a restart, as shown in Figure 72.
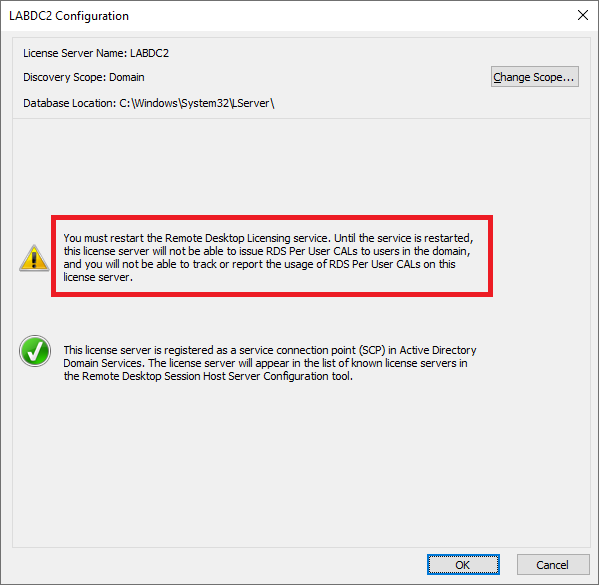
Figure 72 In the elevated PowerShell session, type in the following commands, as shown in Figure 73.
12Stop-ServiceTermServLicensingStart-ServiceTermServLicensing
Figure 73 Exit the PowerShell session.
Click OK, as shown in Figure 74.
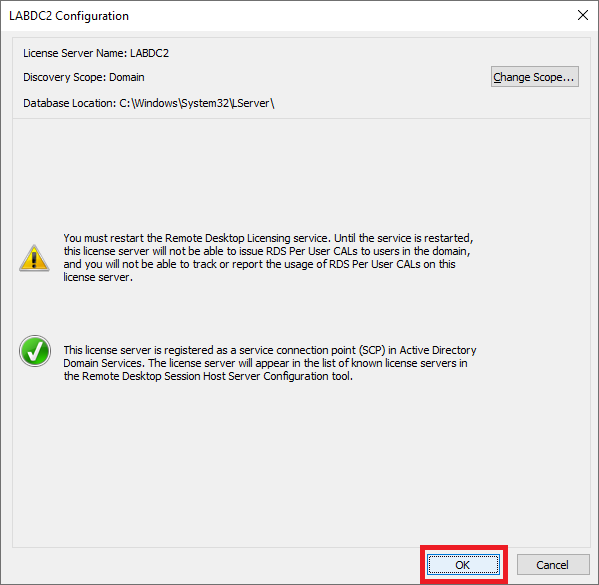
Figure 74 If you compare Figure 68 to Figure 75, you see a green checkmark next to the server name.
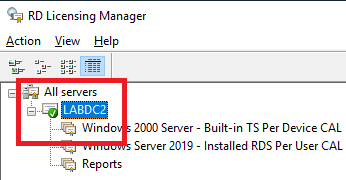
Figure 75 If you follow the steps for Figures 68 and 69, you see both items have green checkmarks now, as shown in Figure 76.
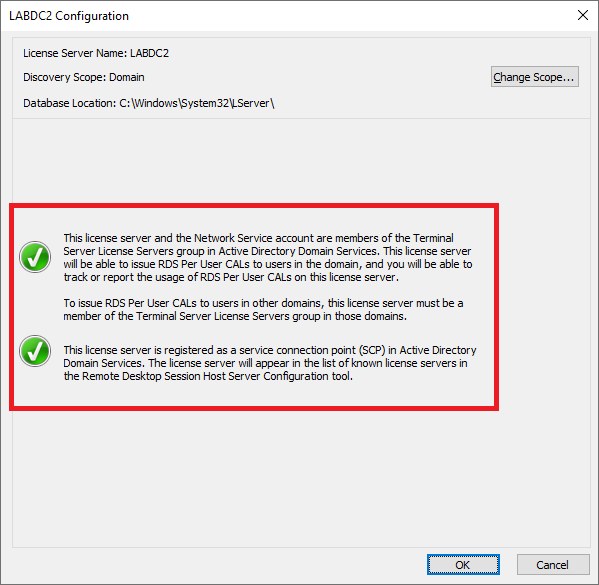
Figure 76 Exit the RD Licensing Manager console.
Citrix Licensing
Citrix Licensing documentation
Note: NEVER browse the internet or download files from a domain controller. That is a bad habit that can have dire consequences.
There are multiple ways to get Citrix Licensing.
1) From the internet browser on LabFS, browse to https://www.citrix.com/downloads/licensing/ and download the latest License Server for Windows to E:\CitrixLicense, as shown in Figures 77 and 78.
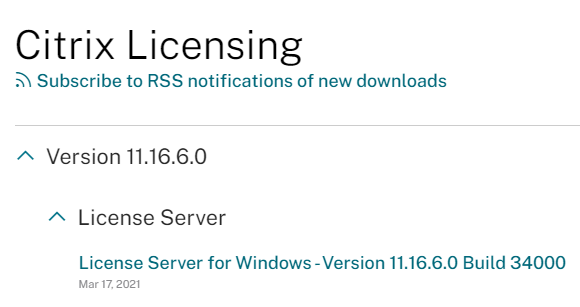
Figure 77 
Figure 78 2) Mount the latest CVAD ISO to the LabDC2 VM, browse to x:\x64\Licensing (where x is the drive letter for the CD/DVD drive), as shown in Figure 79.

Figure 79 Right-click CitrixLicensing.exe and click Run as administrator, as shown in Figure 80.
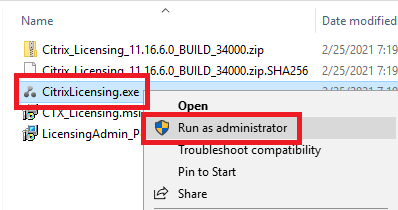
Figure 80 Select I have read, understand, and accept the terms of the license agreement and click Next, as shown in Figure 81.
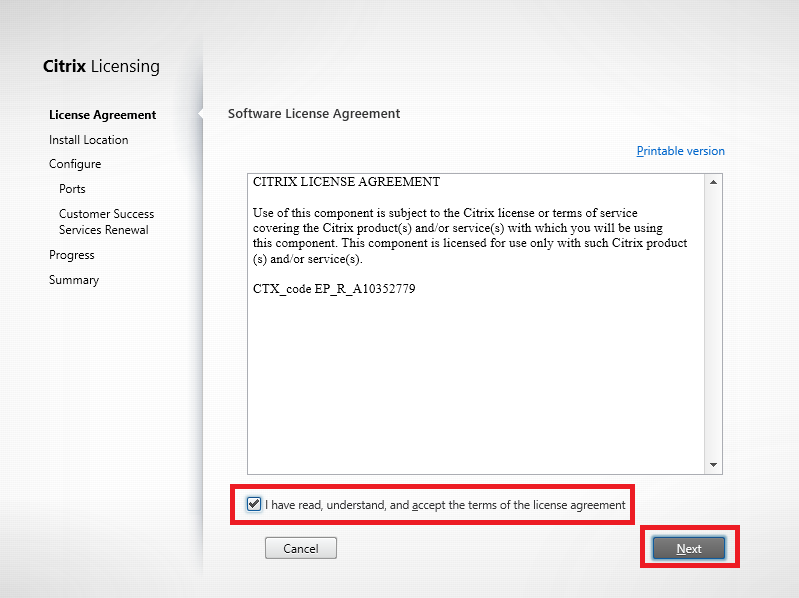
Figure 81 Click Next, as shown in Figure 82.
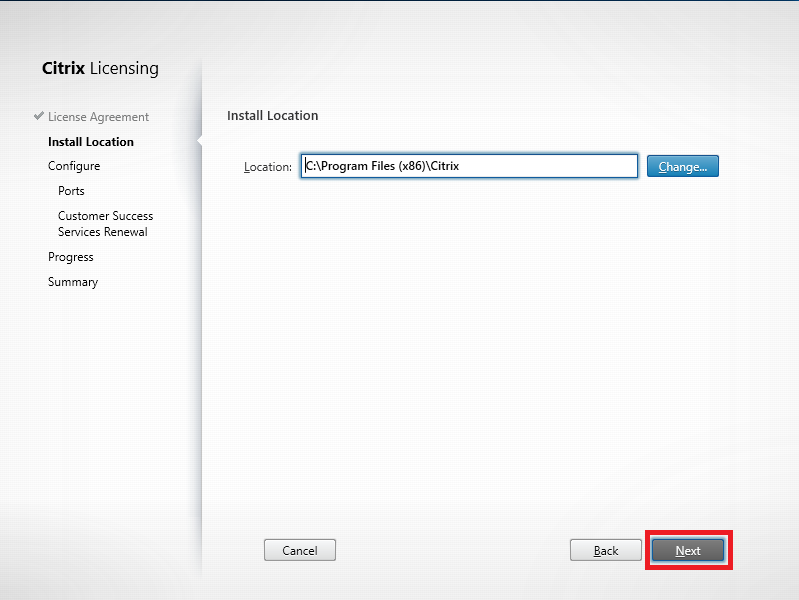
Figure 82 Leave all options at their default settings and click Next, as shown in Figure 83.
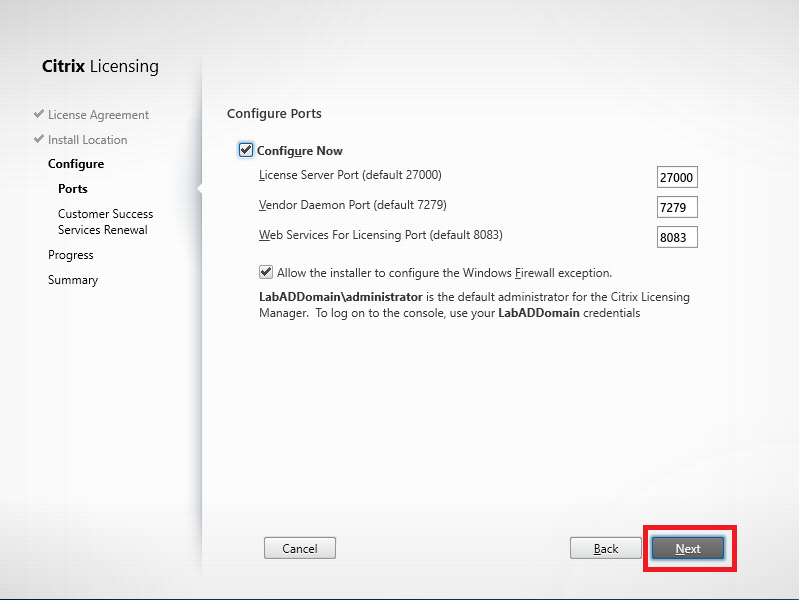
Figure 83 At this time, Citrix does not have a community license program available, so I am using the license provided to me courtesy of the CTP program. I must manually renew the license file every year.
Select Manually check for Customer Success Services renewal licenses and click Install, as shown in Figure 84.
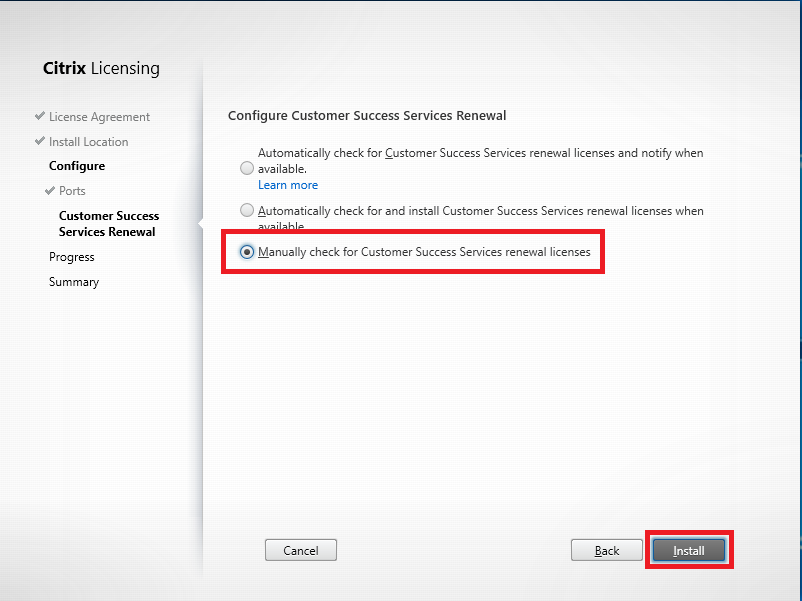
Figure 84 When the installation completes, click Finish, as shown in Figure 85.
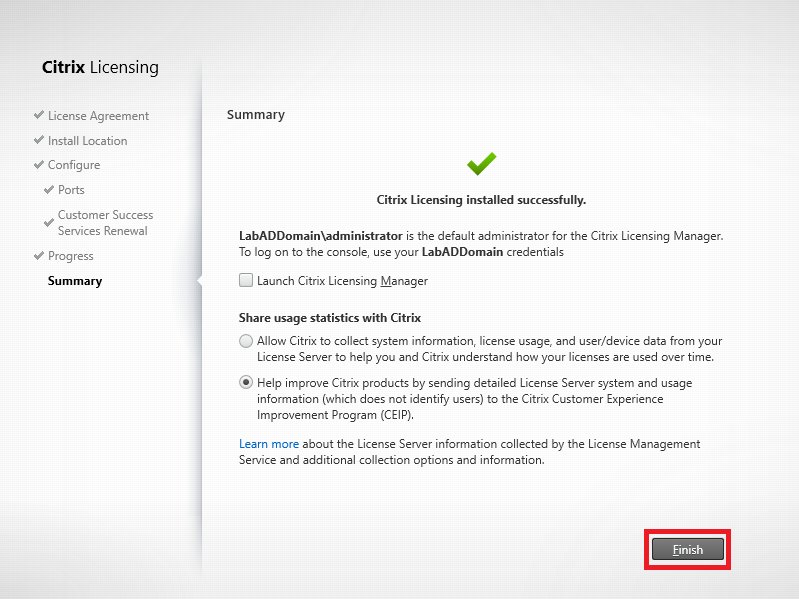
Figure 85 Citrix license files are associated with the CaSe senSiTivE name of the server. Start a command prompt and type in hostname to verify the correct hostname, as shown in Figure 86.
When allocating Citrix licenses, you get to enjoy the painful license return and reallocate process if you get the hostname wrong. Get it right the first time.
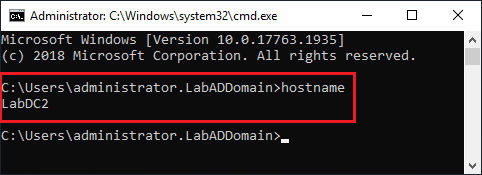
Figure 86 Keep the command prompt open.
My preferred way of getting Citrix license files onto a Citrix license server is to copy the .lic files to C:\Program Files (x86)\Citrix\Licensing\MyFiles and restart the Citrix Licensing service.
Once you copy your license files to C:\Program Files (x86)\Citrix\Licensing\MyFiles, enter the following commands from the command prompt, as shown in Figure 87.
1net stop "Citrix Licensing" && net start "Citrix Licensing"
Figure 87 You can verify that the Citrix license file is valid by looking in the Application event log for Event ID 20736 from source Citrix_Licensing, as shown in Figure 88.
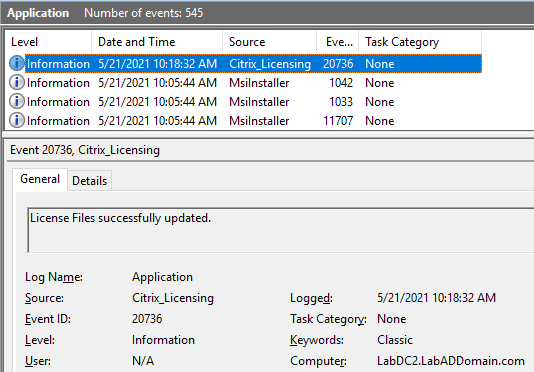
Figure 88 Following the steps used in Citrix XenServer Host and Pool ConfigurationI applied the new license file to my two XenServer pools, as shown in Figure 89.
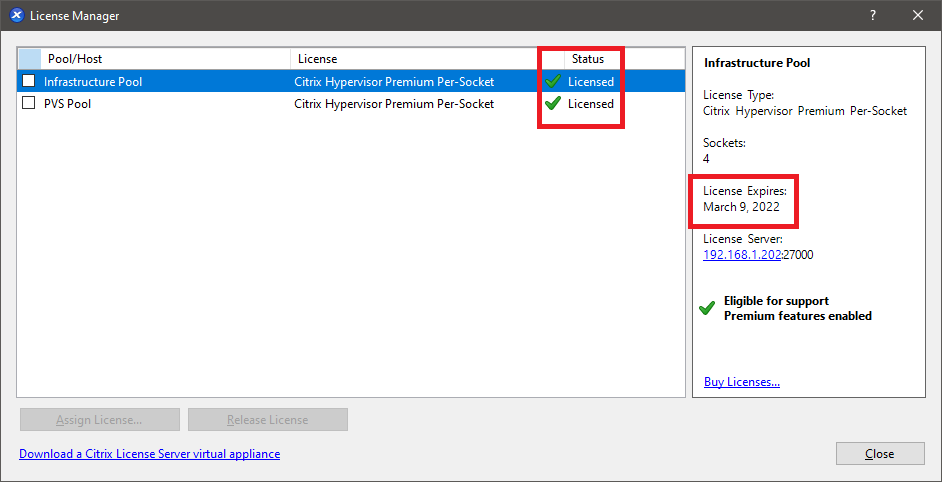
Figure 89 Up next: Create a Management Computer


June 17, 2021
Active Directory, VMware, XenServer