-
04 Building Webster’s Lab V2 – Initial VMware ESXi Host Configuration
May 27, 2021
[Updated 8-Nov-2021]
Now that the ESXi 7.0 host installation is complete, it is time for the initial host configuration. In this article, you complete the following steps:
- Give the Host a Static IPv4 address
- Configure DNS
- Give the Host a unique hostname
- Enable SSH
- Enable VMware vSphere Storage APIs Array Integration (VAAI) support for NFS on the Synology NAS
When we completed the ESXi 7.0 installation and the host rebooted, the host was at the screen shown in Figure 1.
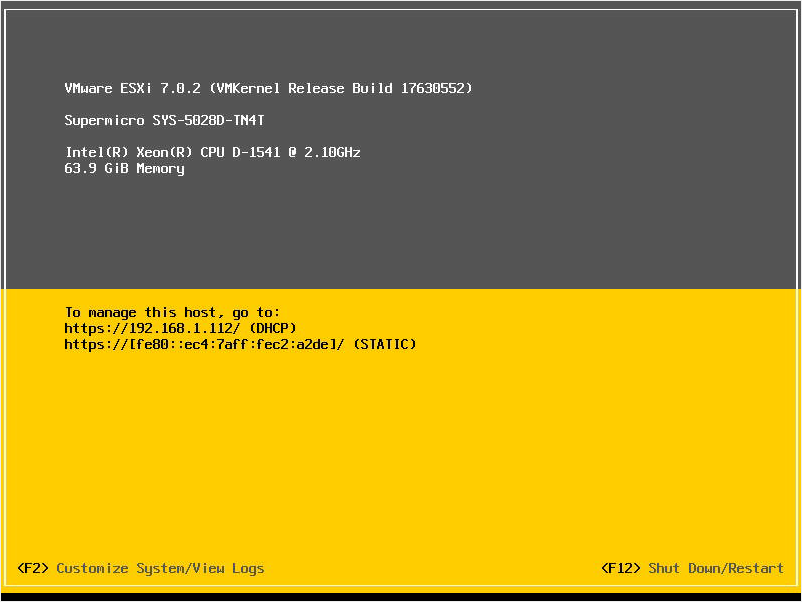
Figure 1 Using the Host’s IPMI, press F2, as shown in Figure 2.
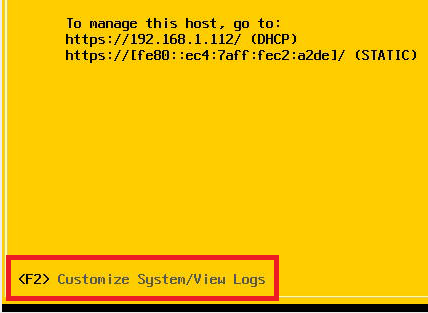
Figure 2 Enter the Password for root and press Enter, as shown in Figure 3.
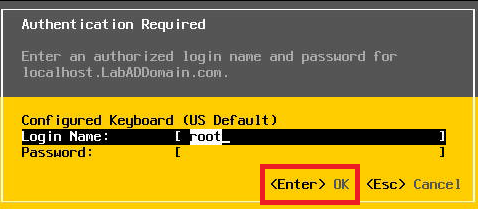
Figure 3 Use the down arrow key, select Configure Management Network, and press Enter, as shown in Figure 4.
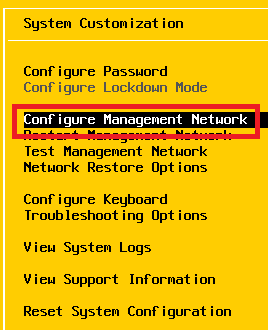
Figure 4 Use the down arrow key, select IPv4 Configuration, and press Enter, as shown in Figure 5.
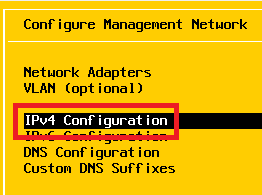
Figure 5 Use the down arrow key, highlight Set static IPv4 address and net configuration and press the spacebar as shown in Figure 6.
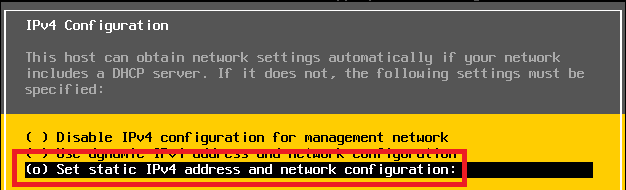
Figure 6 Press the down arrow, enter the appropriate IPv4 information, and press Enter, as shown in Figure 7.
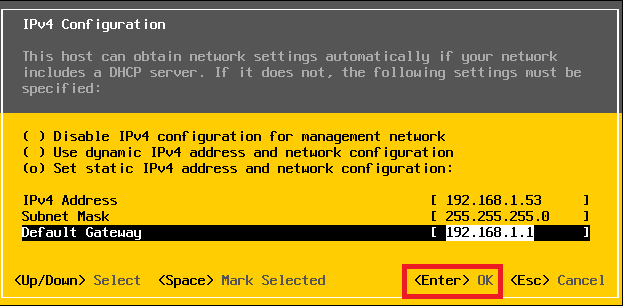
Figure 7 Press the down arrow, highlight DNS Configuration, and press Enter, as shown in Figure 8.
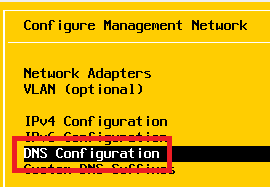
Figure 8 Enter your Primary and Alternate DNS Servers, type in a Hostname, and press Enter, as shown in Figure 9. Currently, there is no Active Directory domain, domain controller of DNS. I am using my router’s DNS.
Note: The ESXi installer gives each host the hostname of “localhost”. In Microsoft Windows, localhost has a specific use. Each ESXi host requires a unique Hostname (as does each Microsoft Windows computer account in Active Directory).
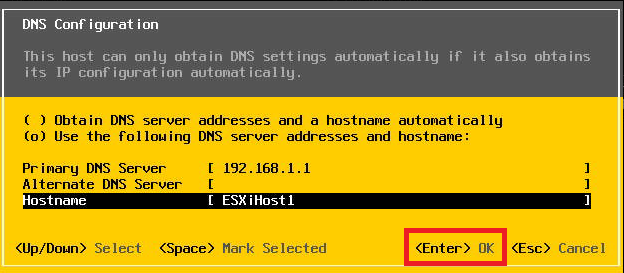
Figure 9 Press Esc, then press Y to apply the changes and restart the management network, as shown in Figure 10.
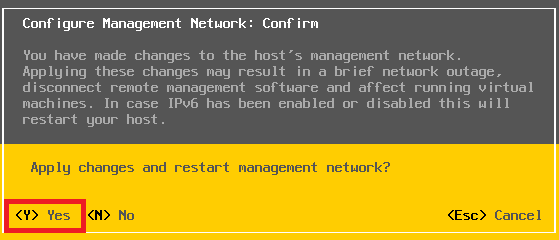
Figure 10 Note: Abdullah Abdullah recommends running Test Management Network before continuing. ESXi then performs the following tests:
- Pings the subnet gateway specified
- Pings the primary DNS server specified
- Pings the alternate DNS server specified
- Resolves the hostname of the ESXi host
Use the down arrow key, select Troubleshooting Options, and press Enter, as shown in Figure 11.
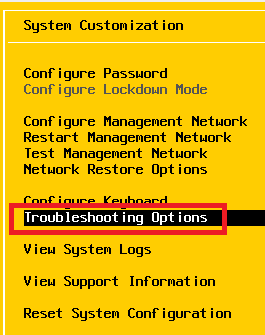
Figure 11 To install the VAAI Plug-in for Synology NFS support, SSH is required to use PuTTY (or your preferred SSH client) to install the necessary drivers and plug-ins.
Note: ESXi 7.0 does not include the VAAI Plug-in for the Synology NAS.
Use the down arrow key, highlight Enable SSH, and press Enter, as shown in Figures 12 and 13.
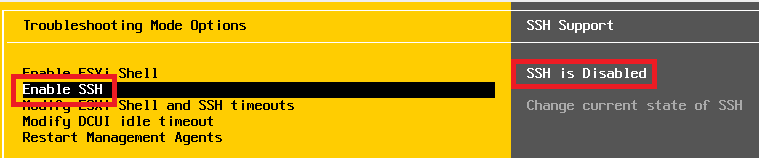
Figure 12 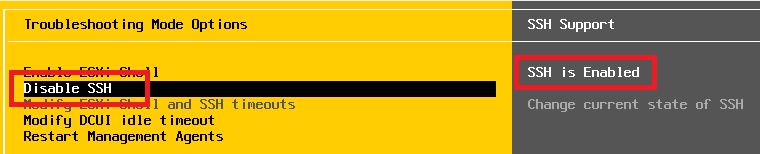
Figure 13 Press ESC twice to return to the main ESXi host screen, as shown back in Figure 1.
Now, you need to install the VAAI Plug-in for NFS. Go to https://global.download.synology.com/download/Tools/NFSVAAIPlugin/1.2-1008/VMware_ESXi/synology-nfs-vaai-plugin-1.2-1008.vib and download the VIB NFS Plug-in for VMware VAAI for your Synology NAS model.
Note: If the download link has changed, go to https://www.synology.com and search for “nfs vaai plugin”. A user account on synology.com is not required to download the VIB file.
Note: VIB stands for vSphere Installation Bundle. At a conceptual level, a VIB is somewhat similar to a ZIP archive in that it is a collection of files packaged into a single archive to facilitate distribution.
Using your favorite secure upload utility, I used WinSCP, upload the VAAI plug-in to the /tmp directory on the ESXi host.
First, connect to the ESXi host, as shown in Figure 14.
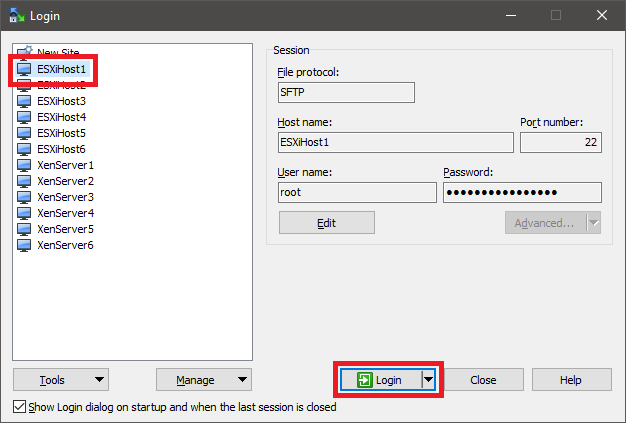
Figure 14 If this is the first time connecting to the host, a key exchange is required. If you want to add the server’s host key to the secure upload utility’s cache, click Yes, as shown in Figure 15.
You can connect without adding the server’s host key to the secure upload utility’s cache. Click No if you do not wish to save the server’s host key in the cache.
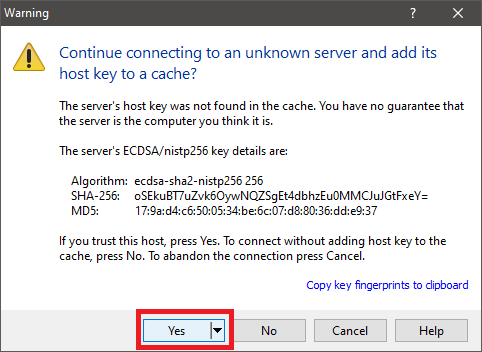
Figure 15 In WinSCP, there are three ways to upload the VIB file to the ESXi host.
- Drag and Drop the VIB file from the left pane to the right pane, as shown in Figure 18.
- Select the VIB file in the left pane, press F5, and click OK, as shown in Figure 16.
- Select the VIB file in the left pane, right-click, select Upload, as shown in Figure 17, and click OK, as shown in Figure 16.
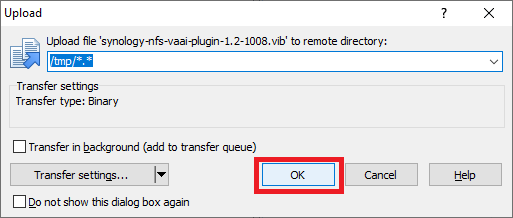
Figure 16 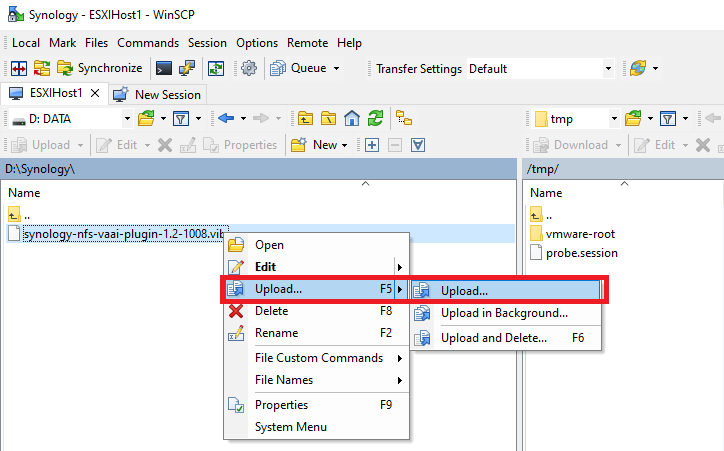
Figure 17 Using your preferred upload method, copy the VIB file to the /tmp directory on the ESXi host, as shown in Figure 18.
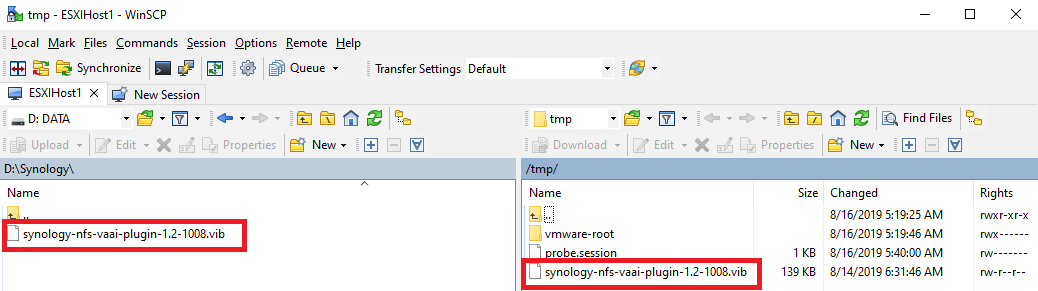
Figure 18 Exit your favorite secure upload utility.
Using your favorite SSH client, connect to the ESXi host, as shown in Figure 19. I used PuTTY.
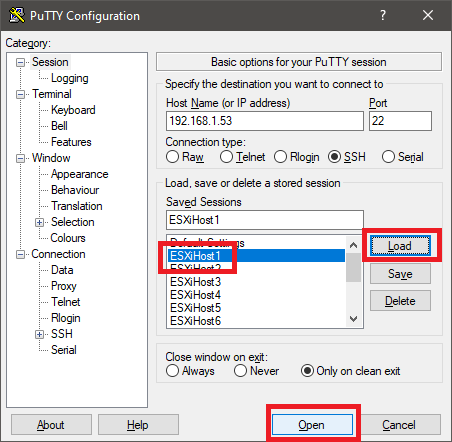
Figure 19 Note: I only tested PuTTY. I did not try using the SSH client from Windows 10.
If this is the first time connecting to the host, a key exchange is required. If you want to add the host’s key to the SSH client’s cache, click Yes, as shown in Figure 20.
You can connect without adding the host’s key to the SSH client’s cache. Click No if you do not wish to save the host’s key in the cache.
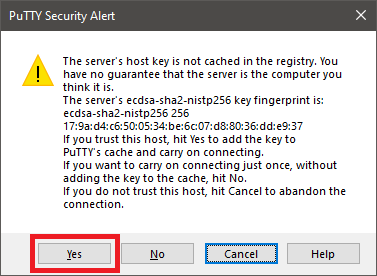
Figure 20 Log in to the host using your configured credentials. If you just installed ESXi, log in as root and the password used during the ESXi install, as shown in Figure 21.
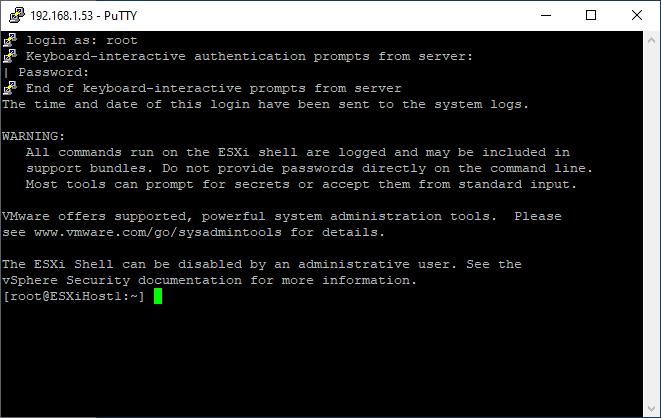
Figure 21 Run the following command, as shown in Figure 22.
esxcli software vib install -v /tmp/synology-nfs-vaai-plugin-1.2-1008.vib –no-sig-check
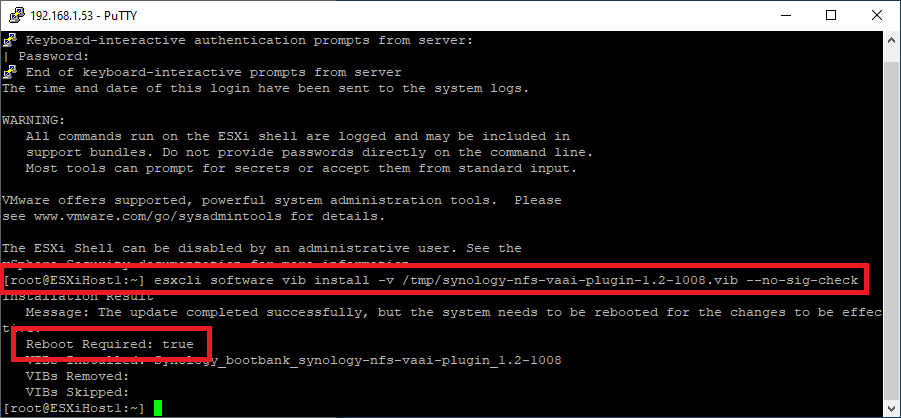
Figure 22 Reboot the ESXi host by typing reboot and pressing Enter, as shown in Figure 23.

Figure 23 Once the host is up, use your SSH client to verify the VAAI plug-in installation. Run the following command, as shown in Figure 24.
esxcli software vib list | grep nfs
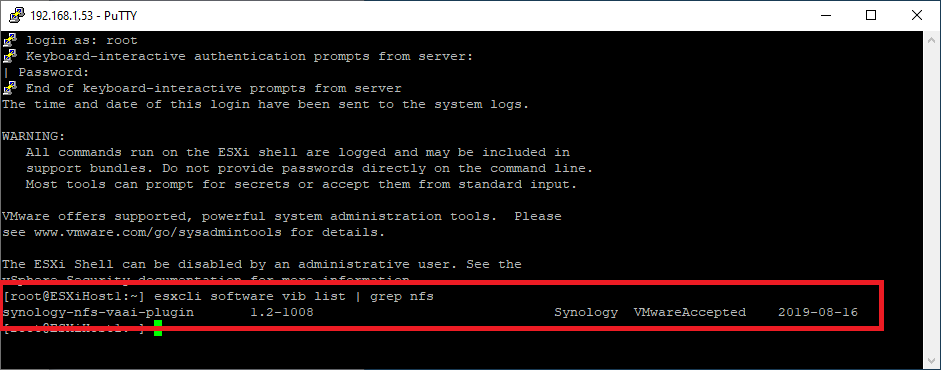
Figure 24 Now that the host has its initial configuration complete, the rest uses the HTML5 client.
Up next: VMware ESXi Host Configuration.
Subscribe
Subscribe to our e-mail newsletter to receive updates.


2 Responses to “04 Building Webster’s Lab V2 – Initial VMware ESXi Host Configuration”
May 28, 2022 at 5:16 am
I haven’t even done the work yet and I can tell this is going to be a great help. I’m just doing the prep work before starting the upgrades
May 28, 2022 at 6:23 am
I hope the guide helps you out.
Webster