-
02 Building Webster’s Lab V2 – Configuring a Synology 1817+ NAS for NFS, ESXi 7.0, and XenServer 8.2
[Updated 27-Aug-2021]
In the “Introduction” article, I made the following statements:
I decided to go with Network File System (NFS) instead of Internet Small Computer Systems Interface (iSCSI) for storage. Gregory Thompson was the first to tell me to use NFS instead of iSCSI. If you Google “VMware NFS iSCSI”, you find many articles that explain why NFS is better than iSCSI for VMware environments. For me, NFS is easier to configure on an ESXi host than iSCSI. I also found out that my Synology 1817+ storage unit supported NFS.
For home labs, there are two vendors whose names I see referenced frequently: QNAP and Synology.
Webster’s Lab has two Synology devices: a DS1817 and a DS1817+ (both are already deprecated devices). The DS1817 uses SSDs, and I use it for backups and ISO storage. The DS1817+ uses SSDs, and I use it for temporary VMs. I store permanent VMs on local SSD storage on the Citrix XenServer hosts.
Synology uses DiskStation Manager (DSM) to manage its storage devices. DSM is a web-based operating system designed to help manage all aspects of the storage device.
This article shows how I configured my Synology 1817+ to use NFS and install the VMware vSphere Storage APIs Array Integration (VAAI) plugin.
Note: Chapters 2 and 3 of the Synology NAS User’s Guide cover the installation and initial configuration of the Synology NAS with DSM.
First, log in to the NAS by opening an internet browser, browsing to the Synology device’s IP address, entering the username and password for the device, and then clicking Sign In. For me, that is https://192.168.1.253:5001, as shown in Figure 1.
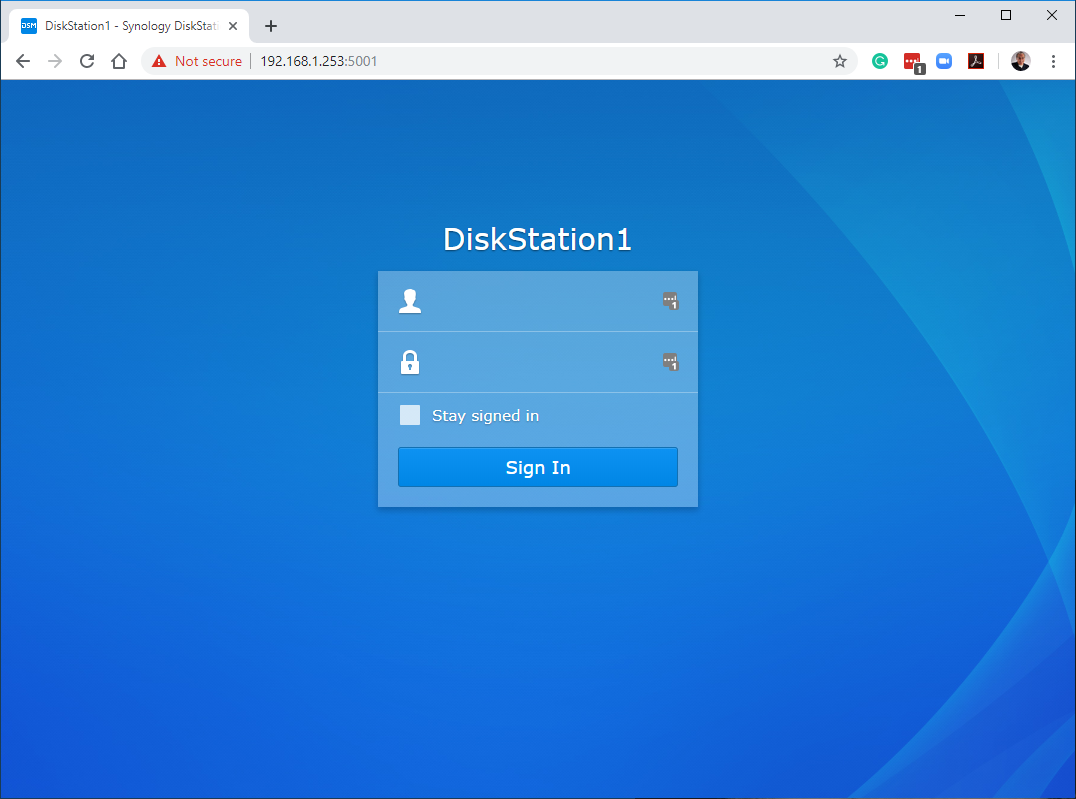
Figure 1 Next, on the main page, click the Control Panel, as shown in Figure 2.
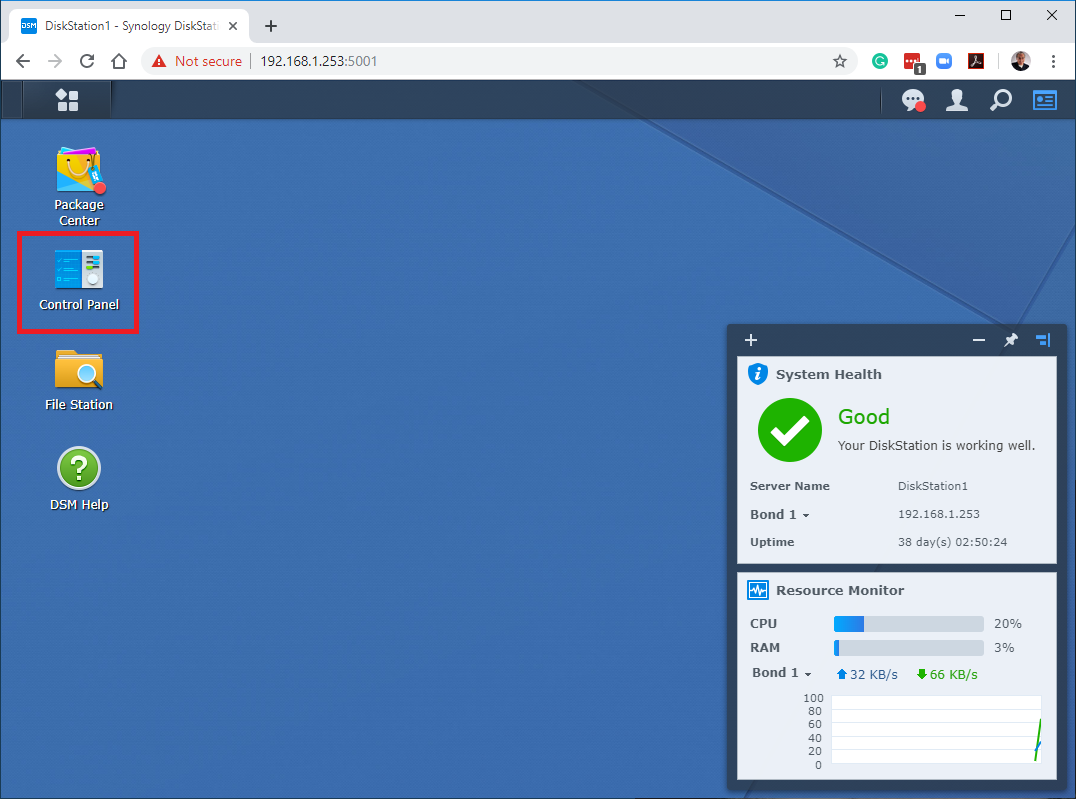
Figure 2 Click on File Services, as shown in Figure 3.
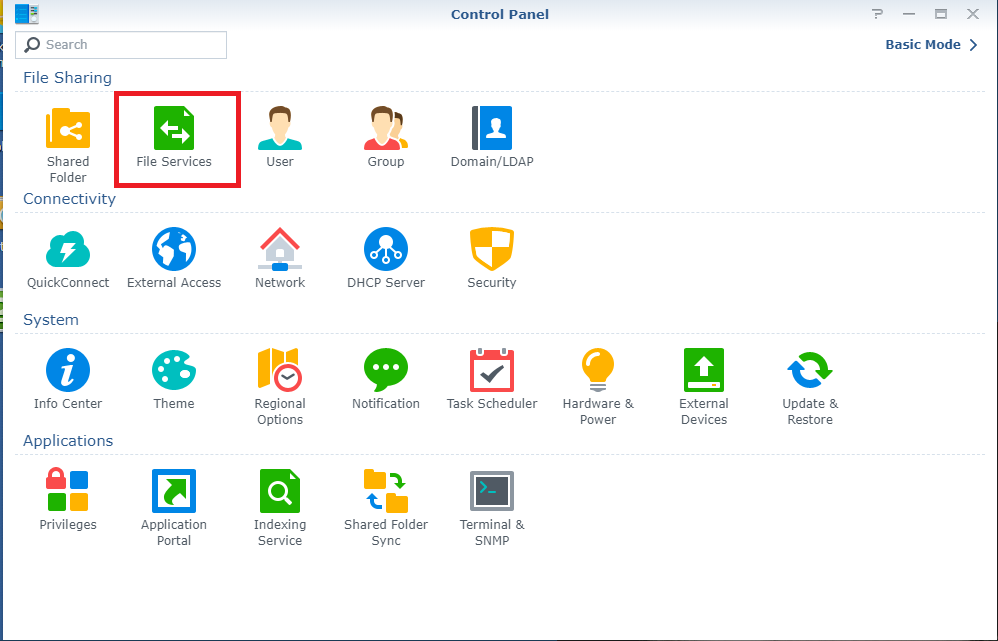
Figure 3 On the SMB/AFP/NFS tab, select Enable NFS, and Enable NFSv4.1 support, as shown in Figure 4.
Note: VMware has an article to show the differences in the capabilities of NFS 3 and NFS 4.1. Please see NFS Protocols and ESXi.
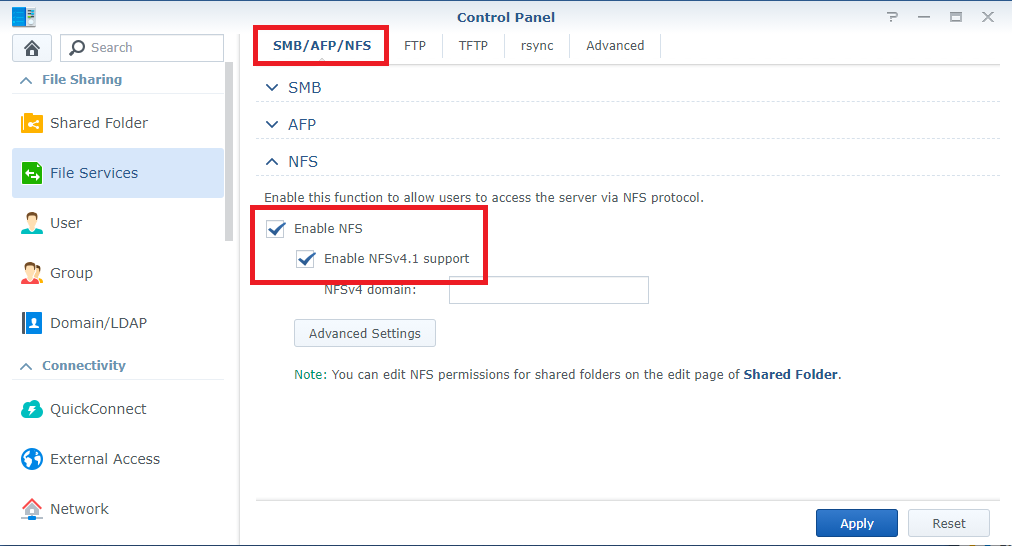
Figure 4 Click Apply to save the changes, as shown in Figure 5.
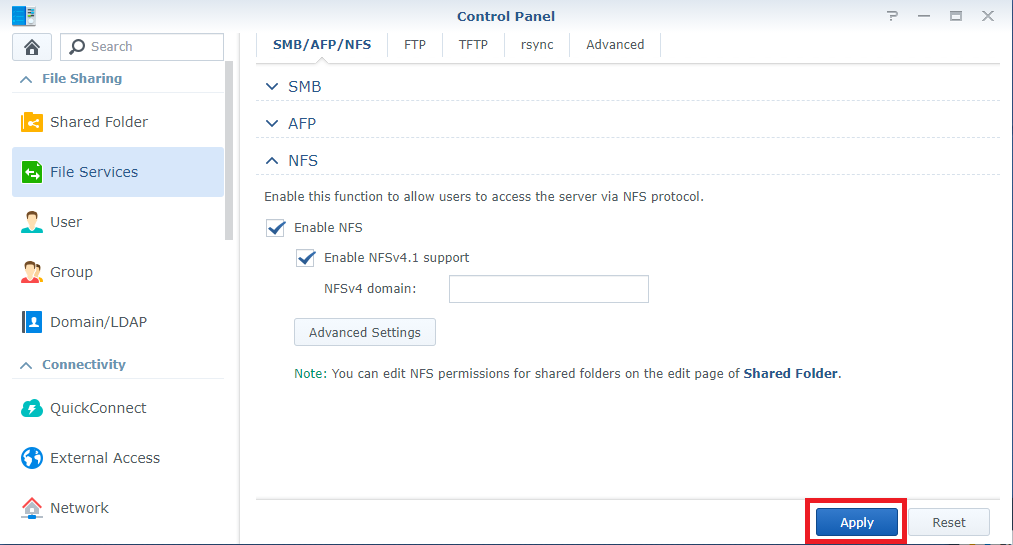
Figure 5 Click Shared Folder, as shown in Figure 6.
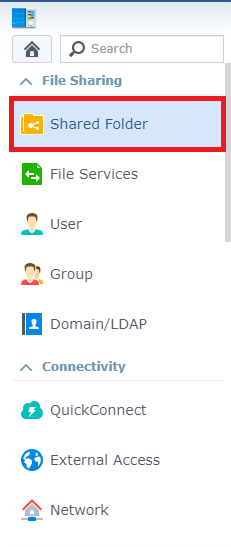
Figure 6 Click Create, as shown in Figure 7.

Figure 7 Do the following steps, as shown in Figure 8:
Enter a Name and Description.
If you have more than one Volume configured, select the appropriate Volume for the Location.
Select Hide this shared folder in “My Network Places” and Hide sub-folders and files from users without permissions.
Deselect Enable Recycle Bin
Click Next
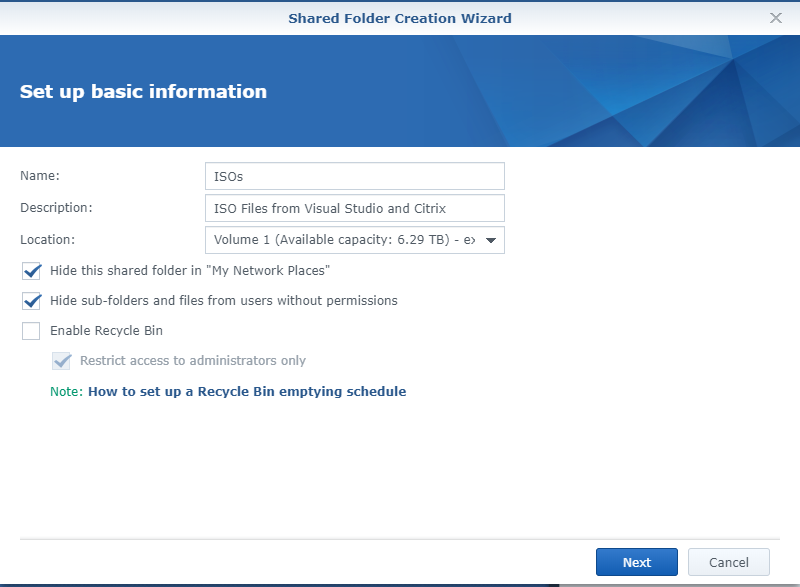
Figure 8 Verify that nothing is selected and click Next, as shown in Figure 9.
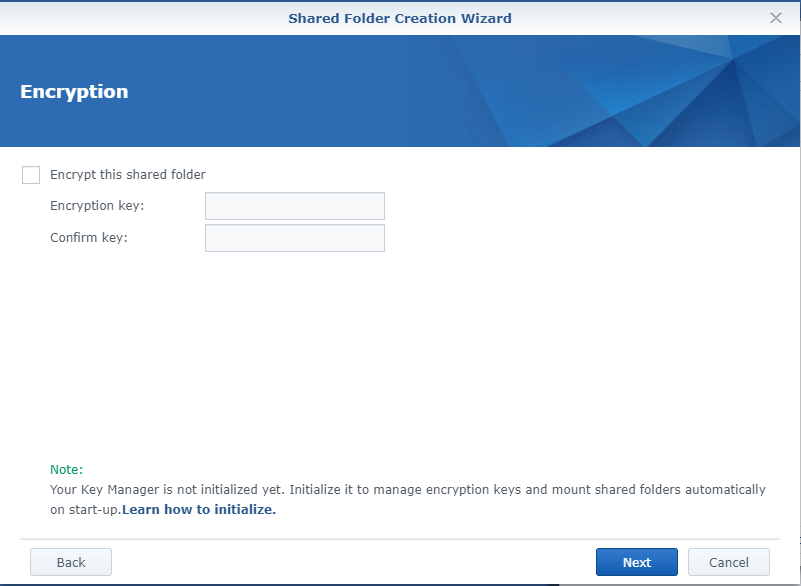
Figure 9 Verify that nothing is selected and click Next, as shown in Figure 10.
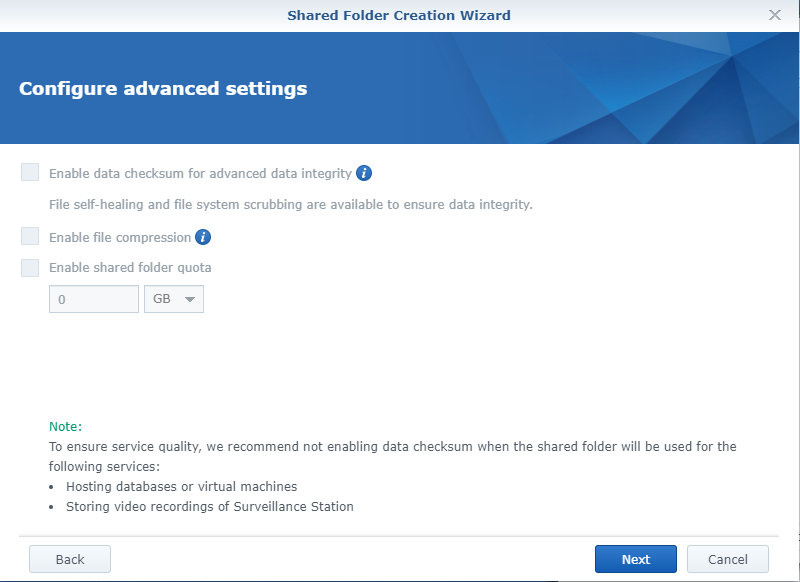
Figure 10 Verify that all the information is correct, as seen in Figure 11. If it is, click Apply. If the information is not correct, click Back, correct the information, and then continue.
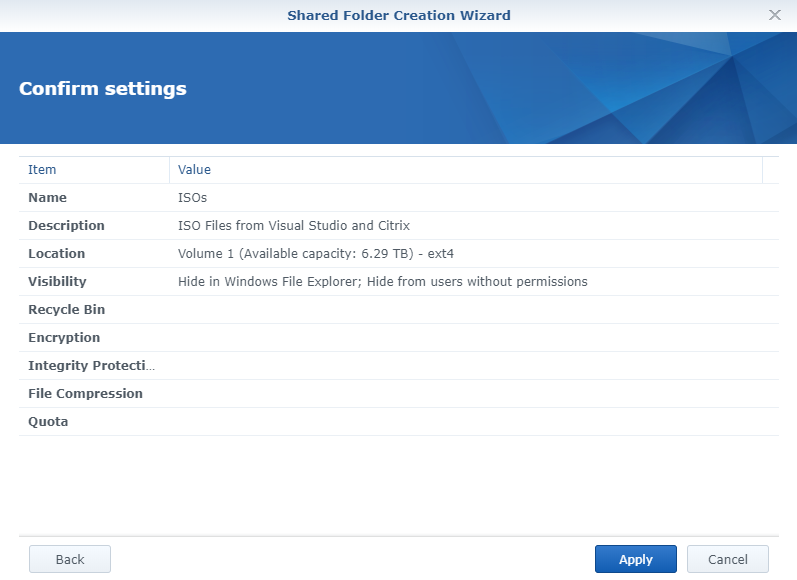
Figure 11 Select Read/Write for the admin accounts and No Access for the guest account on the Permissions tab, as shown in Figure 12. Do not click OK yet.
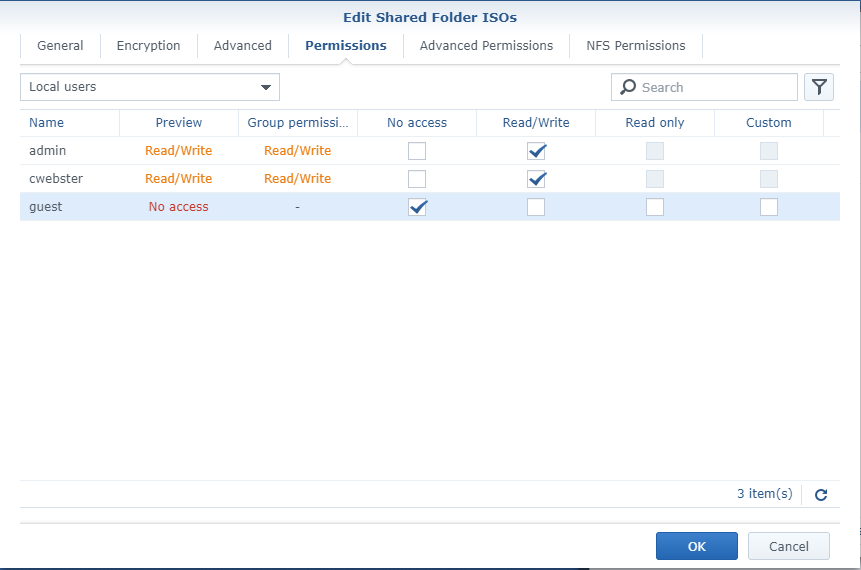
Figure 12 Click the NFS Permissions tab and then click Create, as shown in Figure 13.
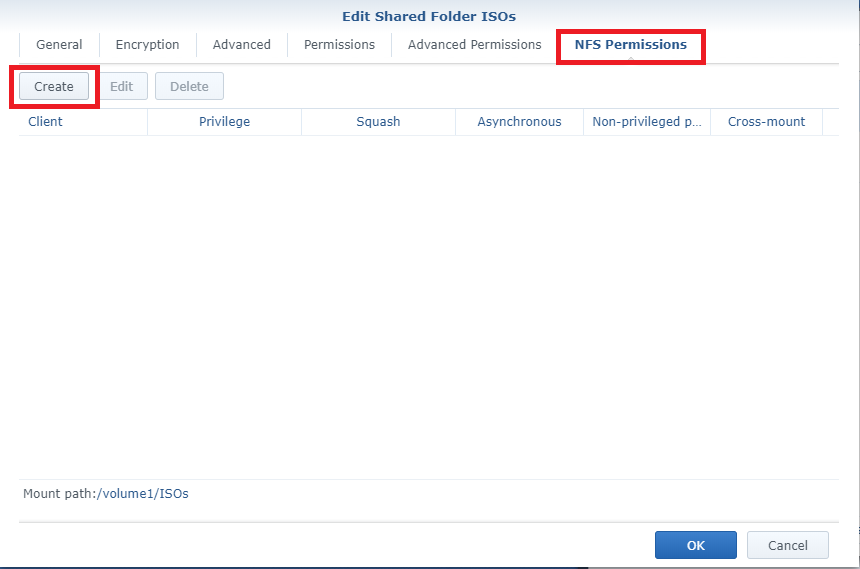
Figure 13 Enter the Hostname or IP address of the ESXi host and click OK, as shown in Figure 14. Because I have six ESXi hosts and later add them to VMware vCenter, I entered an * for the IP address to allow all IP addresses in Webster’s Lab access.
Note: Synology Diskstation Manager grants NFS permissions on a per-host basis instead of a per-user basis because virtualization hosts access the NFS shares, not users.
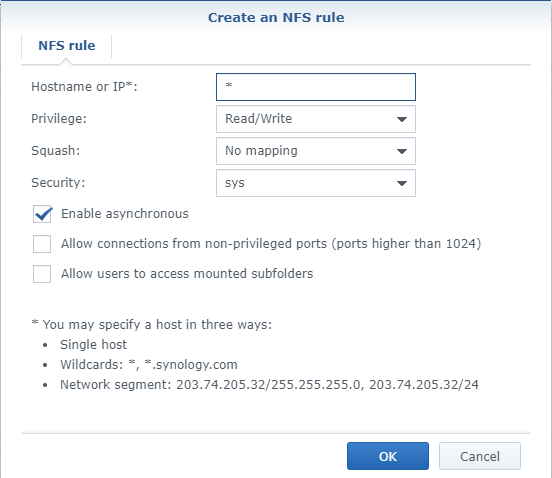
Figure 14 Note: Save the Mount path information shown in Figure 15. It would help if you had it when creating datastores on the ESXi host and setting up the vCenter Service Appliance (VCSA) backup. If you need the Mount path information later, click the Edit tab displayed in Figure 15, and go to the NFS Permissions tab as shown previously in Figure 13.
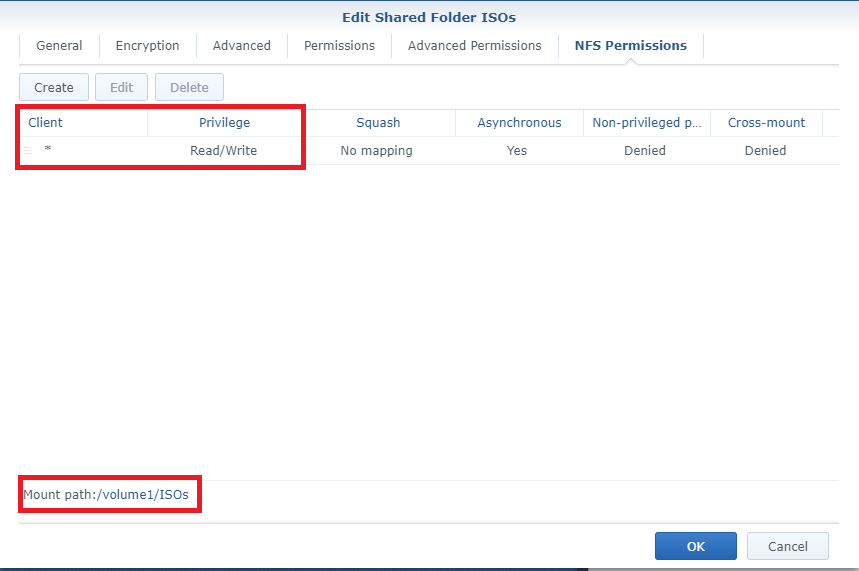
Figure 15 Repeats the steps for Figures 7 through 15 for additional NFS Shared Folders needed, as shown in Figure 16.
For example, for Webster’s Lab, I created NFS Shared folders for ISOs and VMware VMs, XenServer VMs, and the VCSA backup, as you can see in Figure 16. Each NFS share has a unique mount path. I have four NFS shares, so I have four NFS mount paths.
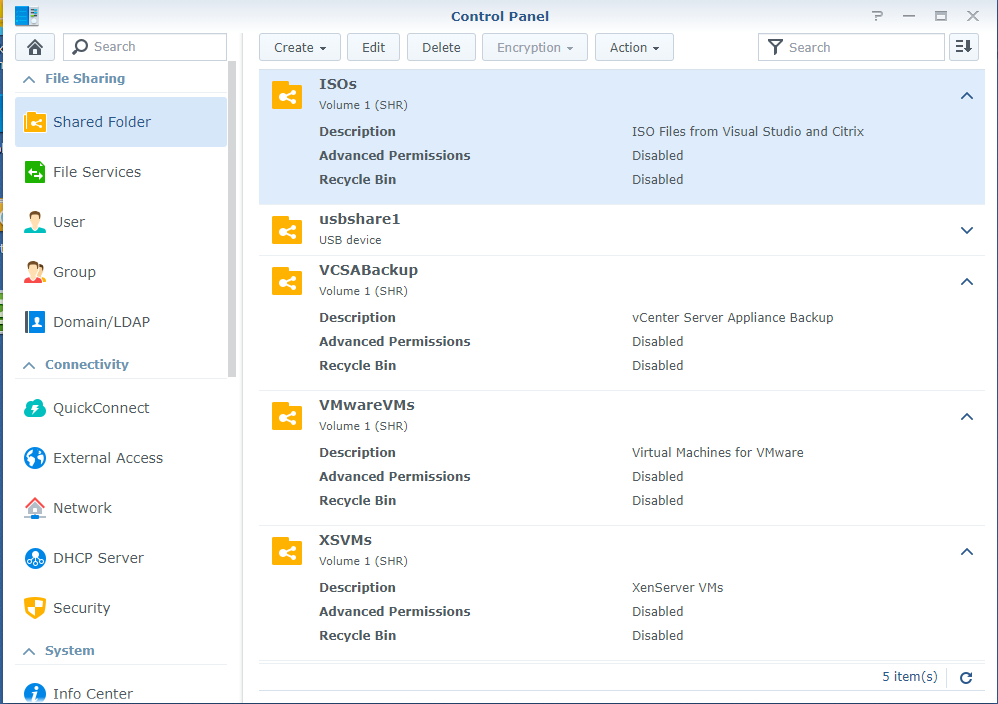
Figure 16 Now, you need to install the VAAI Plug-in for NFS. Go to https://global.download.synology.com/download/Tools/NFSVAAIPlugin/1.2-1008/VMware_ESXi/synology-nfs-vaai-plugin-1.2-1008.vib and download the VIB NFS Plug-in for VMware VAAI for your Synology NAS model.
Note: If the download link has changed, go to https://www.synology.com and search for “nfs vaai plugin”. A user account on synology.com is not required to download the VIB file.
Note: VIB stands for vSphere Installation Bundle. At a conceptual level, a VIB is somewhat similar to a ZIP archive in that it is a collection of files packaged into a single archive to facilitate distribution.
Using your favorite secure upload utility, I used WinSCP, upload the VAAI plug-in to the /tmp directory on the ESXi host.
First, connect to the ESXi host, as shown in Figure 17.
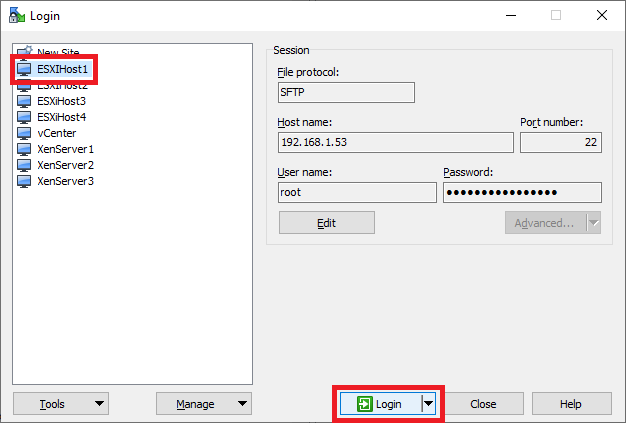
Figure 17 If this is the first time connecting to the host, a key exchange is required. If you want to add the server’s host key to the secure upload utility’s cache, click Yes, as shown in Figure 15.
You can connect without added the server’s host key to the secure upload utility’s cache. Click No if you do not wish to save the server’s host key in the cache.
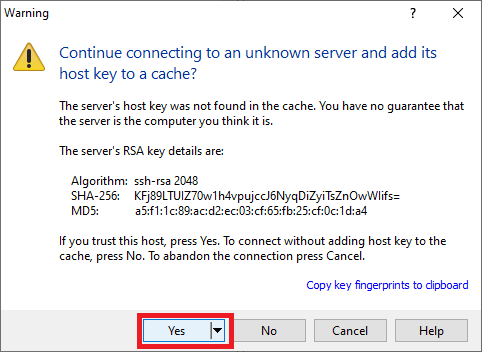
Figure 18 In WinSCP, there are three ways to upload the VIB file to the ESXi host.
- Drag and Drop the VIB file from the left pane to the right pane, as shown in Figure 18.
- Select the VIB file in the left pane, press F5, and click OK, as shown in Figure 16.
- Select the VIB file in the left pane, right-click, select Upload, as shown in Figure 17, and click OK, as shown in Figure 16.
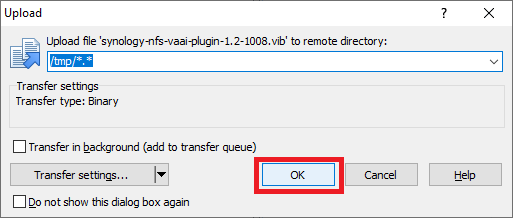
Figure 19 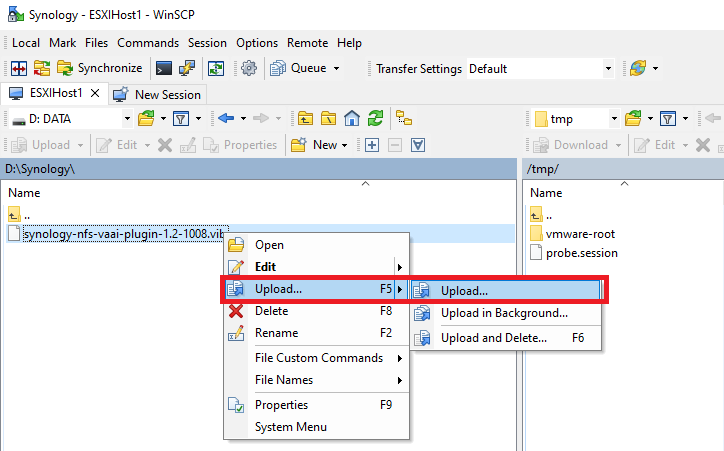
Figure 20 Using your preferred upload method, copy the VIB file to the /tmp directory on the ESXi host, as shown in Figure 21.

Figure 21 Exit your favorite secure upload utility.
Note: The following two steps (the final two steps) are part of the ESXi host configuration. I just wanted to sneak them in here to get all the Synology NFS information in one article.
Using your favorite SSH client, I used PuTTY, connect to the ESXi host, as shown in Figure 22.
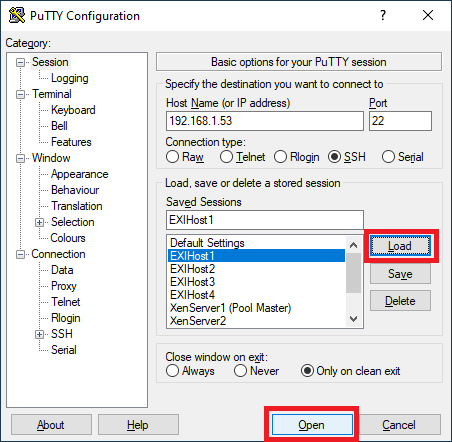
Figure 22 Note: I only tested PuTTY. I did not try using the SSH client from Windows 10.
If this is the first time connecting to the host, a key exchange is required. If you want to add the host’s key to the SSH client’s cache, click Yes, as shown in Figure 23.
You can connect without adding the host’s key to the SSH client’s cache. Click No if you do not wish to save the host’s key in the cache.
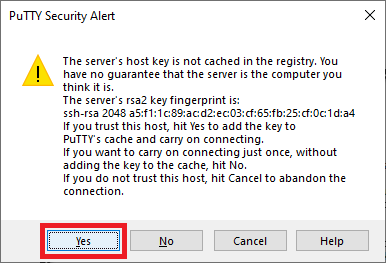
Figure 23 Log in to the host using your configured credentials. If you just installed ESXi, log in as root and the password used during the ESXi install, as shown in Figure 24.
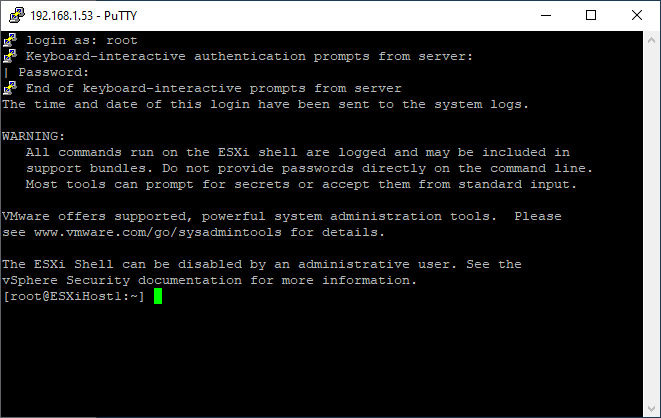
Figure 24 Run the following command, as shown in Figure 25.
esxcli software vib install -v /tmp/synology-nfs-vaai-plugin-1.2-1008.vib –no-sig-check
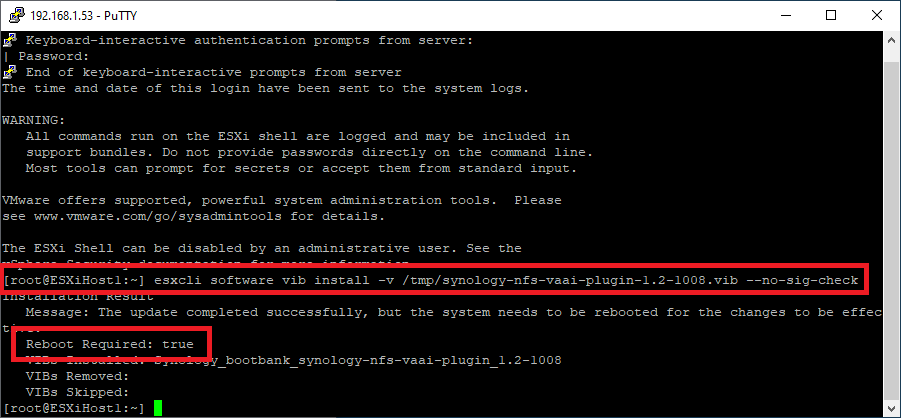
Figure 25 Reboot the ESXi host by typing reboot and pressing Enter, as shown in Figure 26.

Figure 26 Once the host is up, use your SSH client to verify the VAAI plug-in installation. Run the following command, as shown in Figure 27.
esxcli software vib list | grep nfs
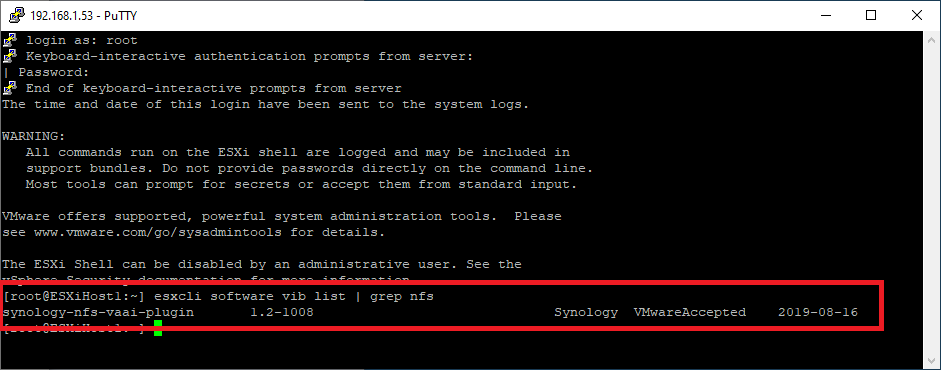
Figure 27 Up next, Install VMware ESXi 7.0.
3 Responses to “02 Building Webster’s Lab V2 – Configuring a Synology 1817+ NAS for NFS, ESXi 7.0, and XenServer 8.2”


September 2, 2021 at 10:05 am
Hi team,
I have DSM 7 and have NFS 4.1 enabled.
September 1, 2021 at 6:42 pm
FYI DSM 7 disables NFS 4.1. 🙁 I am running a 1817+
September 2, 2021 at 7:01 am
Disables it permanently or disables it during the installation and you can enable it after the install?
Thanks
Webster